Common Errors and FAQs
General Sync Behavior
What is the recommended first step before syncing any record type (vendors, customers, projects, cost codes)?
Always click Fetch latest data to pull the most recent Sage 300 CRE records into the sync UI before linking or pushing.
How does auto-linking work between Sage 300 CRE and Autodesk Build (ACC)?
Auto-linking compares Sage records to Autodesk Build using fields like ERP ID, name, code, address, and other matching-rule fields you configure. Uncheck any fields you do not want considered when matching.
When should we manually link records instead of relying on auto-link?
Manual linking should be a last resort, used only when auto-link cannot find a match you know exists or when there are multiple possible matches and you have confirmed the exact Autodesk Build record that should be linked.
When is it safe to turn on auto-sync (create/update/link) for a module?
Turn on auto-sync only after you have synced a representative sample, reviewed how the records land in Autodesk Build (naming, fields, types), and cleaned up duplicates or obvious data issues in Sage and Autodesk Build. After that, auto-sync can run with fewer surprises.
Can we flip a sync direction later (e.g., from Sage → Autodesk Build to Autodesk Build → Sage)?
Direction flips are possible but not turnkey; they usually require extra configuration, regression checks, and often a professional services fee. Sage is treated as the system of record by default, so only request a flip if there is a strong process reason.
Can we sync Purchase Orders and Subcontracts from Sage 300 CRE to Autodesk Build, while syncing Subcontract Change Orders and Subcontractor Payment Applications from Autodesk Build to Sage 300 CRE?
Yes, this workflow is supported. You can configure the sync to push Purchase Orders and Subcontracts from Sage 300 CRE to Autodesk Build (ACC), while simultaneously syncing Subcontract Change Orders (SCOs) and Subcontractor Payment Applications from Autodesk Build back to Sage 300 CRE. Each record type can have its own sync direction.
Vendors and Customers
How does Autodesk Build treat vendors and customers from Sage 300 CRE?
Autodesk Build stores both in the same Companies module. To distinguish them, the sync writes (vendor) or (customer) in the ERP Partner Company ID so the type stays visible even though the list is combined.
Can a single Autodesk Build company be both a vendor and a customer linked to separate Sage records?
No. The sync expects a 1:1 relationship between a Sage record and an Autodesk Build company. If the same real-world company exists as both a Sage vendor and customer, add a tag or naming cue in Sage (e.g., “Vendor – XYZ”, “Customer – XYZ”) so the names remain unique when pushed.
What happens if Sage has two vendors with the same name but different IDs?
Autodesk Build requires unique company names. The second record will fail with an error like “company name has already been taken.” Update the name in Sage (or carefully use a value map) so each company name is distinct, then push again.
Can we sync vendor or customer contacts/members between Sage and Autodesk Build?
Not today. Contacts and members do not sync; manage them separately in each system.
How do we exclude certain vendors from being synced to Autodesk Build (e.g., employees, one-off vendors)?
Use filters on vendor attributes (such as default ledger account or last invoice date) to scope which vendors are in view, or select specific vendors and choose Ignore so they stay out of sync until you explicitly unignore them.
What if we accidentally ignore a vendor or customer?
Filter by Is ignored = true, select the record, and choose Unignore to return it to the active sync list.
What are common errors when syncing vendors/customers and how do we fix them?
- Duplicate matches in Autodesk Build: Clean up duplicates in Autodesk Build or Sage so only one clear record exists, then re-run auto-link.
- Company name already taken: Adjust the name in Sage to make it unique, then push again.
- Invalid state/country codes: Normalize addresses in Sage to valid state and country values.
- Character limits: Extremely long fields (for example, names over 256 characters) may be truncated or error; shorten in Sage and re-sync.
Can we delete vendors or customers via the sync tool?
No. In Autodesk Build you typically deactivate rather than delete. Deactivate directly in Autodesk Build; the sync UI does not delete vendor/customer records.
How can we do a one-time cleanup of very old or inactive vendors before syncing?
Filter on Last invoice date or Last updated date to exclude older or inactive vendors. Sync only the filtered list, or mark the rest as ignored.
Projects
Which direction do projects sync by default?
Projects sync from Sage 300 CRE to Autodesk Build by default.
Do we need an Autodesk Build project template set up before syncing projects?
Strongly recommended. Templates standardize budget code segments, preconfigure permissions and approvals, and keep setup consistent across projects. Work with your Autodesk Build implementation manager to finalize templates early.
Can we support multiple different Autodesk Build project templates?
Yes. Multiple templates are supported, and selection/filtering is controlled via configuration. Your implementation team can wire which templates apply to which projects.
How long does it take for a newly synced project to be usable in Autodesk Build cost management?
After pushing a project from Sage, the Project Cost module can take a few minutes to finish initializing. During that time, pushing cost codes or cost types may return “project not set up yet” errors. Wait a few minutes and retry.
What project filters do you recommend when syncing from Sage?
Use Active projects only to avoid syncing archived or closed jobs and to keep Autodesk Build clean.
What happens if we try to sync archived or test projects?
They will attempt to sync, but you will create noise in Autodesk Build and the error log. Prefer filtering to active production projects and Ignore obvious test or training jobs.
Can we delete or deactivate projects through sync?
You can delete certain synced project records from Autodesk Build using controls in the sync UI, but this is one-directional. Archiving/deactivation ultimately follows Autodesk Build and Sage native behavior.
Can we map Sage project type to Autodesk project type? What about long type values?
Yes. Sage project type can be mapped into Autodesk Build, but both systems enforce character limits. Use shorter or abbreviated types (for example, “Residential” → “Res”) if you hit limits.
What does “automatic sync eligible” mean on the projects screen?
It lists projects already linked between Sage 300 CRE and Autodesk Build that can participate in automatic syncing. Turning on auto-sync for those records keeps them updated, while other projects can remain manual.
Error: Project Already Exists
If you encounter the error [Autodesk Build Error] [Project Name] already exists, you will need to either:
- Link the Record: link the Project to the existing Project in Autodesk Build, or
- Check for Duplicates: if you cannot link the Project, it means there is already a Project in your accounting system that links to the Autodesk Project. In this case, you can:
- Delete or consolidate the duplicate Project in your accounting system,
- Ignore the duplicate record, or
- Update the name of the Project name to make it unique.
Error: Invalid State Code for Country
When syncing Projects, Vendors, or Customers in Autodesk Build, only valid state or province names and ISO 3166-1 alpha-2 country codes are supported. Additionally, the specified state or province must correspond to a valid location within the project's country.
United States
Below is a list of valid state codes for use in Autodesk Build:
- AL: Alabama
- AK: Alaska
- AZ: Arizona
- AR: Arkansas
- CA: California
- CO: Colorado
- CT: Connecticut
- DE: Delaware
- FL: Florida
- GA: Georgia
- HI: Hawaii
- ID: Idaho
- IL: Illinois
- IN: Indiana
- IA: Iowa
- KS: Kansas
- KY: Kentucky
- LA: Louisiana
- ME: Maine
- MD: Maryland
- MA: Massachusetts
- MI: Michigan
- MN: Minnesota
- MS: Mississippi
- MO: Missouri
- MT: Montana
- NE: Nebraska
- NV: Nevada
- NH: New Hampshire
- NJ: New Jersey
- NM: New Mexico
- NY: New York
- NC: North Carolina
- ND: North Dakota
- OH: Ohio
- OK: Oklahoma
- OR: Oregon
- PA: Pennsylvania
- RI: Rhode Island
- SC: South Carolina
- SD: South Dakota
- TN: Tennessee
- TX: Texas
- UT: Utah
- VT: Vermont
- VA: Virginia
- WA: Washington
- WV: West Virginia
- WI: Wisconsin
- WY: Wyoming
Canada
Below is a list of valid province codes for use in Autodesk Build:
- AB: Alberta
- BC: British Columbia
- MB: Manitoba
- NB: New Brunswick
- NL: Newfoundland and Labrador
- NS: Nova Scotia
- ON: Ontario
- PE: Prince Edward Island
- QC: Quebec
- SK: Saskatchewan
- NT: Northwest Territories
- NU: Nunavut
- YT: Yukon
Error: NotAllowedException: Not Authorized. Current project is not active.
This errors is from the Project no longer being marked as Active in Autodesk.
To resolve this error, you can either:
-
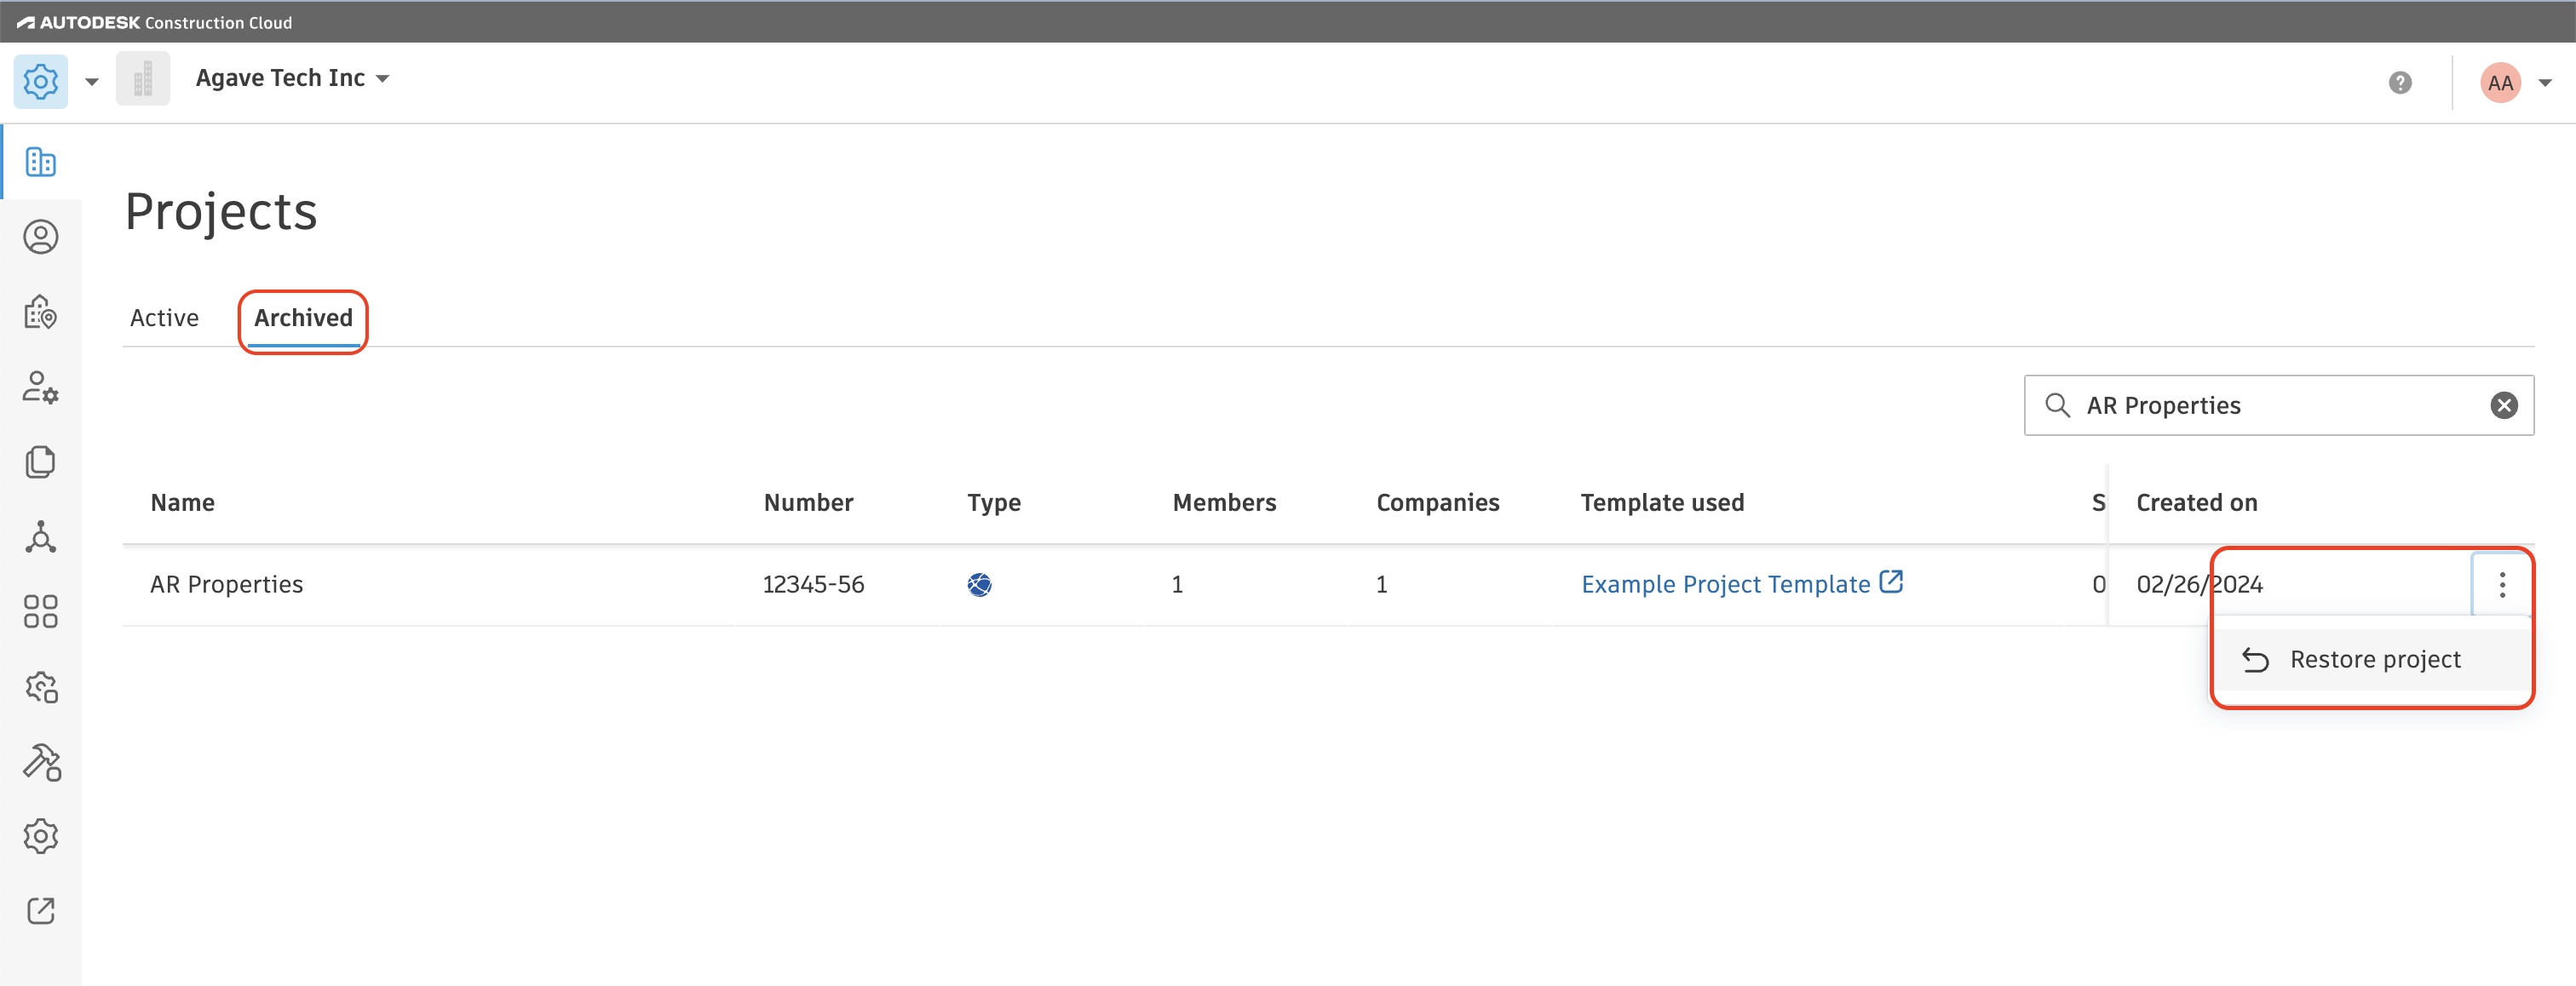
Mark the Project as Active in Autodesk. You can do this by going to Account Admin-->Projects, and selecting the Archived tab. From there, you can select to Restore Projects:
-
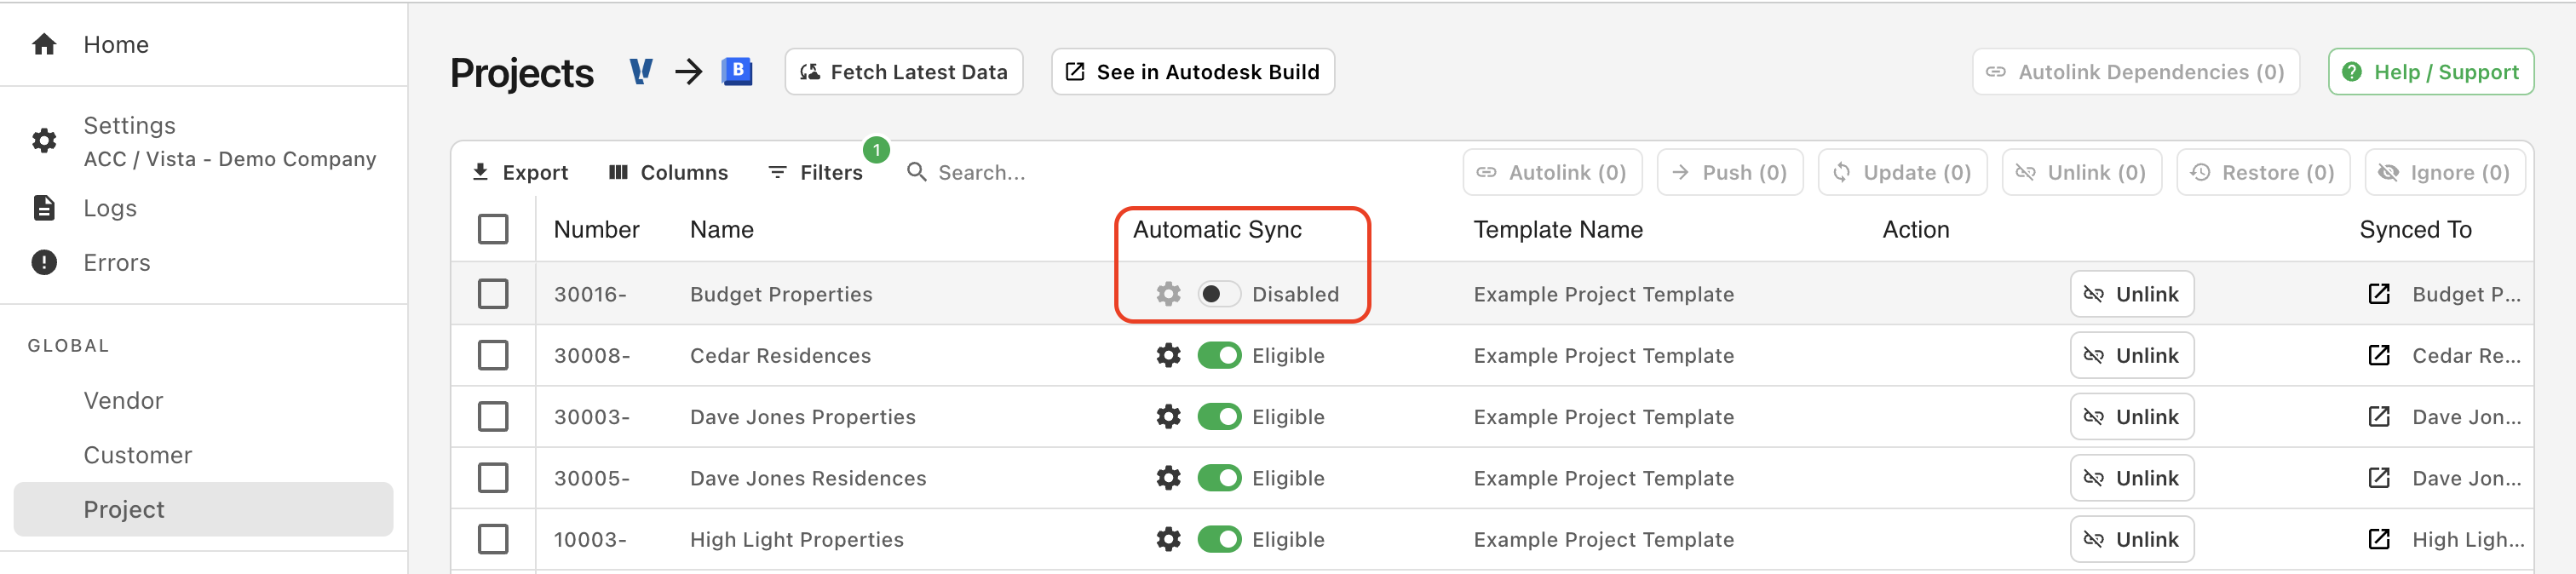
Disable Auto-syncs for the Project in Agave. You can do this by going to the Projects tab in the Agave Sync website, and toggling off Automatic Sync for the Project:
If you want to apply Project Templates in Autodesk Build as a default, see our guide on setting up Project Templates.
Configuring Autodesk Budget Codes to Match your Accounting System
You will want to make sure your Autodesk Build Budget Codes is set up to match the structure of your Sub Jobs, Cost Codes, and Cost Types in your Accounting System. We recommend properly configuring this in your Project Template(s) to ensure all Autodesk Projects use the same Budget Code structure.
The following includes a video walk through and guide to properly configure your Project Template's Budget Code.
To ensure they match:
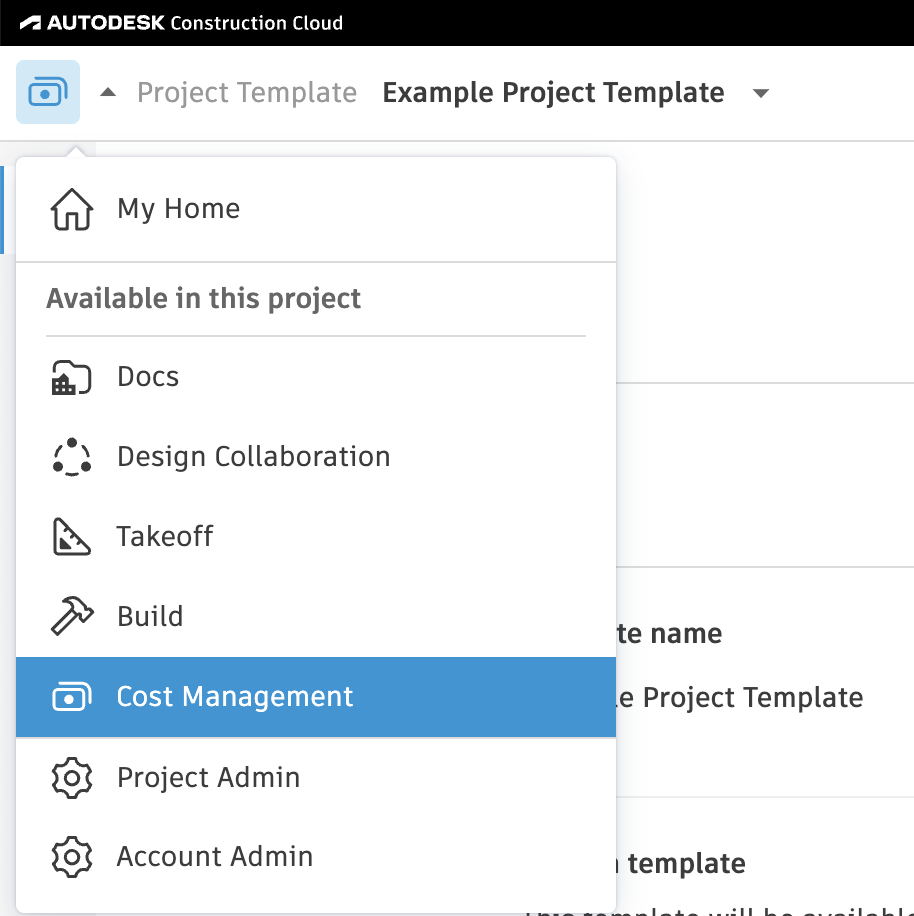
- In your Project Template, go to the Cost Management module.
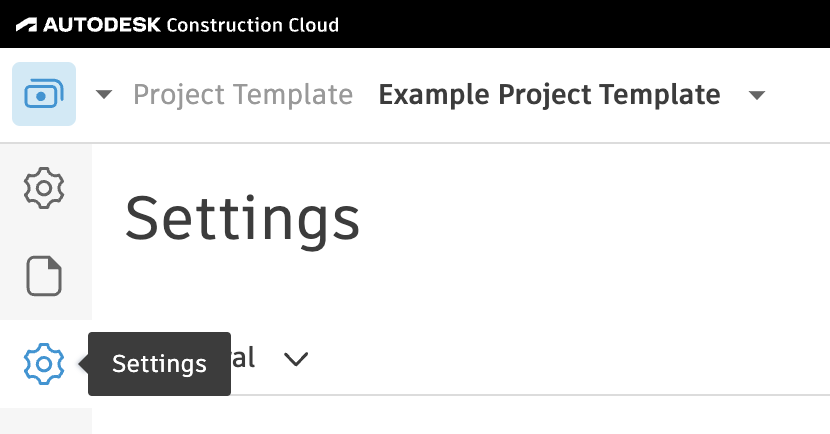
- Select the gear icon or Settings on the left navigation.
- Select the Budget tab, select Add New.

Configuring Sub Jobs
If you plan to use Sub Jobs, complete the following steps. If you do not, feel free to skip this step.
Note, the following Accounting Systems have the concept of Sub Jobs:
- Acumatica ("Tasks")
- CMiC
- Deltek ComputerEase ("Phases")
- Foundation ("Phases")
- Sage 100 Contractor ("Phases")
- Sage 300 CRE ("Extras")
- Sage Intacct
- Vista
To configure your Sub Job setup:
- Press the pencil icon next to Segment 1, and type in Sub Job.

- Below Sub Job:
- For Where, select "Code"
- For Number of Characters, select "Flexible"
- For Delimiter, select "Hyphen"

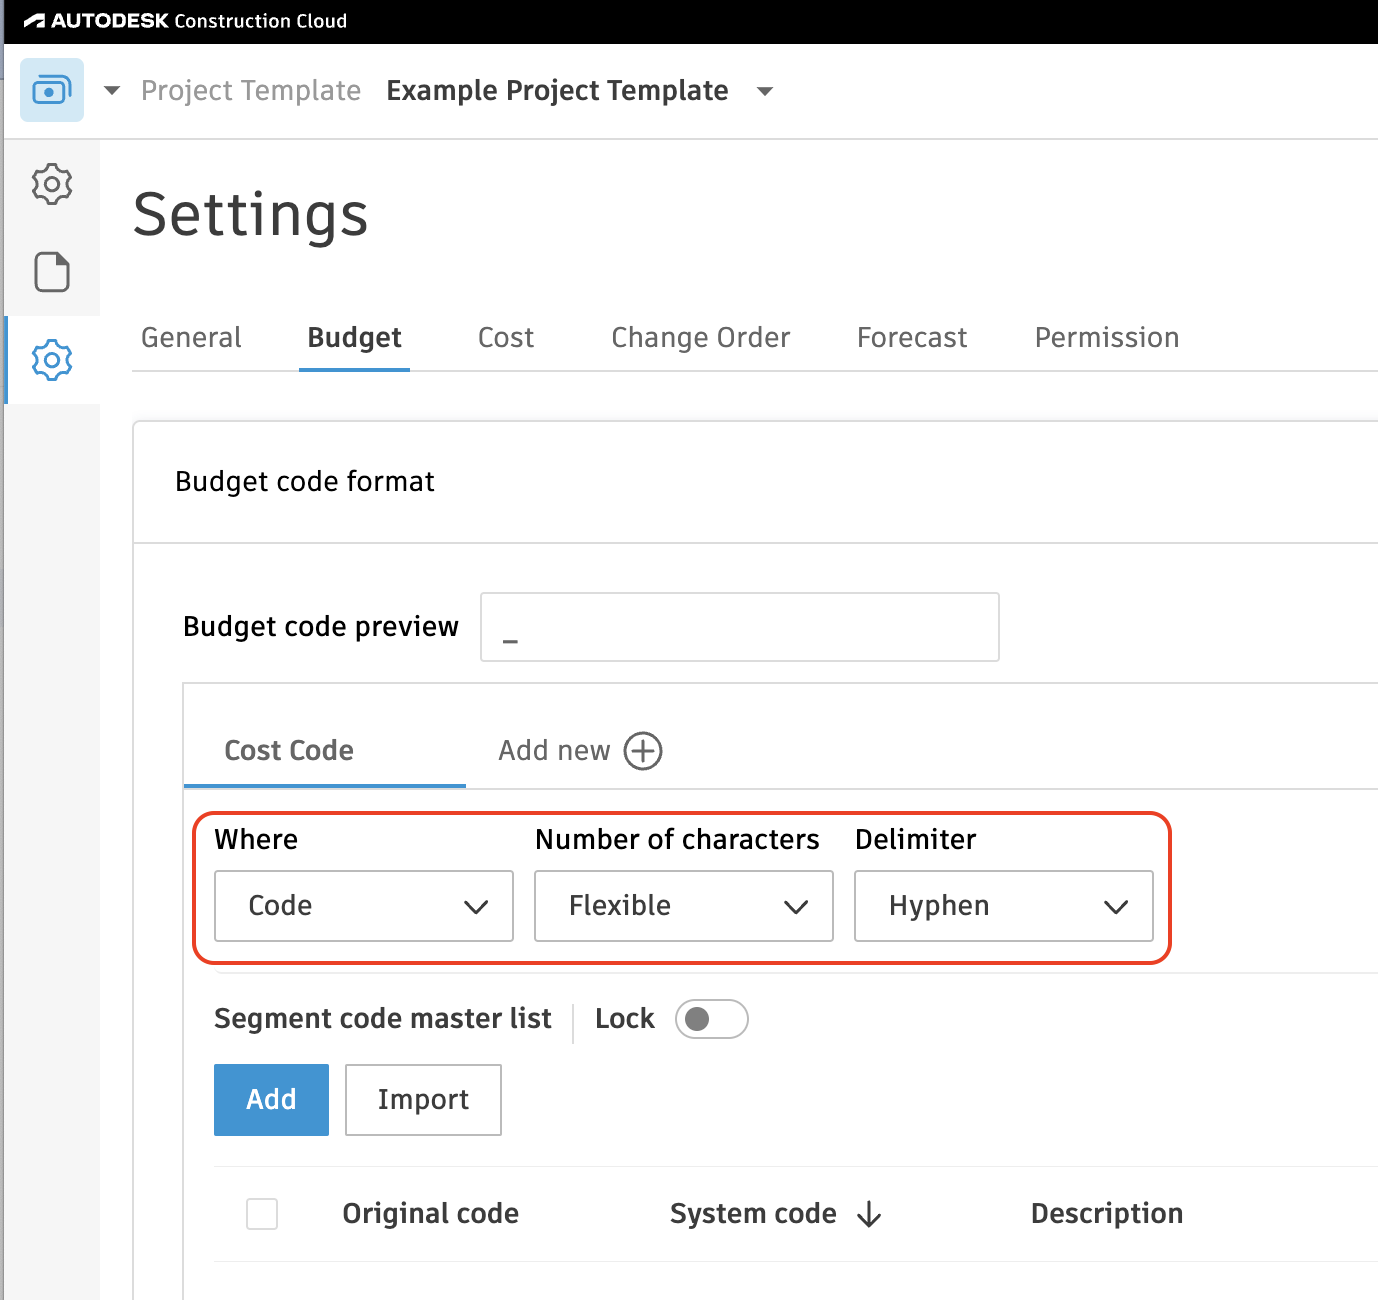
Configuring Cost Codes
To configure your Cost Code setup:
- Press the pencil icon next to Segment 1, and type in Cost Code.

- Below Cost Code:
- For Where, select "Code"
- For Number of Characters, select "Flexible"
- For Delimiter, select "Hyphen"
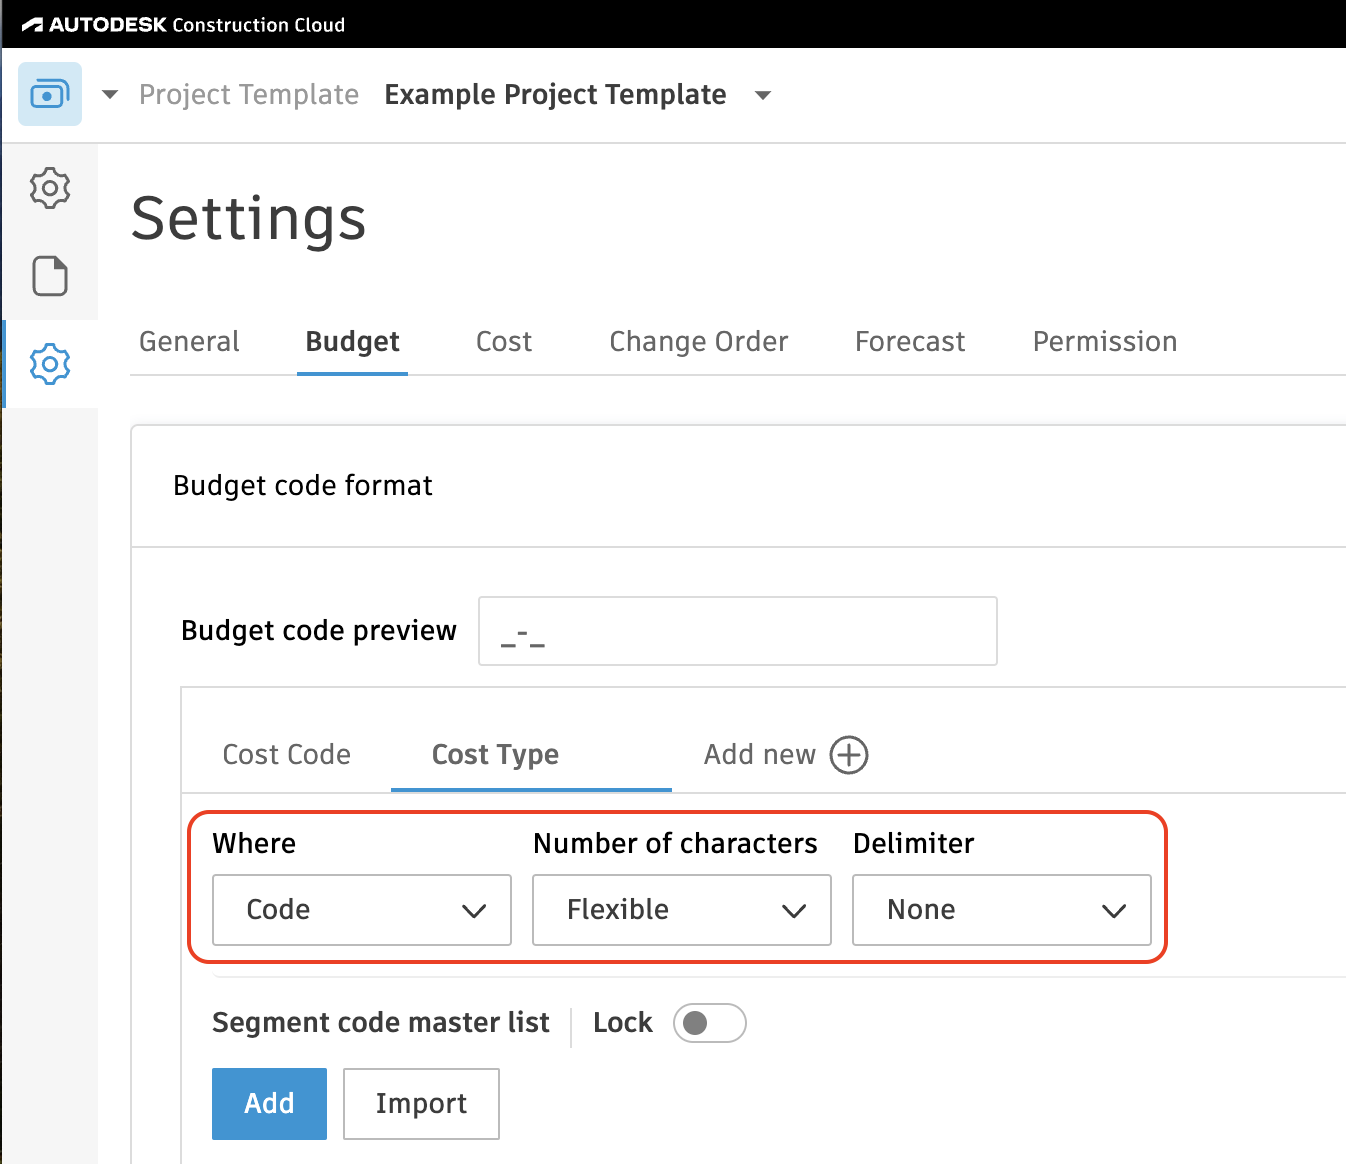
Configuring Cost Types
To configure your Cost Type setup:
-
Press the pencil icon next to Segment 2, and type in Cost Type.
-
Below Cost Type:
- For Where, select "Code"
- For Number of Characters, select "Flexible"
- For Delimiter, select "None"
Can we change the naming convention of these segments?
Yes, you can change the naming convention based on your team's preference. However, this should be consistent across every other Project Template created.
Can we have more than three budget segments?
No, Agave only supports syncing up to three budget segments.
Can we modify each segment detail?
If you want the segment to appear as part of your Budget Code, then "Where" should always be set to "Code".
"Number of characters" can be changed to match your accounting system. For example, if your Cost Type is always set to 3 characters like "LAB" or "MAT", then this can be set to "3" instead of "Flexible".
"Delimiter" can be set to any option on the drop down list based on preference.
Should we add budget codes to the Project Template?
We recomemnd leaving these segments empty in the Project Template. The goal is for the accounting system to be the single source of truth so that only one set of budget codes need to be maintained, and Agave can sync them directly from your accounting system to each Autodesk project as needed.
If you must have budget codes in the Project Template, ensure they are an exact match with what is in your accounting system to prevent sync errors due to discrepancy.
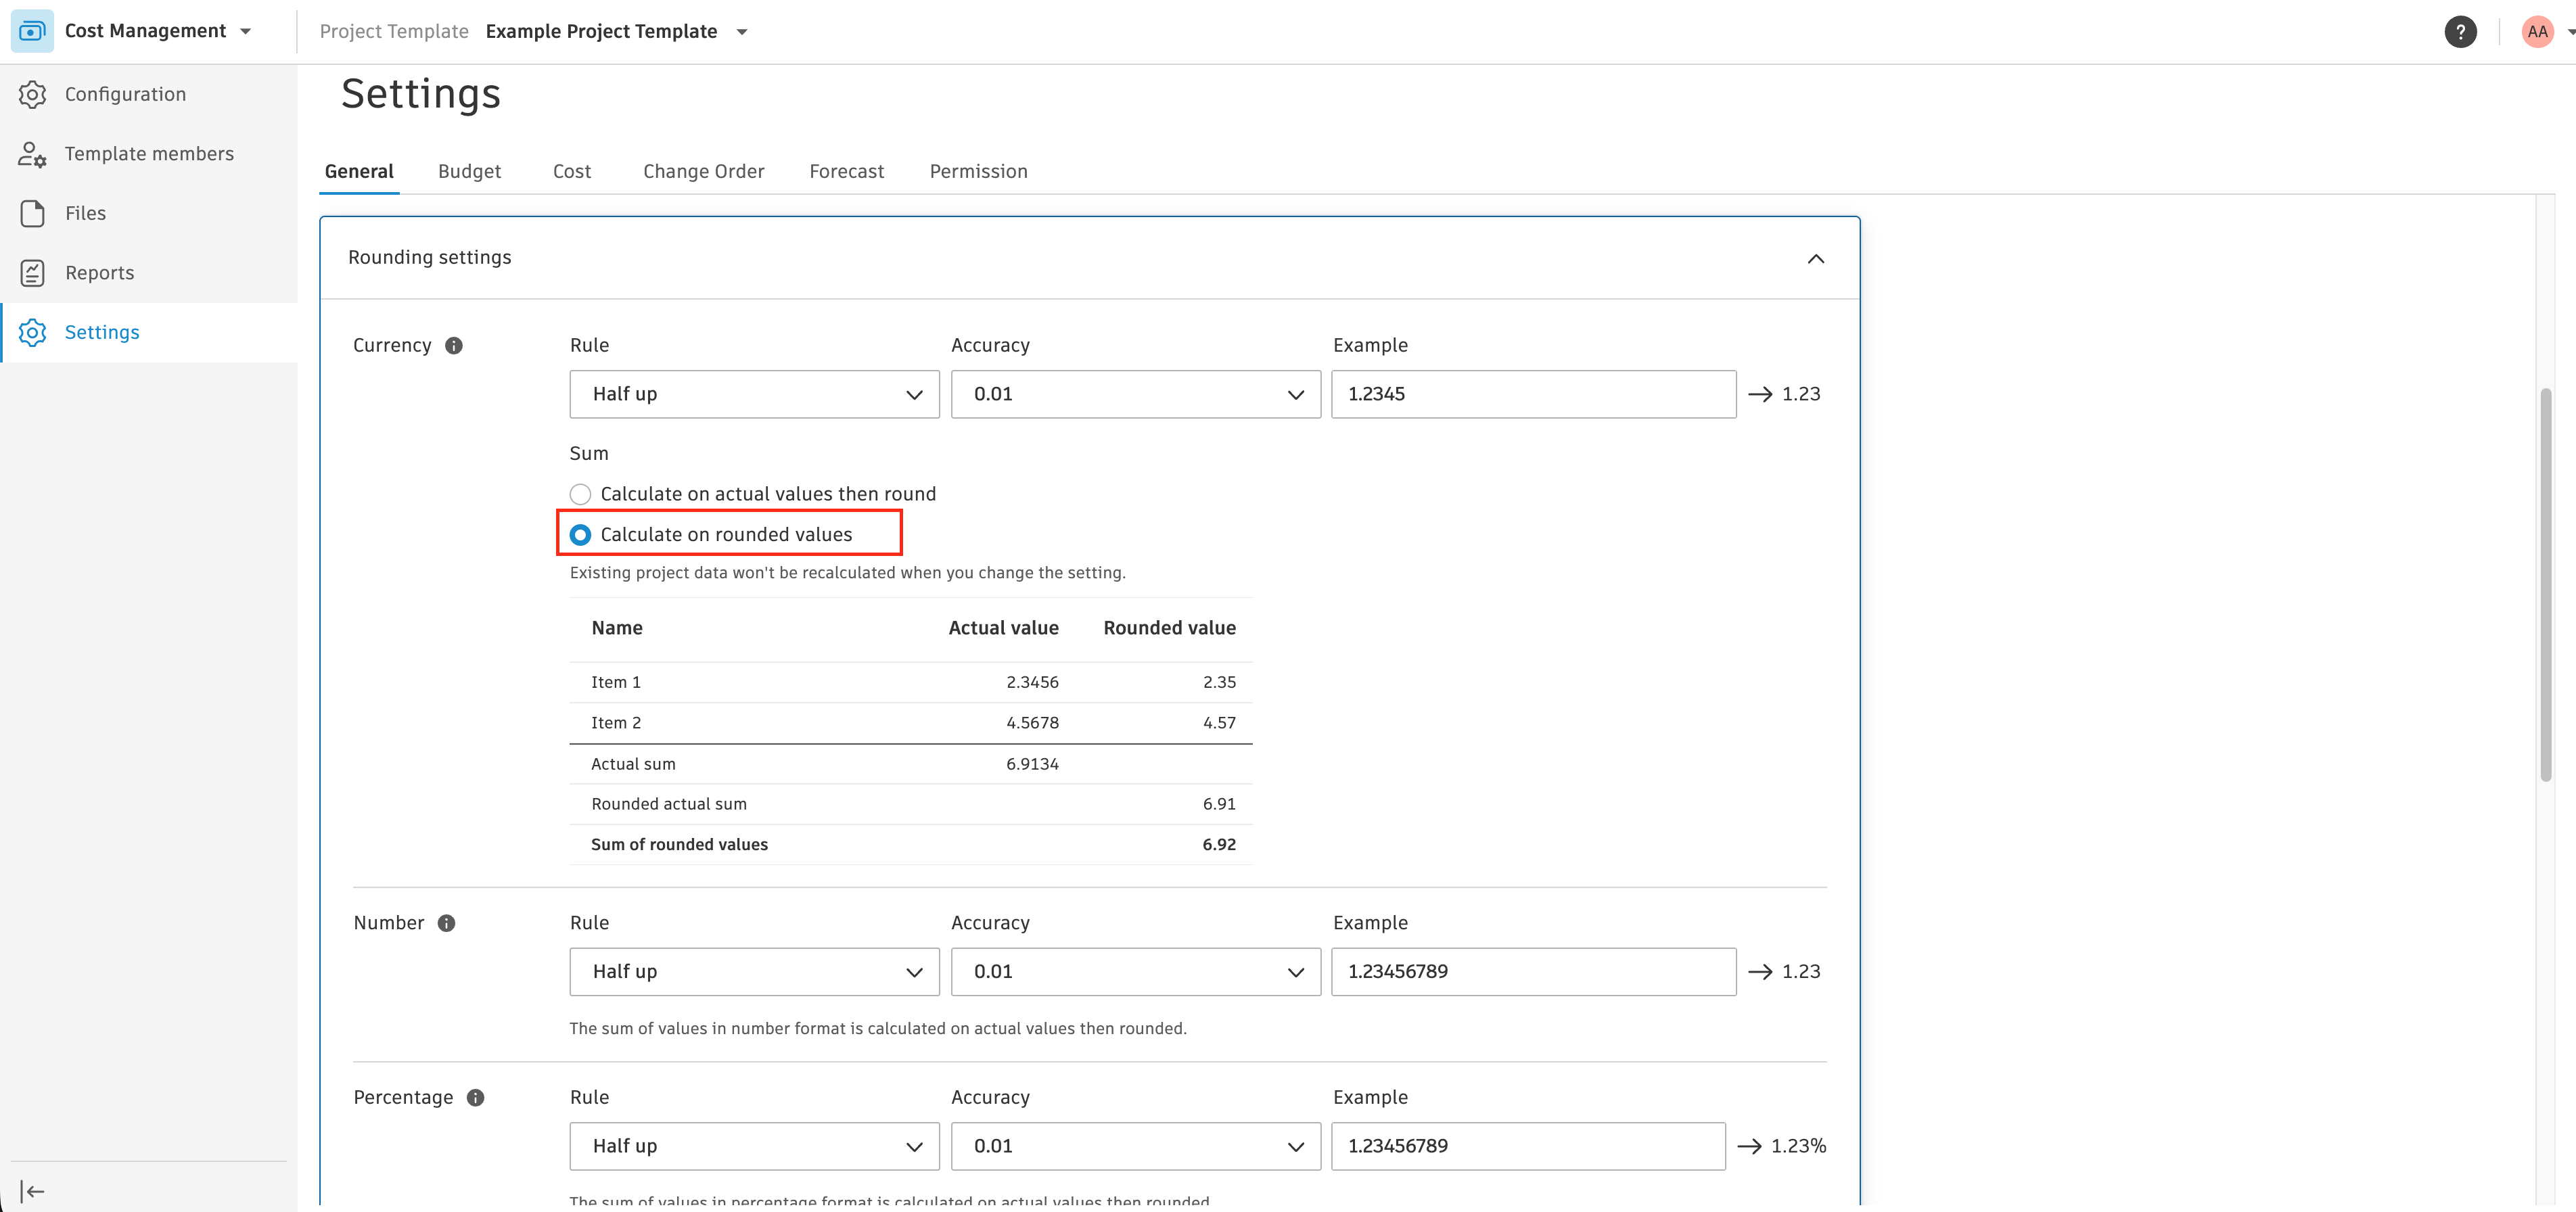
Configure Rounding Settings
Autodesk defaults to accumulating values at 4-decimal precision before rounding the total. Most accounting systems (e.g. Vista) round each line item first, then sum. This mismatch produces small discrepancies that cause reconciliation failures on audited jobs. Ensure that the Currency is set to “Calculate on rounded values”.
The type field is required.
When syncing Projects form Sage 300CRE to Autodesk, we require a project type.
To resolve this error, you can go into the Job Setup > General in Job Cost module in Sage 300CRE, and add a Type there. The type here should be any free form text.
Which direction do projects sync by default?
Projects sync from Sage 300 CRE to Autodesk Build by default.
Do we need an Autodesk Build project template set up before syncing projects?
Strongly recommended. Templates standardize budget code segments, preconfigure permissions and approvals, and keep setup consistent across projects. Work with your Autodesk Build implementation manager to finalize templates early.
Can we support multiple different Autodesk Build project templates?
Yes. Multiple templates are supported, and selection/filtering is controlled via configuration. Your implementation team can wire which templates apply to which projects.
How long does it take for a newly synced project to be usable in Autodesk Build cost management?
After pushing a project from Sage, the Project Cost module can take a few minutes to finish initializing. During that time, pushing cost codes or cost types may return "project not set up yet" errors. Wait a few minutes and retry.
What project filters do you recommend when syncing from Sage?
Use Active projects only to avoid syncing archived or closed jobs and to keep Autodesk Build clean.
What happens if we try to sync archived or test projects?
They will attempt to sync, but you will create noise in Autodesk Build and the error log. Prefer filtering to active production projects and Ignore obvious test or training jobs.
Can we delete or deactivate projects through sync?
You can delete certain synced project records from Autodesk Build using controls in the sync UI, but this is one-directional. Archiving/deactivation ultimately follows Autodesk Build and Sage native behavior.
Can we map Sage project type to Autodesk project type? What about long type values?
Yes. Sage project type can be mapped into Autodesk Build, but both systems enforce character limits. Use shorter or abbreviated types (for example, "Residential" → "Res") if you hit limits.
What does "automatic sync eligible" mean on the projects screen?
It lists projects already linked between Sage 300 CRE and Autodesk Build that can participate in automatic syncing. Turning on auto-sync for those records keeps them updated, while other projects can remain manual.
Error: Update failed for table JOB
When syncing from Autodesk Build to Sage 300C CRE, make sure all codes and numbers are formatted as your Sage company file expects them (e.g. Project number as xx-xxxx)
Cost Codes and Budget Codes
How does the integration handle Sage’s parent cost codes vs. full cost codes?
Sage may use a parent cost code (for example, 1010) with child/full cost codes beneath it (for example, 1010.001, 1010.002). In Autodesk Build, the parent becomes the top level in the cost code tree, and the full cost codes become leaf-level codes tied to budget lines.
Should we sync global (company-level) cost codes or project-level cost codes from Sage?
Use project-level cost codes if you need project-specific codes or maximum flexibility. Use global/company cost codes only if your structure is very standardized and never varies by project.
How does Autodesk Build order cost codes, and why do they sometimes look out of order?
Autodesk Build sorts cost codes alphanumerically using ASCII order. Without leading zeros you might see 1, 10, 11, 2, 20…. Add leading zeros in Sage (for example, 0010, 0020) so the order matches expectations.
Should we maintain cost codes in Autodesk Build templates or only in Sage?
Maintain the authoritative cost code list in Sage. Use Autodesk Build templates to define segment structure (such as cost code and cost type segments) rather than a second list of codes, then push codes from Sage into each project as needed.
Can we sync Sage project “extras” or sub-jobs into Autodesk Build?
Yes. Sage sub-jobs/extras can map to an additional cost code segment (often called “Extras”) in the Autodesk Build budget code structure. You may need separate project templates or configurations for projects that use extras.
Can we map Sage prime contract SOV line items to Autodesk Build budget codes automatically?
Not today. Sage prime contracts typically do not carry a full budget code per SOV line the way Autodesk Build expects. Sync the budget/cost codes first, then manually associate SOV line items with budget codes in Autodesk Build.
Purchase Order
How does the General Ledger info sync over?
For context, Autodesk does not have a General Ledger. All Customers appear to want the General Ledger Account to be specified at the line item-level in Sage 300 CRE for Purchase Orders. As a result, we will write the Purchase Order's General Ledger Account using the Line Item's Cost Type's Ledger Account.
How does retention % sync over from Autodesk Build to Sage 300 CRE?
We take the Retention % of Work Completed from Autodesk and sync them as Overall Retention on the Commitment in Sage 300 CRE.
Subcontract
Sage 300 CRE: Subcontract with source_id 'XXX' and id 'XXX' not found
You will need to enable the CN (Contracts) model in Sage 300 CRE.
How does the General Ledger info sync over?
For context, Autodesk does not have a General Ledger. All Customers appear to want the General Ledger Account to be specified at the line item-level in Sage 300CRE for Subcontracts. As a result, we will write the Subcontract's General Ledger Account using the Line Item's Cost Type's Ledger Account.
How does retention % sync over from Autodesk Build to Sage 300CRE?
We take the Retention % of Work Completed from Autodesk and sync them as Overall Retention on the Commitment in Sage 300CRE.
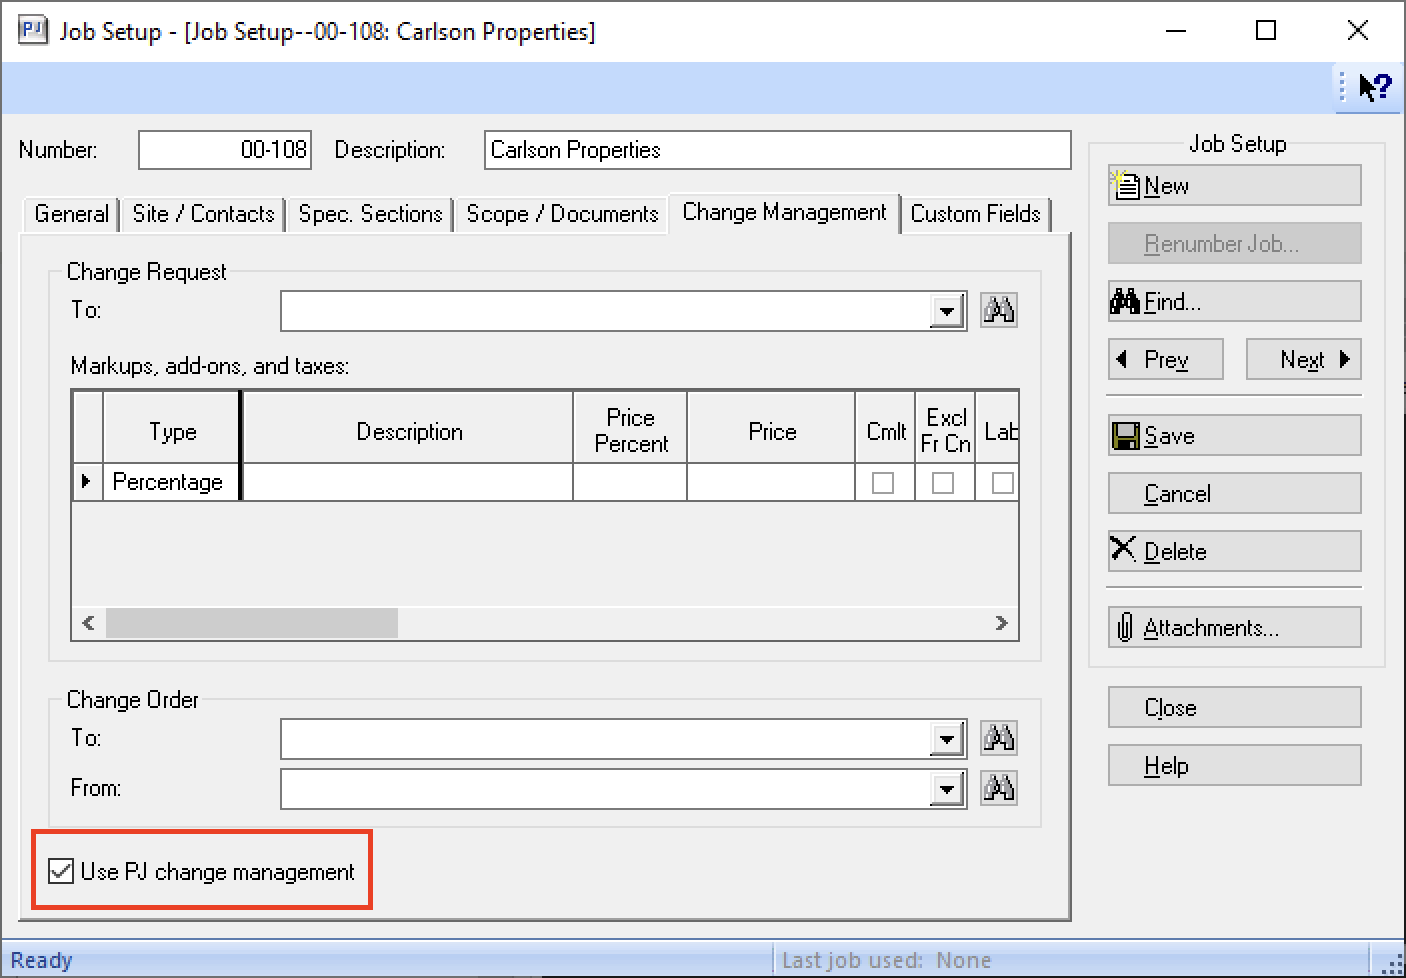
Change Order
Sage 300 CRE: Subcontract Change Order with source_id 'XXX' and id 'XXX' not found
Agave currently only supports PJ Change Orders. Check this setting in your project and retry.
Unit Cost Mismatch
You may encounter an error like "Unit cost mismatch between contract line item 139200 and change order line item -8000.0000" when attempting to sync a Subcontract Change Order to Sage 300 CRE.
For context, Sage 300 CRE has two types of Commitments (i.e. Subcontracts or Purchase Orders):
- Lump Sum:
- Only amount fields exist on the Line Item. In other words, "unit cost" and "quantity" are not set.
- Subcontracts are typically Lump Sum Commitments.
- Unit Price:
- The amount is determined based on the "unit cost" multiplied by "quantity".
- Purchase Orders are typically Unit Price Commitments.
For Unit Price Commitments, Sage 300 CRE prohibits modifying the unit cost of an existing Subcontractor Change Order line item. Therefore, Agave Sync returns the "unit cost mismatch" error when you attempt to modify the unit cost for a Unit Price Commitment.
To resolve this error, you will either need to:
- Keep the same unit cost as the original Subcontract or Purchase Order and modify the quantity to match the amount, or
- Change the Subcontract or Purchase Order to be of type "Lump Sum" (so you can just modify the amount)
Error Handling and Troubleshooting
How do we diagnose why a specific record failed to sync?
Use the error log / sync history to find the record, read the error message (for example, duplicate name, invalid address, missing required field), fix the data in Sage or Autodesk Build, and then re-attempt the sync.
What are typical vendor/customer or project sync issues during initial rollout?
Expect duplicate companies, inconsistent naming between Sage and Autodesk Build, old or inactive vendors/projects that you may not want in Autodesk Build, and address issues (like invalid state or country abbreviations). Use filters and the Ignore function to cut down noise while you clean up data.