FAQs
Inviting an Agave Admin to Your Acumatica Instance
This guide walks your Acumatica system administrator through creating a user account for an Agave Admin so they can access your Acumatica instance with full administrative privileges.
Prerequisites
Before you begin, confirm the following:
- You have system administrator access to the Acumatica instance.
- You know the Agave Admin's full name and email address.
- Your Acumatica license has an available user seat. You can verify this on the License Monitoring Console form.
Step 1: Create the User Account
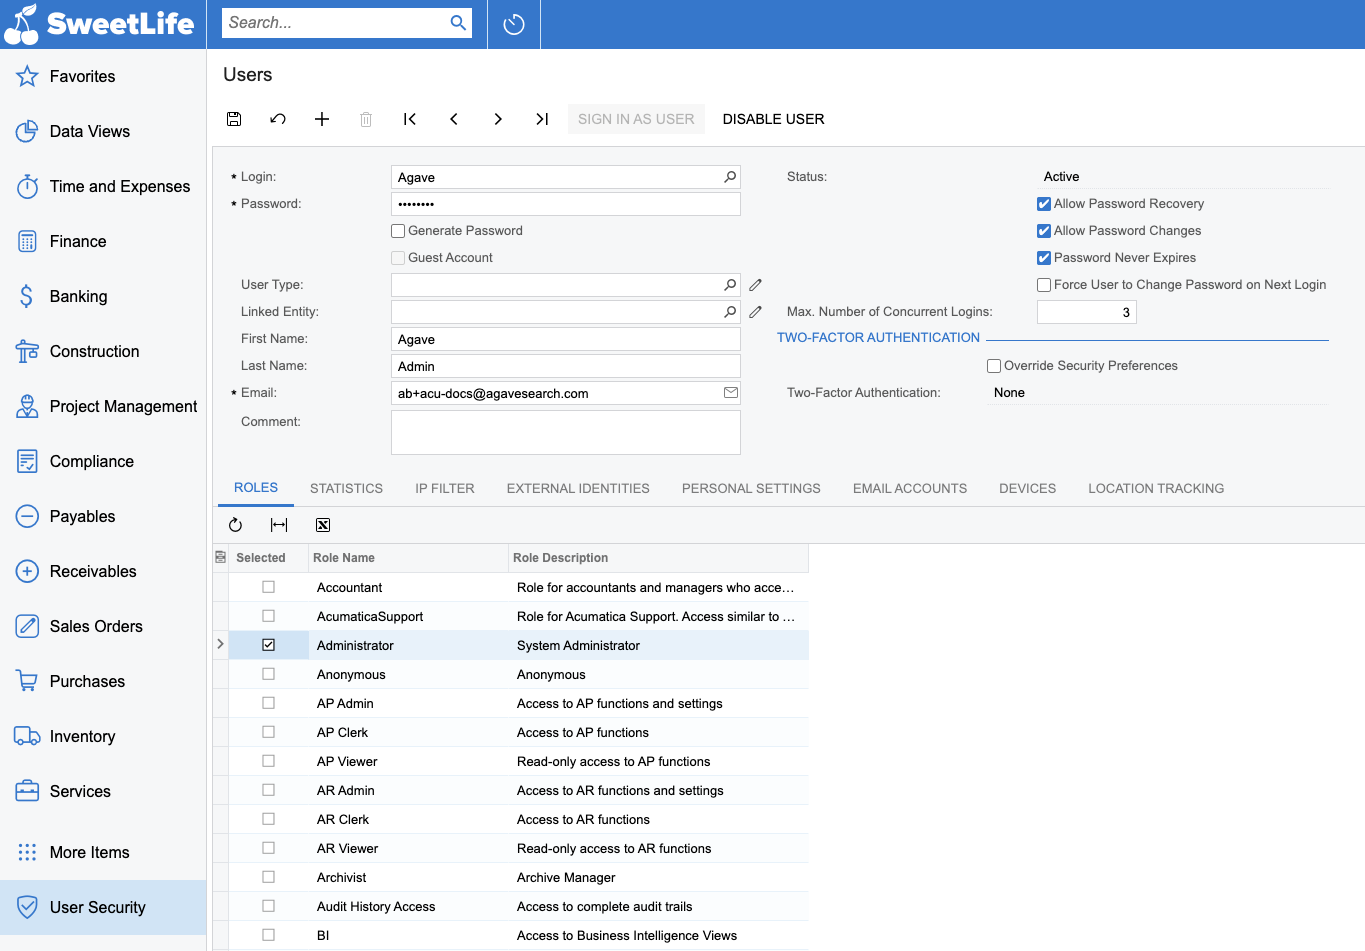
- Navigate to the Users form.
- Click the + (Add New Record) button on the form toolbar.
- Fill in the following fields:
- Login: Enter a username for the Agave Admin (e.g.,
Agave). - First Name: Enter
Agave. - Last Name: Enter
Admin. - Email: Your Agave contact will provide you with an email address. This will be used for password recovery.
- Password: Set a temporary password, and make sure you have noted it down. The Agave Admin will change this after their first sign-in.
- User Type: Leave as the default unless your organization uses custom user types.
- Status: Ensure this is set to Active.
- Login: Enter a username for the Agave Admin (e.g.,
Step 2: Assign the Administrator Role
For full admin access, the Agave Admin needs the Administrator role assigned to their account.
- On the Users form, with the new user record selected, navigate to the Roles tab.
- In the roles list, locate the Administrator role.
- Select the checkbox next to Administrator to grant full access.
- If your instance uses branch-level access controls, also assign the appropriate branch access roles so the Agave Admin can access all relevant branches. You can verify branch role assignments on the Branches form.
Note: The Administrator role grants unrestricted access to all forms, data, and configuration settings in Acumatica. Only assign this role to trusted Agave personnel who require it for integration setup and troubleshooting.
Step 3: Save and Verify
- Click Save on the form toolbar.
- Verify the account status shows Active.
- (Optional) Click Sign In from a separate browser or incognito window using the new credentials to confirm the account works.
Step 4: Share Credentials with the Agave Admin
Provide the Agave Admin with the following information:
- Instance URL: The URL of your Acumatica instance (e.g.,
https://yourcompany.acumatica.com). - Tenant: The tenant name, if your instance has multiple tenants.
- Username: The login you created in Step 1.
- Temporary Password: The password you set. The Agave Admin will change it on first sign-in.
Troubleshooting
| Issue | Possible Cause | Resolution |
|---|---|---|
| "User account is disabled" on sign-in | Account status is not Active | Open Users, locate the account, and set Status to Active |
| User cannot see certain forms or workspaces | Missing roles | Confirm the Administrator role is selected on the Roles tab |
| User cannot access a specific branch | Branch access role not assigned | Assign the branch's access role on the Roles tab of the Users form |
| "Maximum number of users exceeded" | License seat limit reached | Check available seats on the License Monitoring Console |
| Password expired immediately | Password policy enforces expiration | Adjust the expiration policy or reset the password on the Users form |
Acumatica Authentication
This guide applies to both cloud and on-prem instances. To deploy a developer sandbox locally, follow Acumatica's guide here.
Step 1: Create a Connected Application in Acumatica
Agave will inherit the permissions of the user that follows this process, so ensure they have enough access for your use case.
-
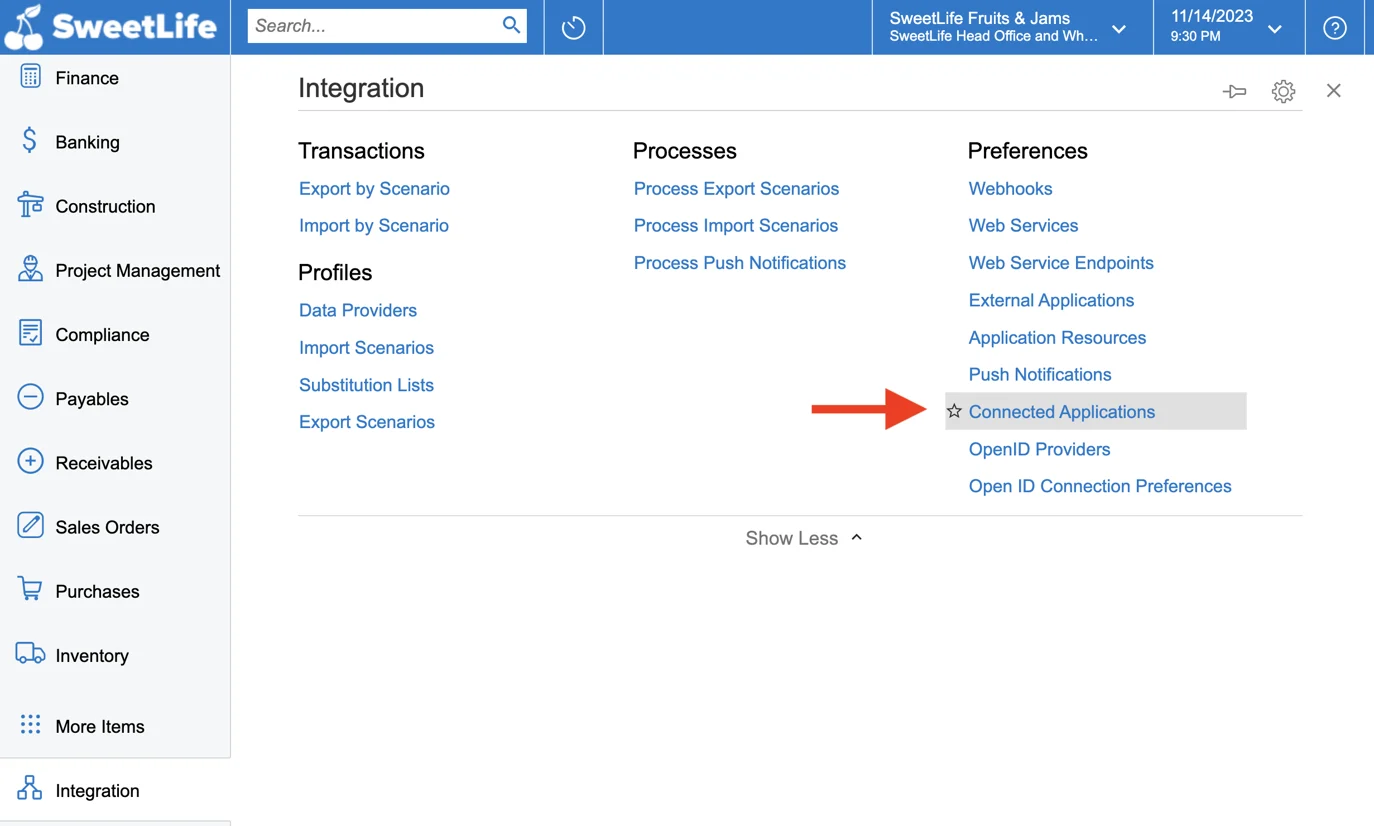
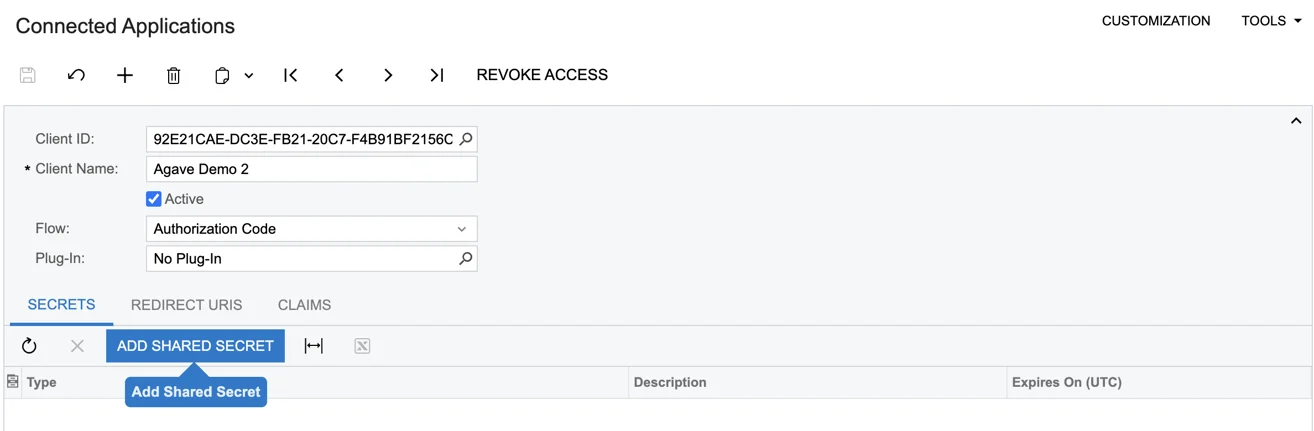
Navigate to Integration > Connected Applications.
-
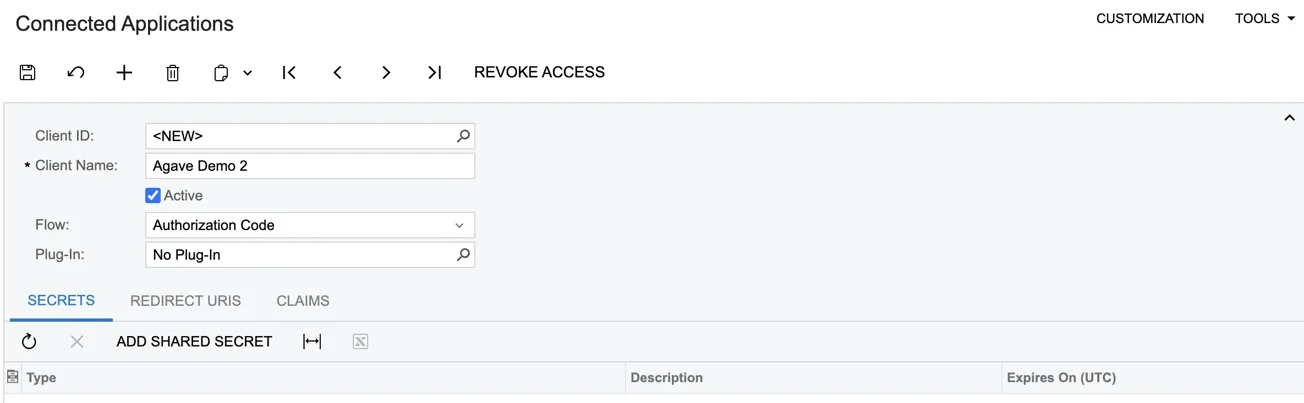
Enter the Client Name and Select Authorization Code for the Authentication Flow. Click Save. After clicking the save button (top left), the Client ID box will autofill. Ensure the Active checkbox is selected.
-
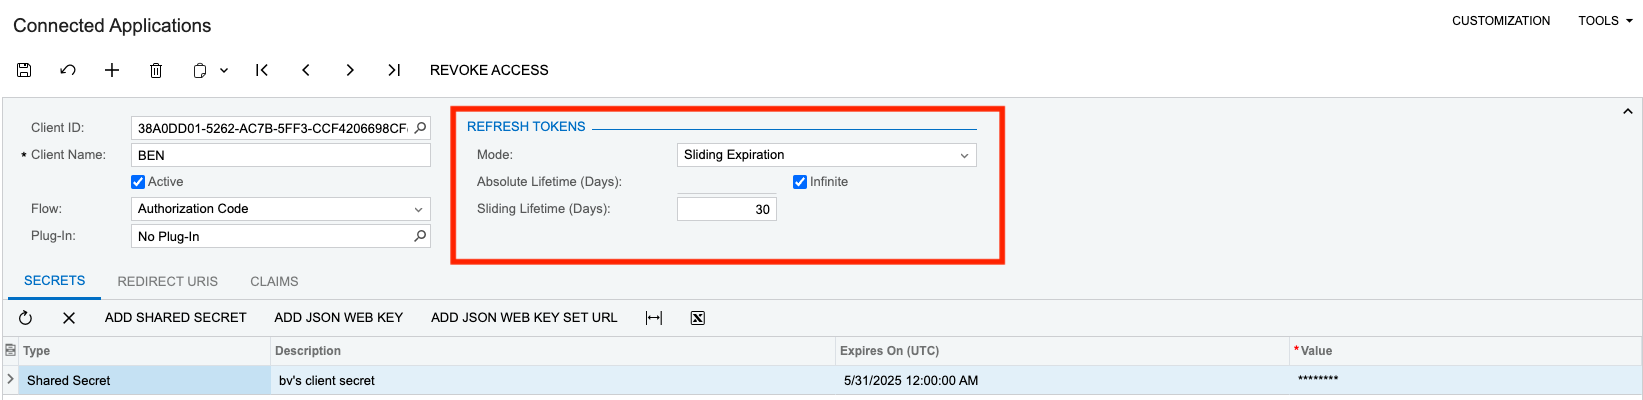
Versions 2023 R2 and later only: Set the "Refresh Tokens" settings:
-
Set Mode to Sliding Expiration
-
Set Absolute Lifetime to Infinite or as long as you plan to use the integration. You will need to reconnect after this time period
-
Set the Sliding Lifetime. Generally 15 - 30 days works well
-
For more information on sliding expiration, see Acumatica's help article
-
-
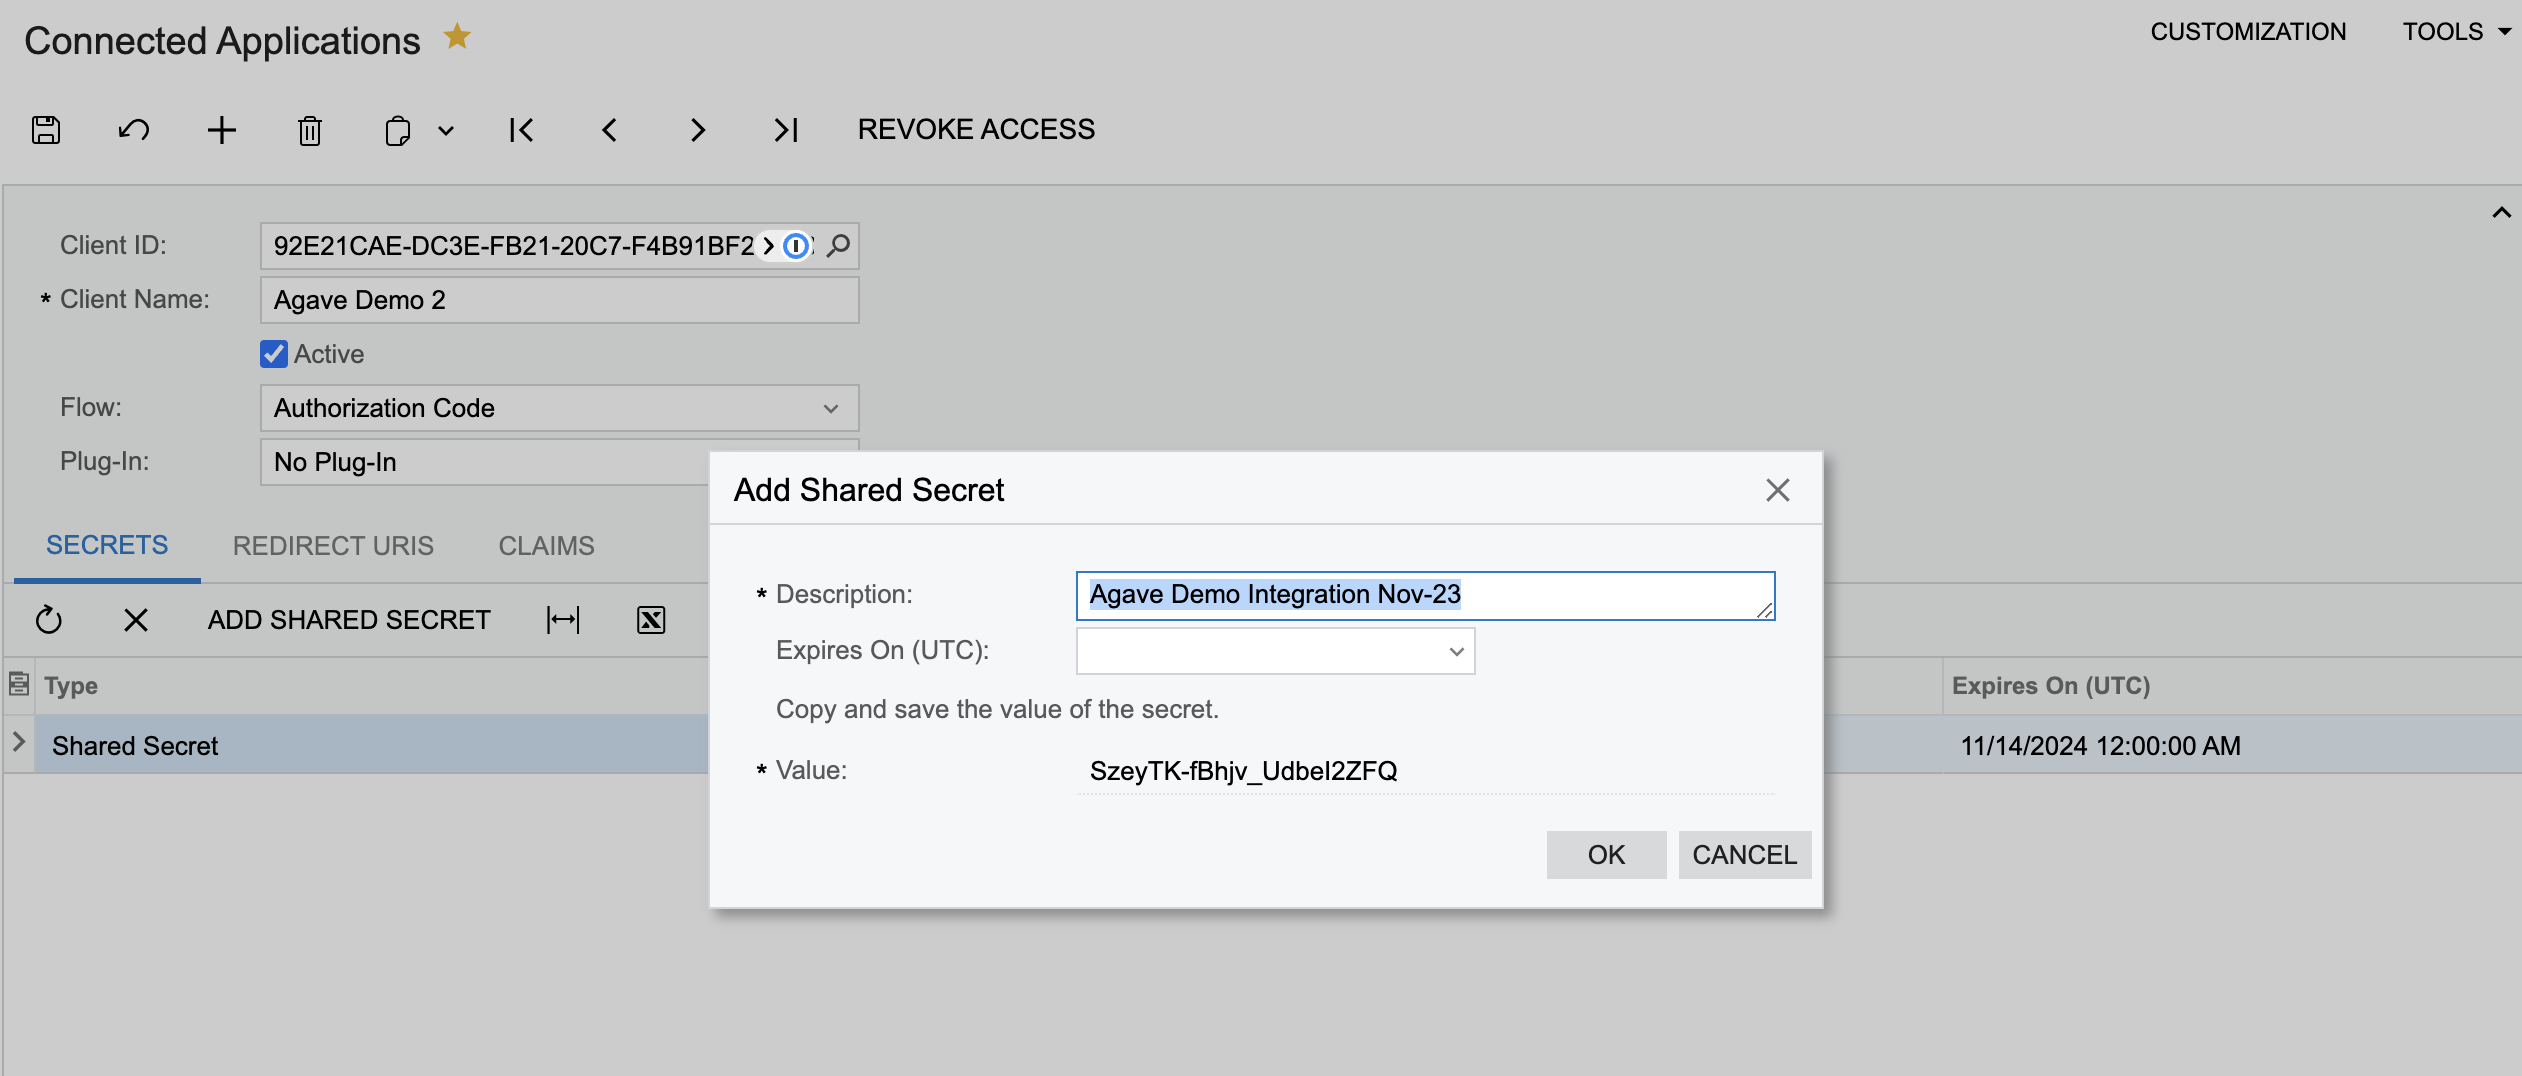
Click Add Shared Secret to generate credentials:
-
Enter a Description and optionally an Expiration Date. Save the Client ID and Secret somewhere safe before closing this box. You will not be able to view the secret again after clicking "OK."
- The Expires On (UTC) field will determine how long the secret is valid. If it expires, you will have to create another account token.
-
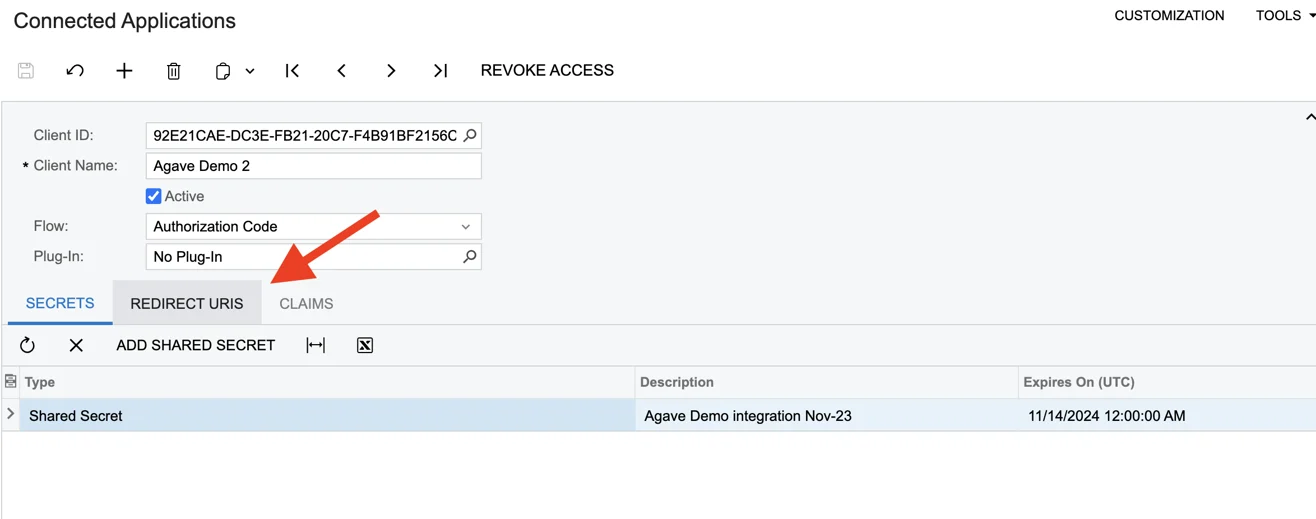
Save (top left) on the Connected Application screen again to activate the Client ID and Secret.
Step 2: Add a Redirect URI to the Connected Application
Adding a Redirect URI enables the OAuth flow through Agave Link.
-
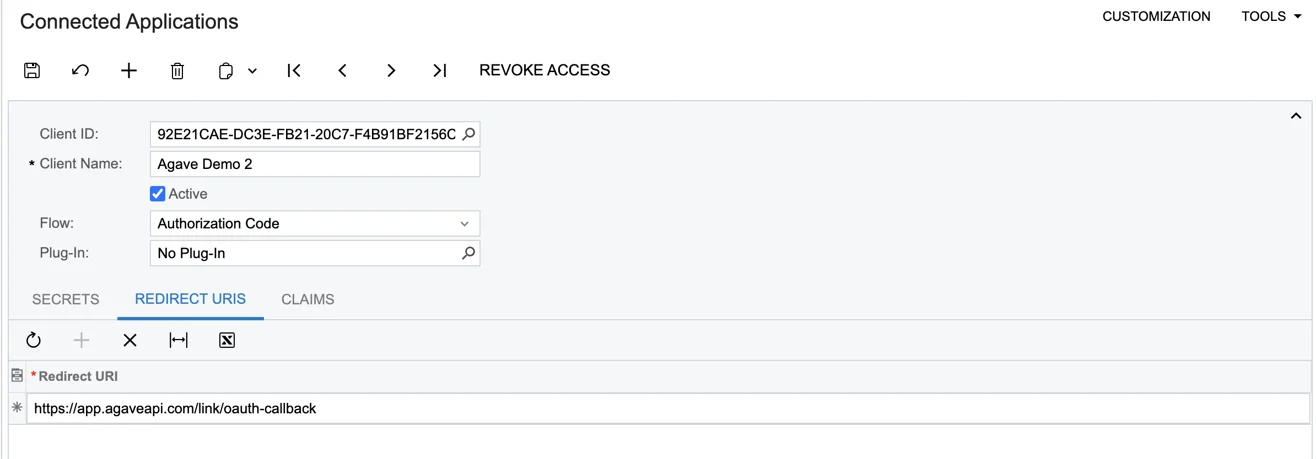
Click the Redirect URIs tab from the Connected Application Record at the end of Step 1.
-
Create an entry (click the Plus) and enter https://app.agaveapi.com/link/oauth-callback in the row.
-
Save (top left). The connected application is now fully set up.
Step 3: Authenticate with Agave Link
- Use the Agave Link Component to connect an Acumatica account.
- Enter the credentials generated in Step 1.
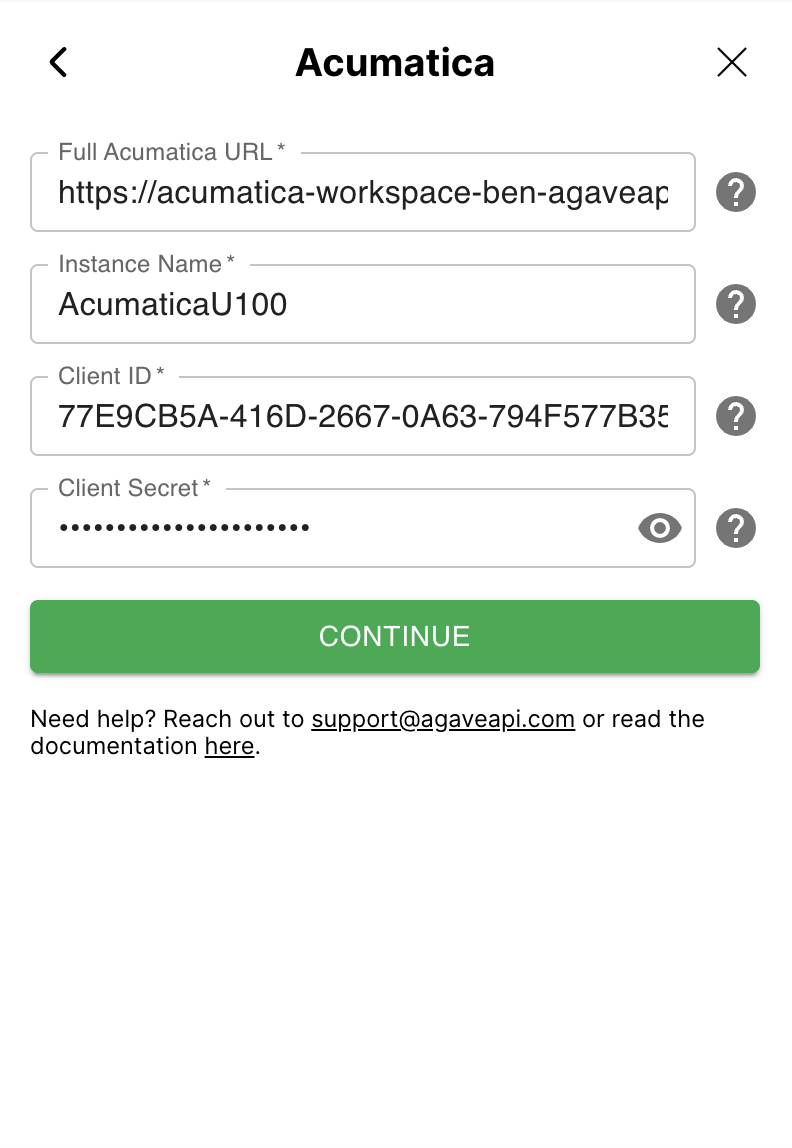
- Full Acumatica URL: URL used to access your instance. For accounts hosted by Acumatica, it will look like this: https://acme.myacumatica.com. Note: Ensure the URL does not contain any characters after the top-level domain (eg ".com").
- Instance Name: Name of your Acumatica instance. Typically the first element in the URL Path of your Acumatica instance (after the domain). Note The Instance Name may be omitted when installed at the root of the site (such as when hosted by Acumatica).
- Client ID: The Client ID created for the Connected Application in Step 1.
- Client Secret: The Client Secret created for the Connected Application in Step 1.
- Click Log in with Acumatica.

- Sign in with Acumatica and grant permissions to Agave.
Only click the "Yes, Allow" button once, otherwise Acumatica will overload with concurrent requests.
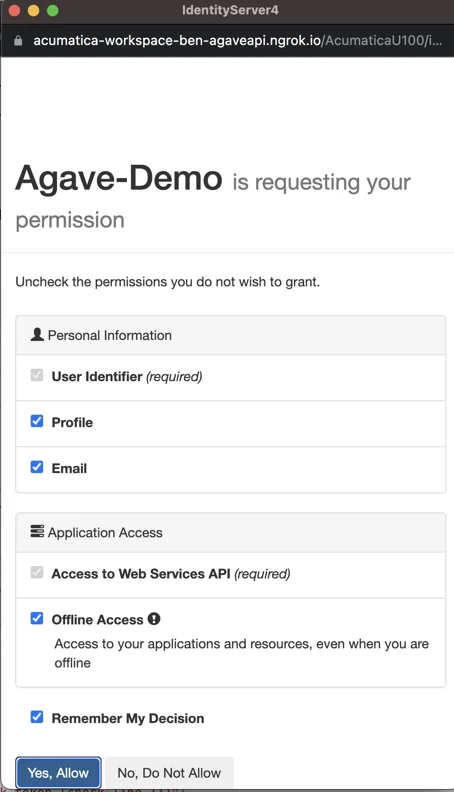
- Done! Agave Link will close if the connection is successful.
Publish the Agave Customization Package to Acumatica
Step 1: Download the Agave.zip file
Click here to download the zip file
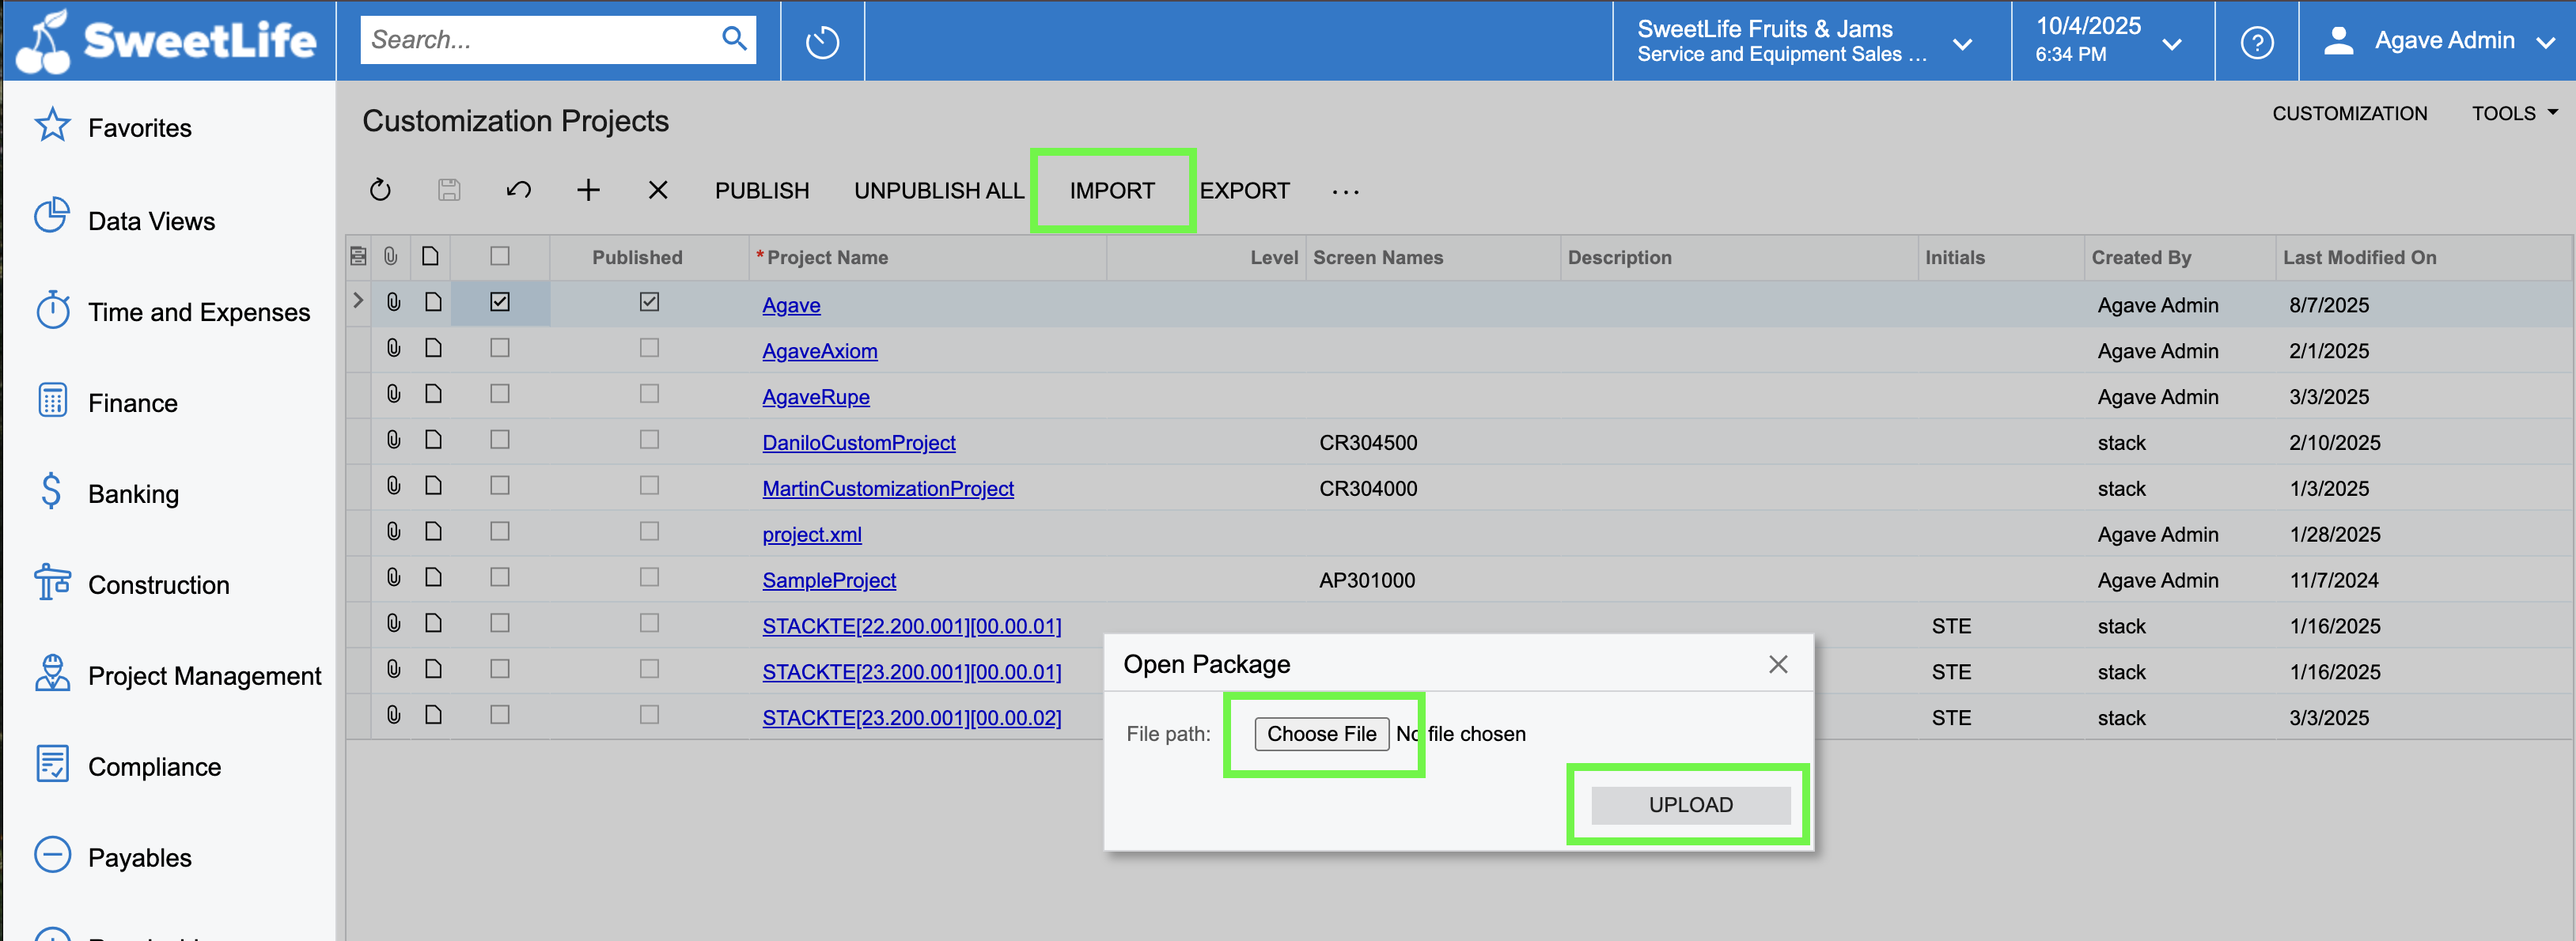
Step 2: Open Customization Project Screen
In Acumatica, navigate to: Construction > Projects Preferences > Customization > Manage Customizations This will open the Customizations Project window
Step 3: Import the Agave Customization
- Click “IMPORT”
- Click “Choose File” and select the Agave.zip
- Click Upload
Step 4: Publish the Customization Project
- Select the the checkbox next to the “Agave” Project
- Click “PUBLISH”

Step 5: Save
After publishing, click the Save button to finalize the installation
Step 6: Publish Agave Reports to the UI
After installing the customization, you need to update several generic inquiries to ensure that Agave can retrieve project-specific data correctly.
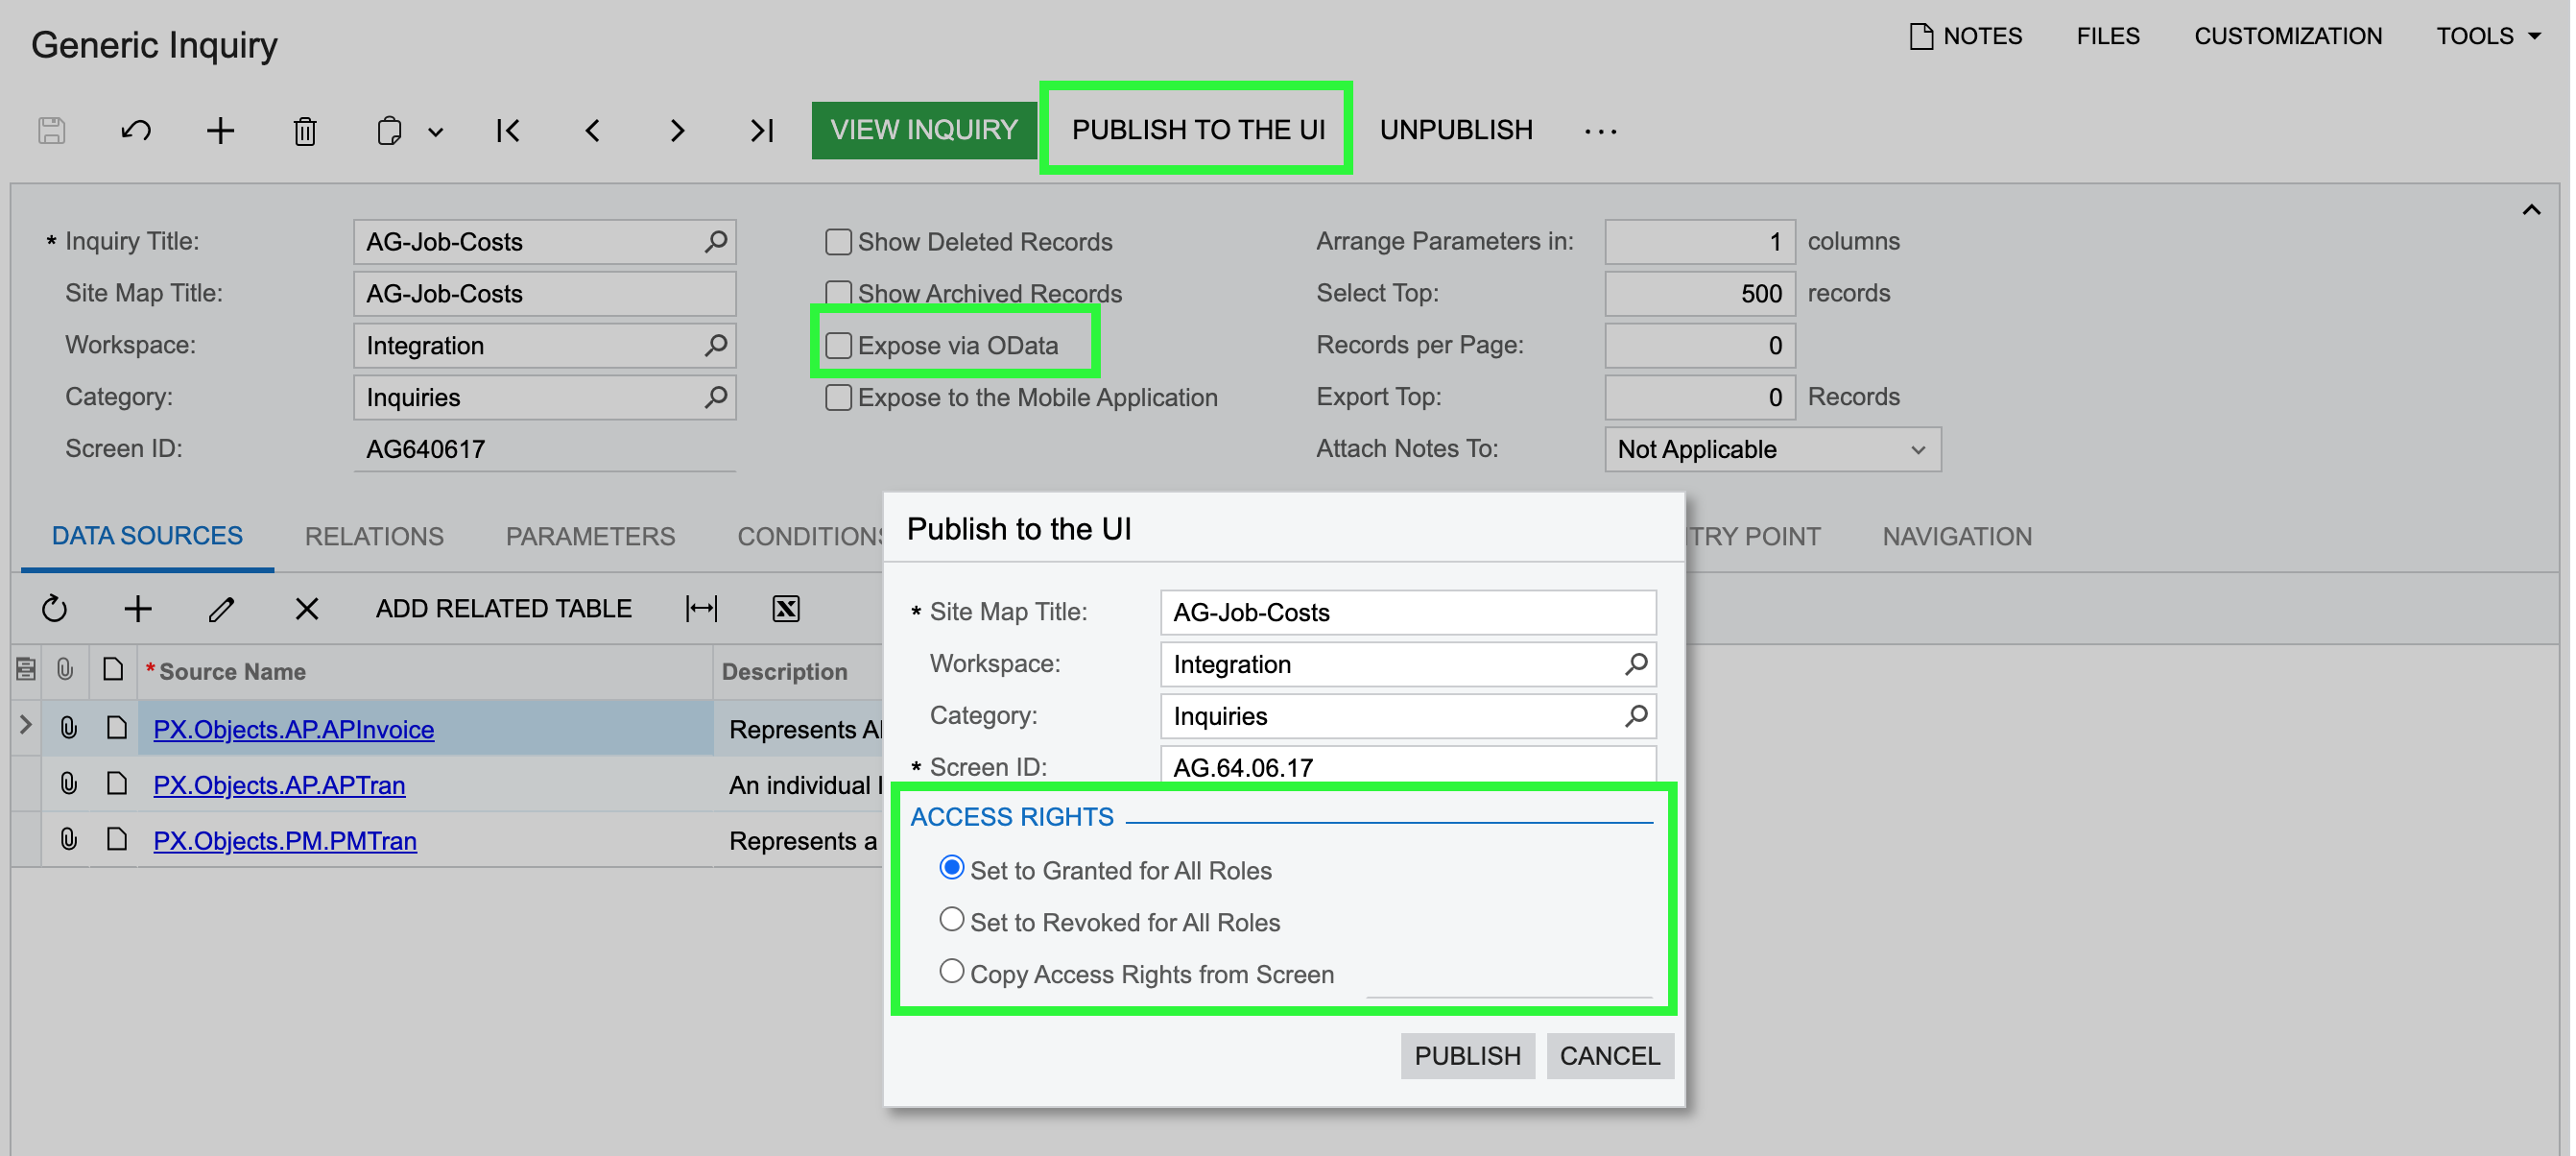
- Navigate to: Generic Inquiry (Screen ID SM20800)
- Click the Search Inquiry Title field to open a list view
- Select AG-job-costs

- Uncheck the “Expose via OData” box
- Click “PUBLISH TO THE UI”
- Under ACCESS RIGHTS select “Set to Granted for All Roles”
- Click Publish
Repeat the steps for the following inquiries:
- AG-AP-Payment-Details
- AG-AP-Payment-Detail
- AG-AP-Payment-Headers
- AG-AP-Payment Header
- AG-AP-Invoices-By-Subcontract