Common Errors and FAQs
ServiceTitan App Installation
Step 1: Get Tenant ID
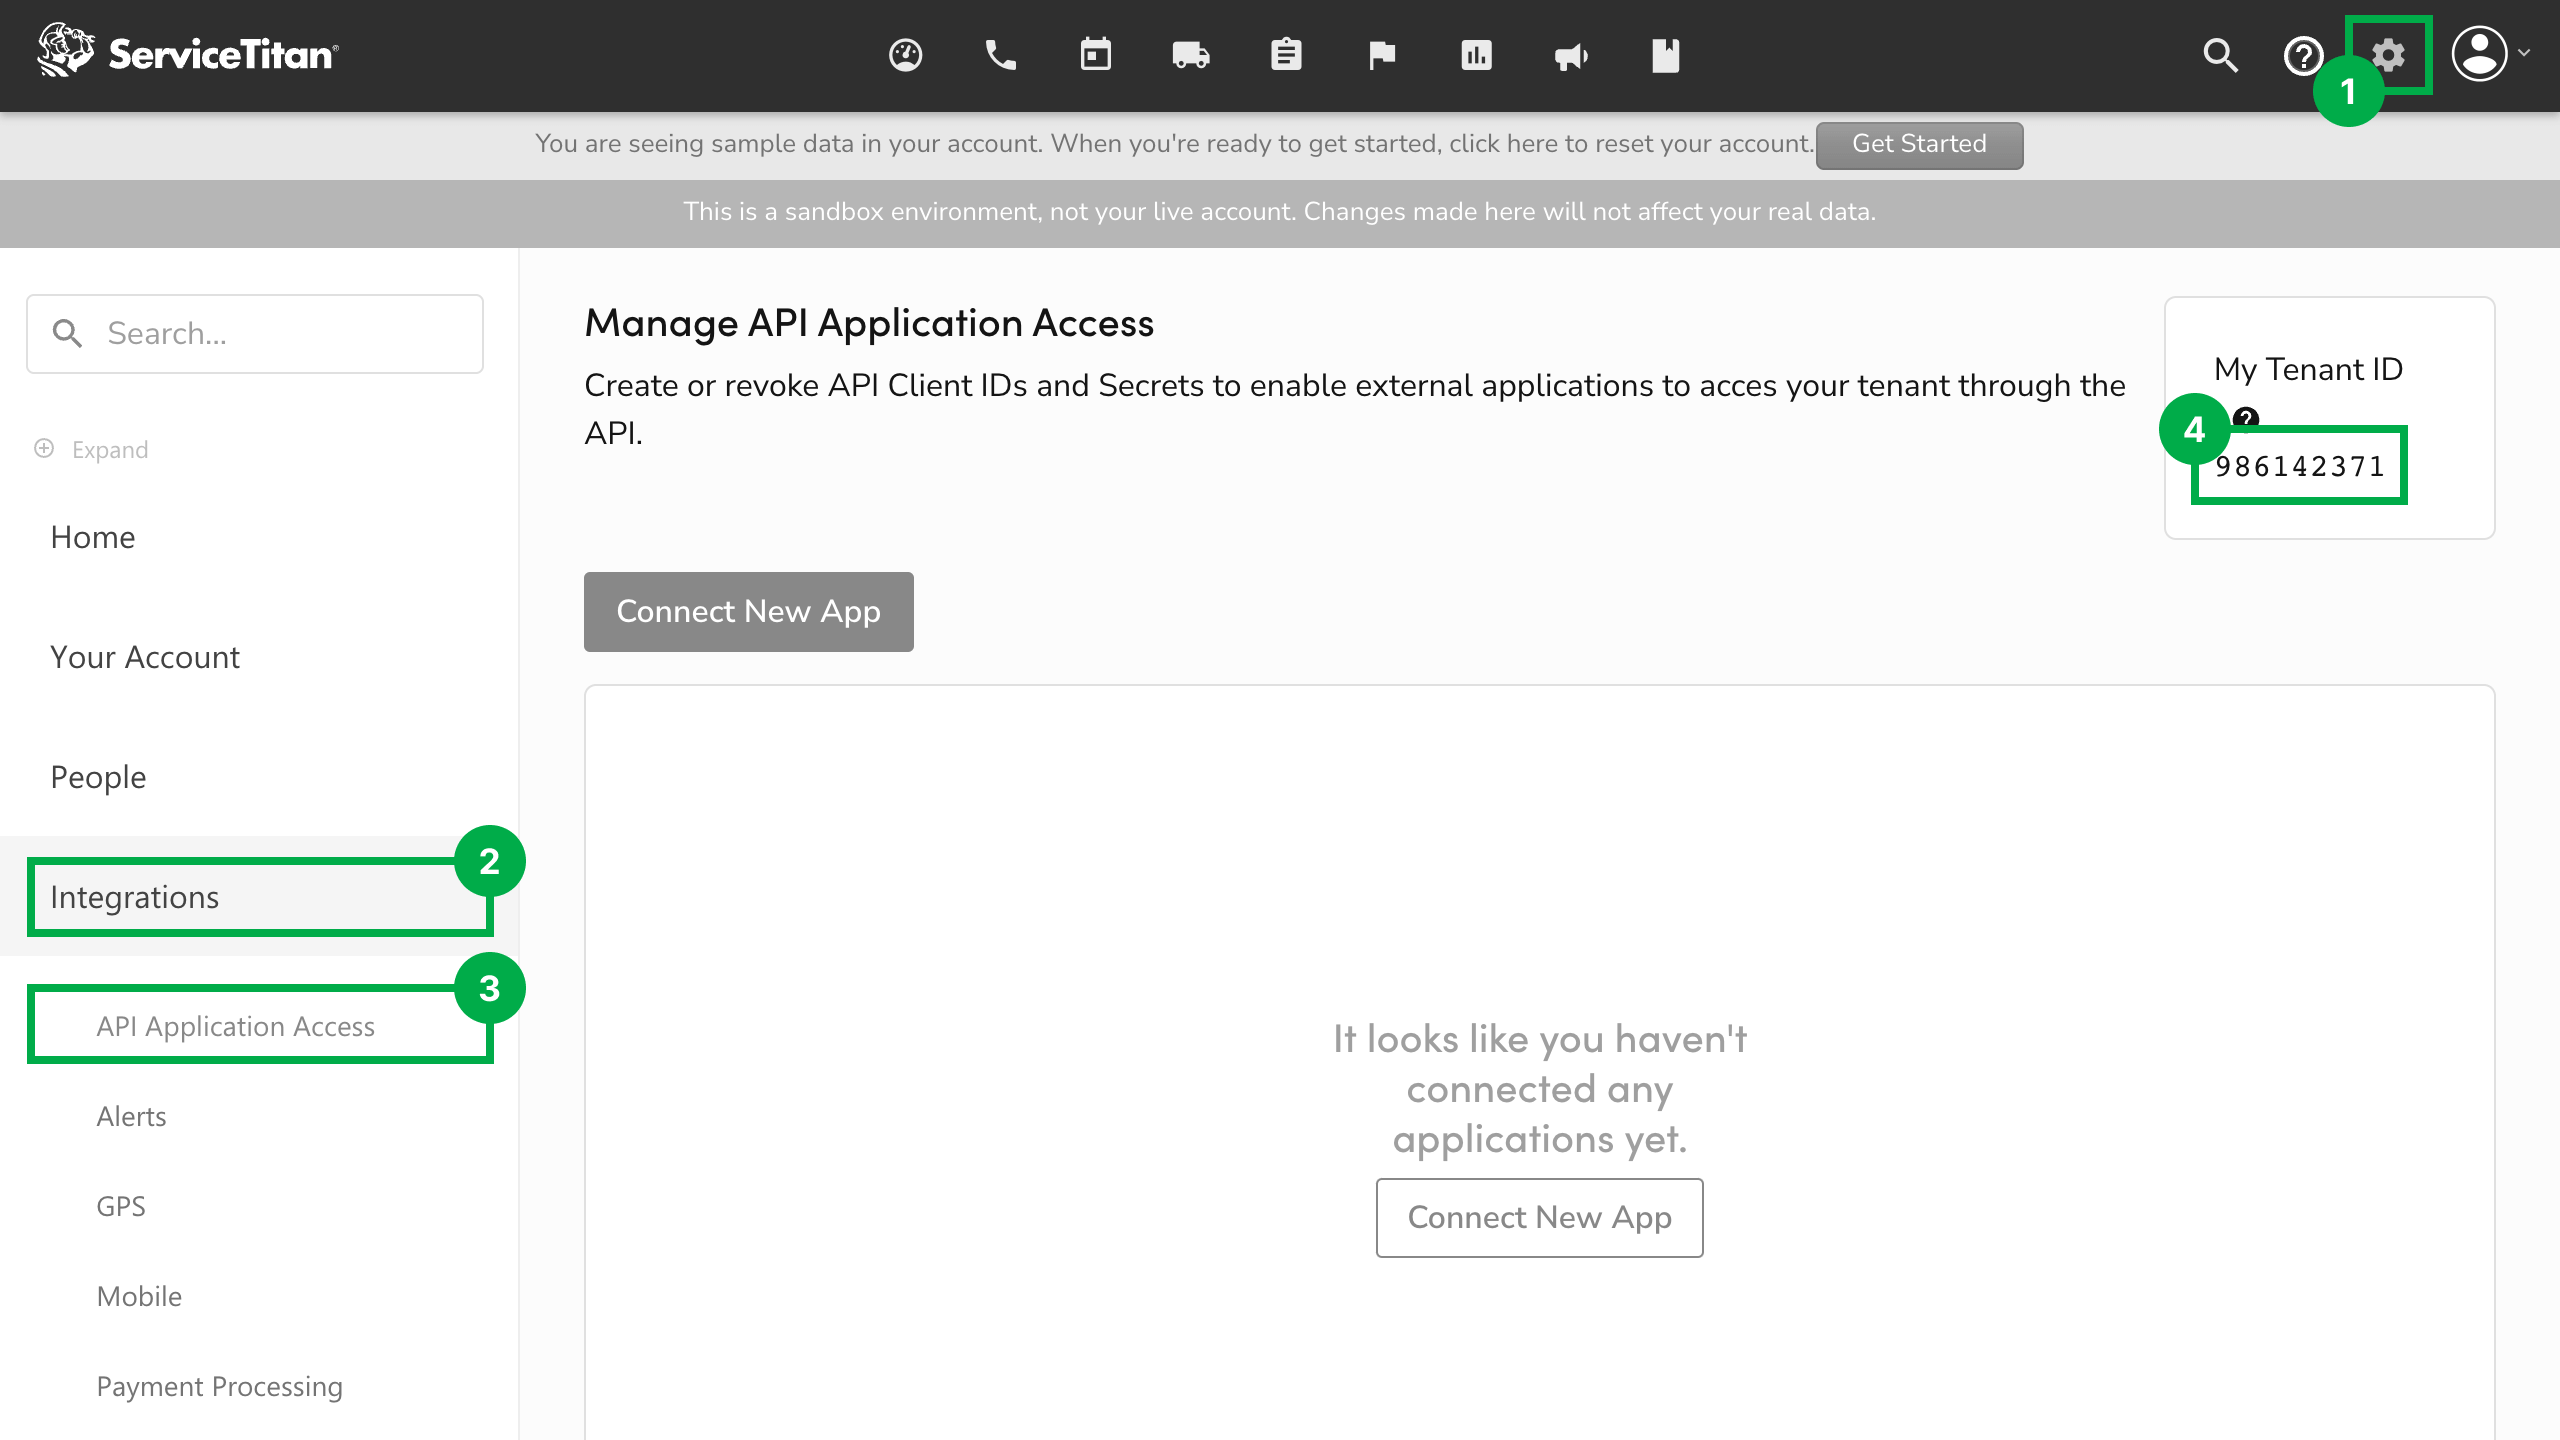
Login to your ServiceTitan account and do the following:
- Press the gear icon in the top-right corner.
- Press "Integration" in the sidebar.
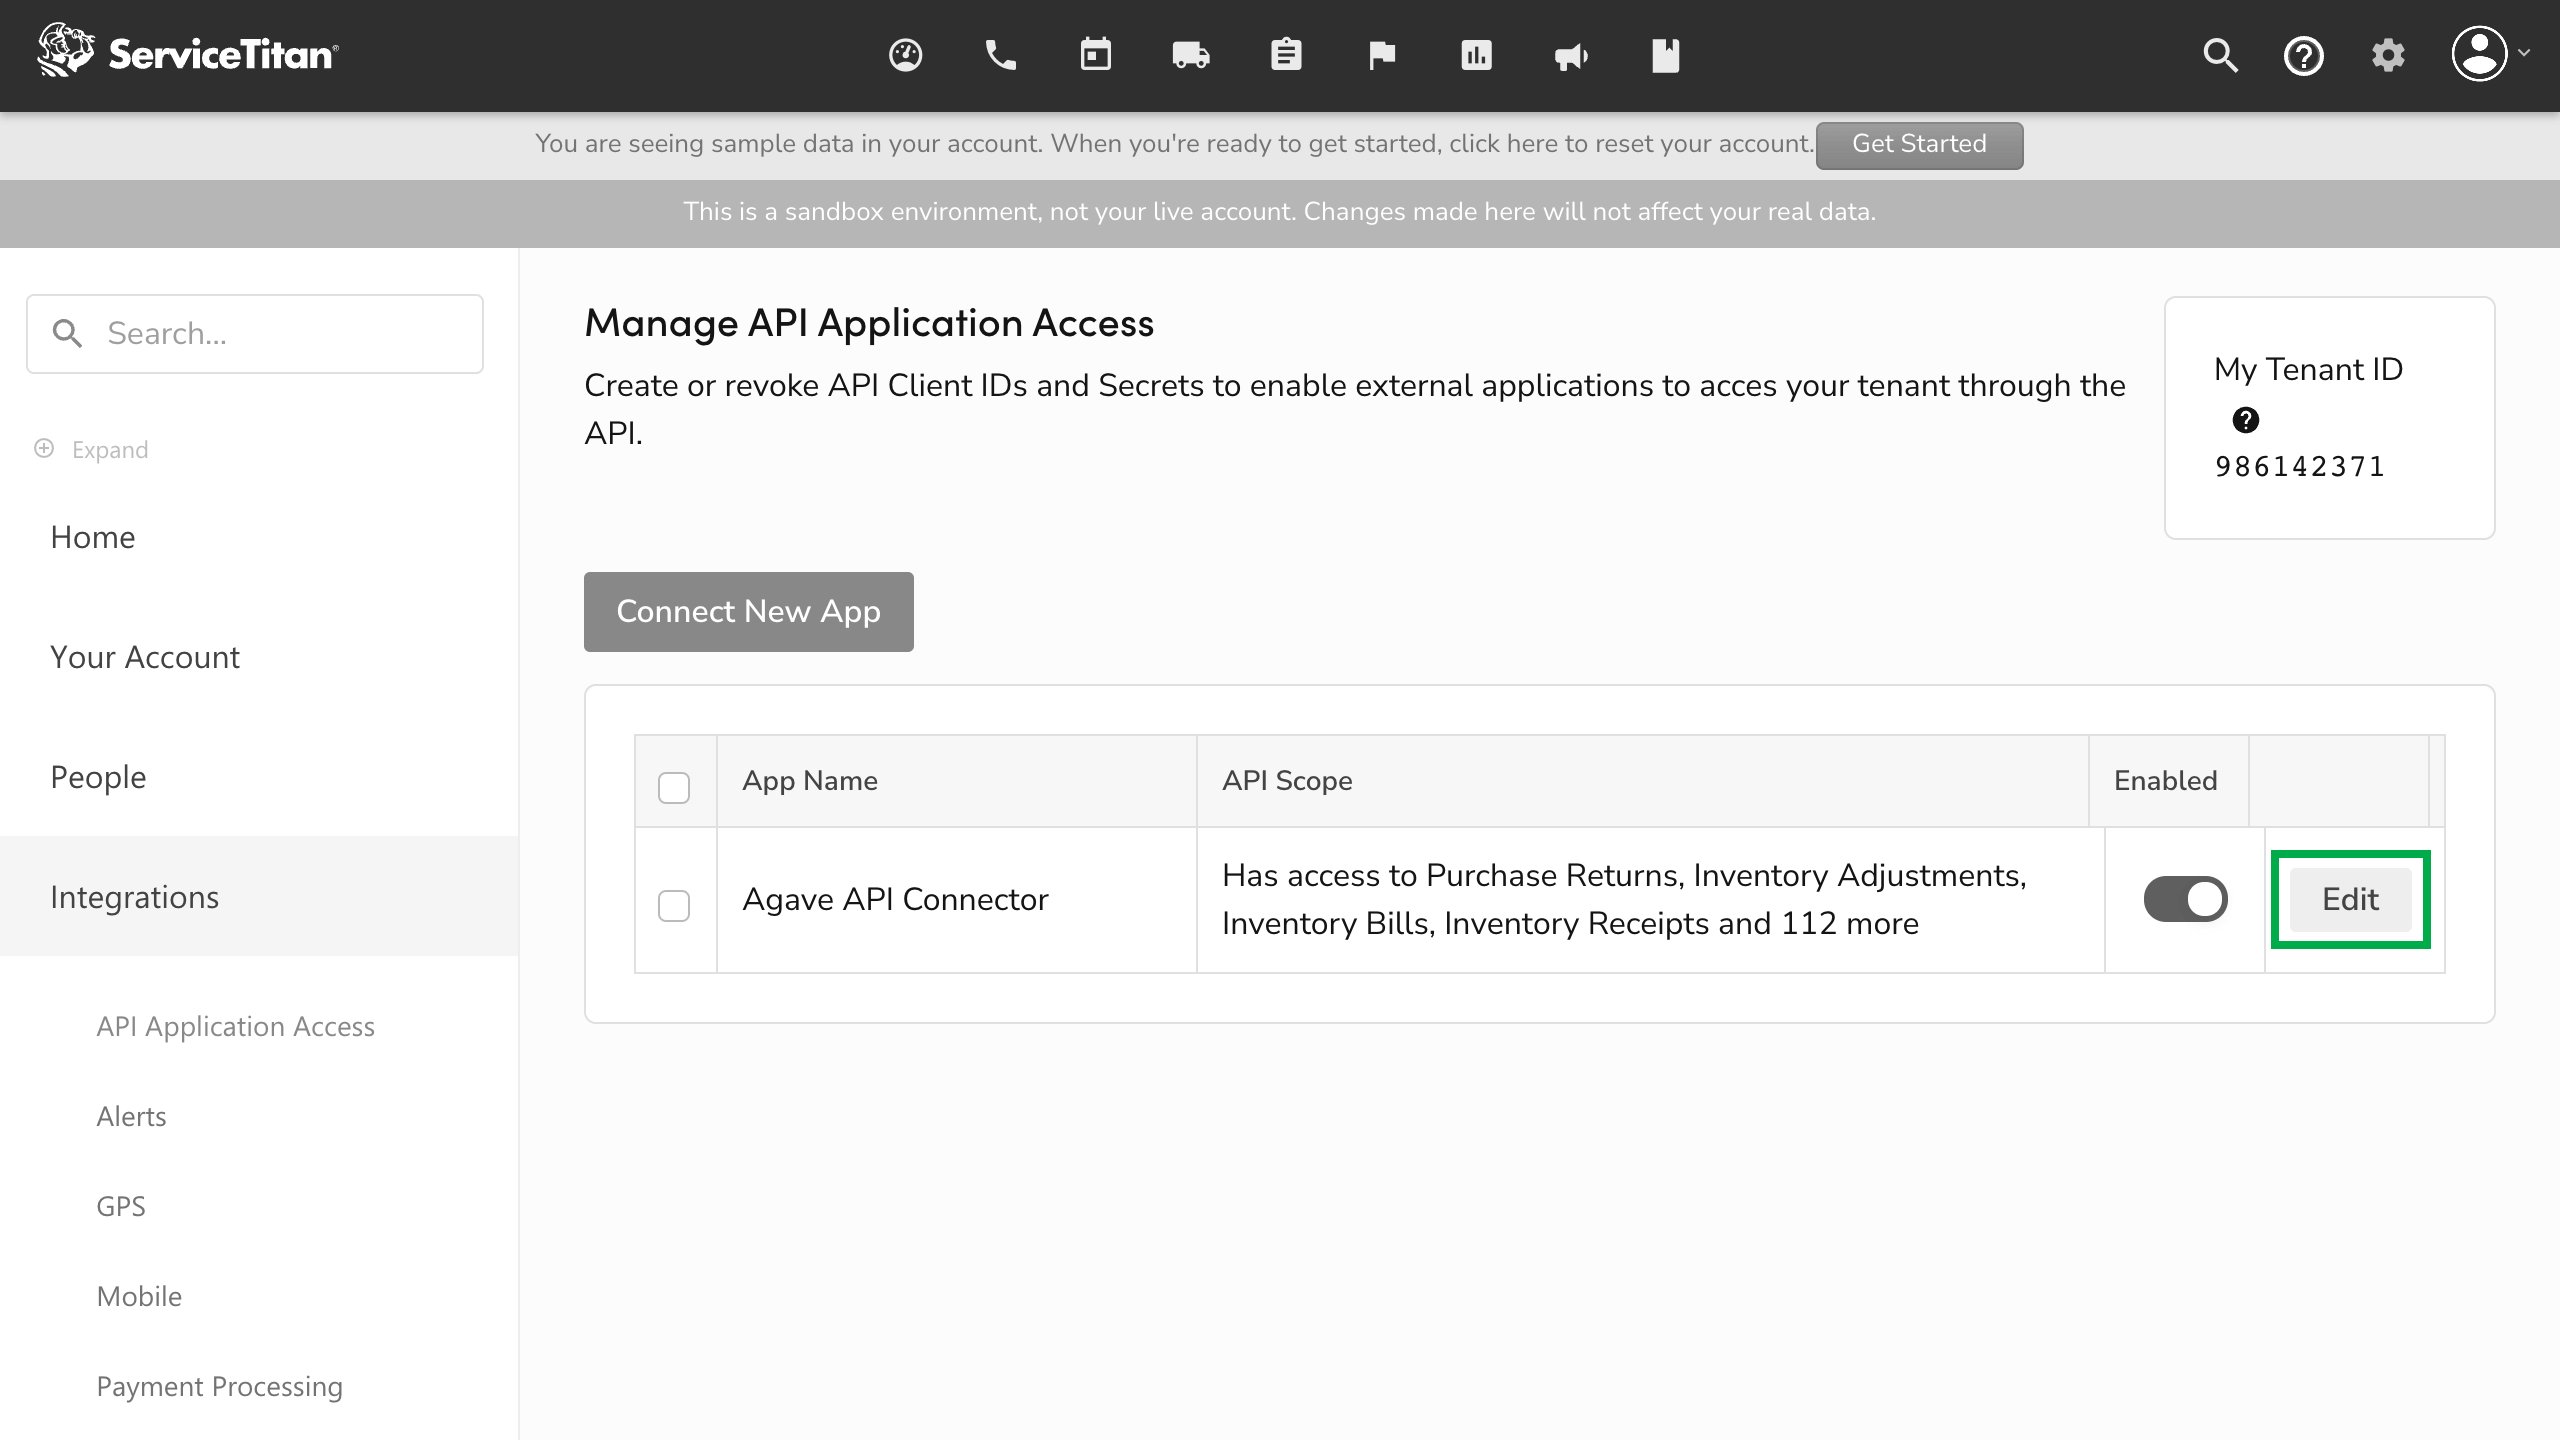
- Press "API Application Access". If you don't see this option, ask your company account admin to give you access.
- Find your "Tenant ID" in the top-right corner.
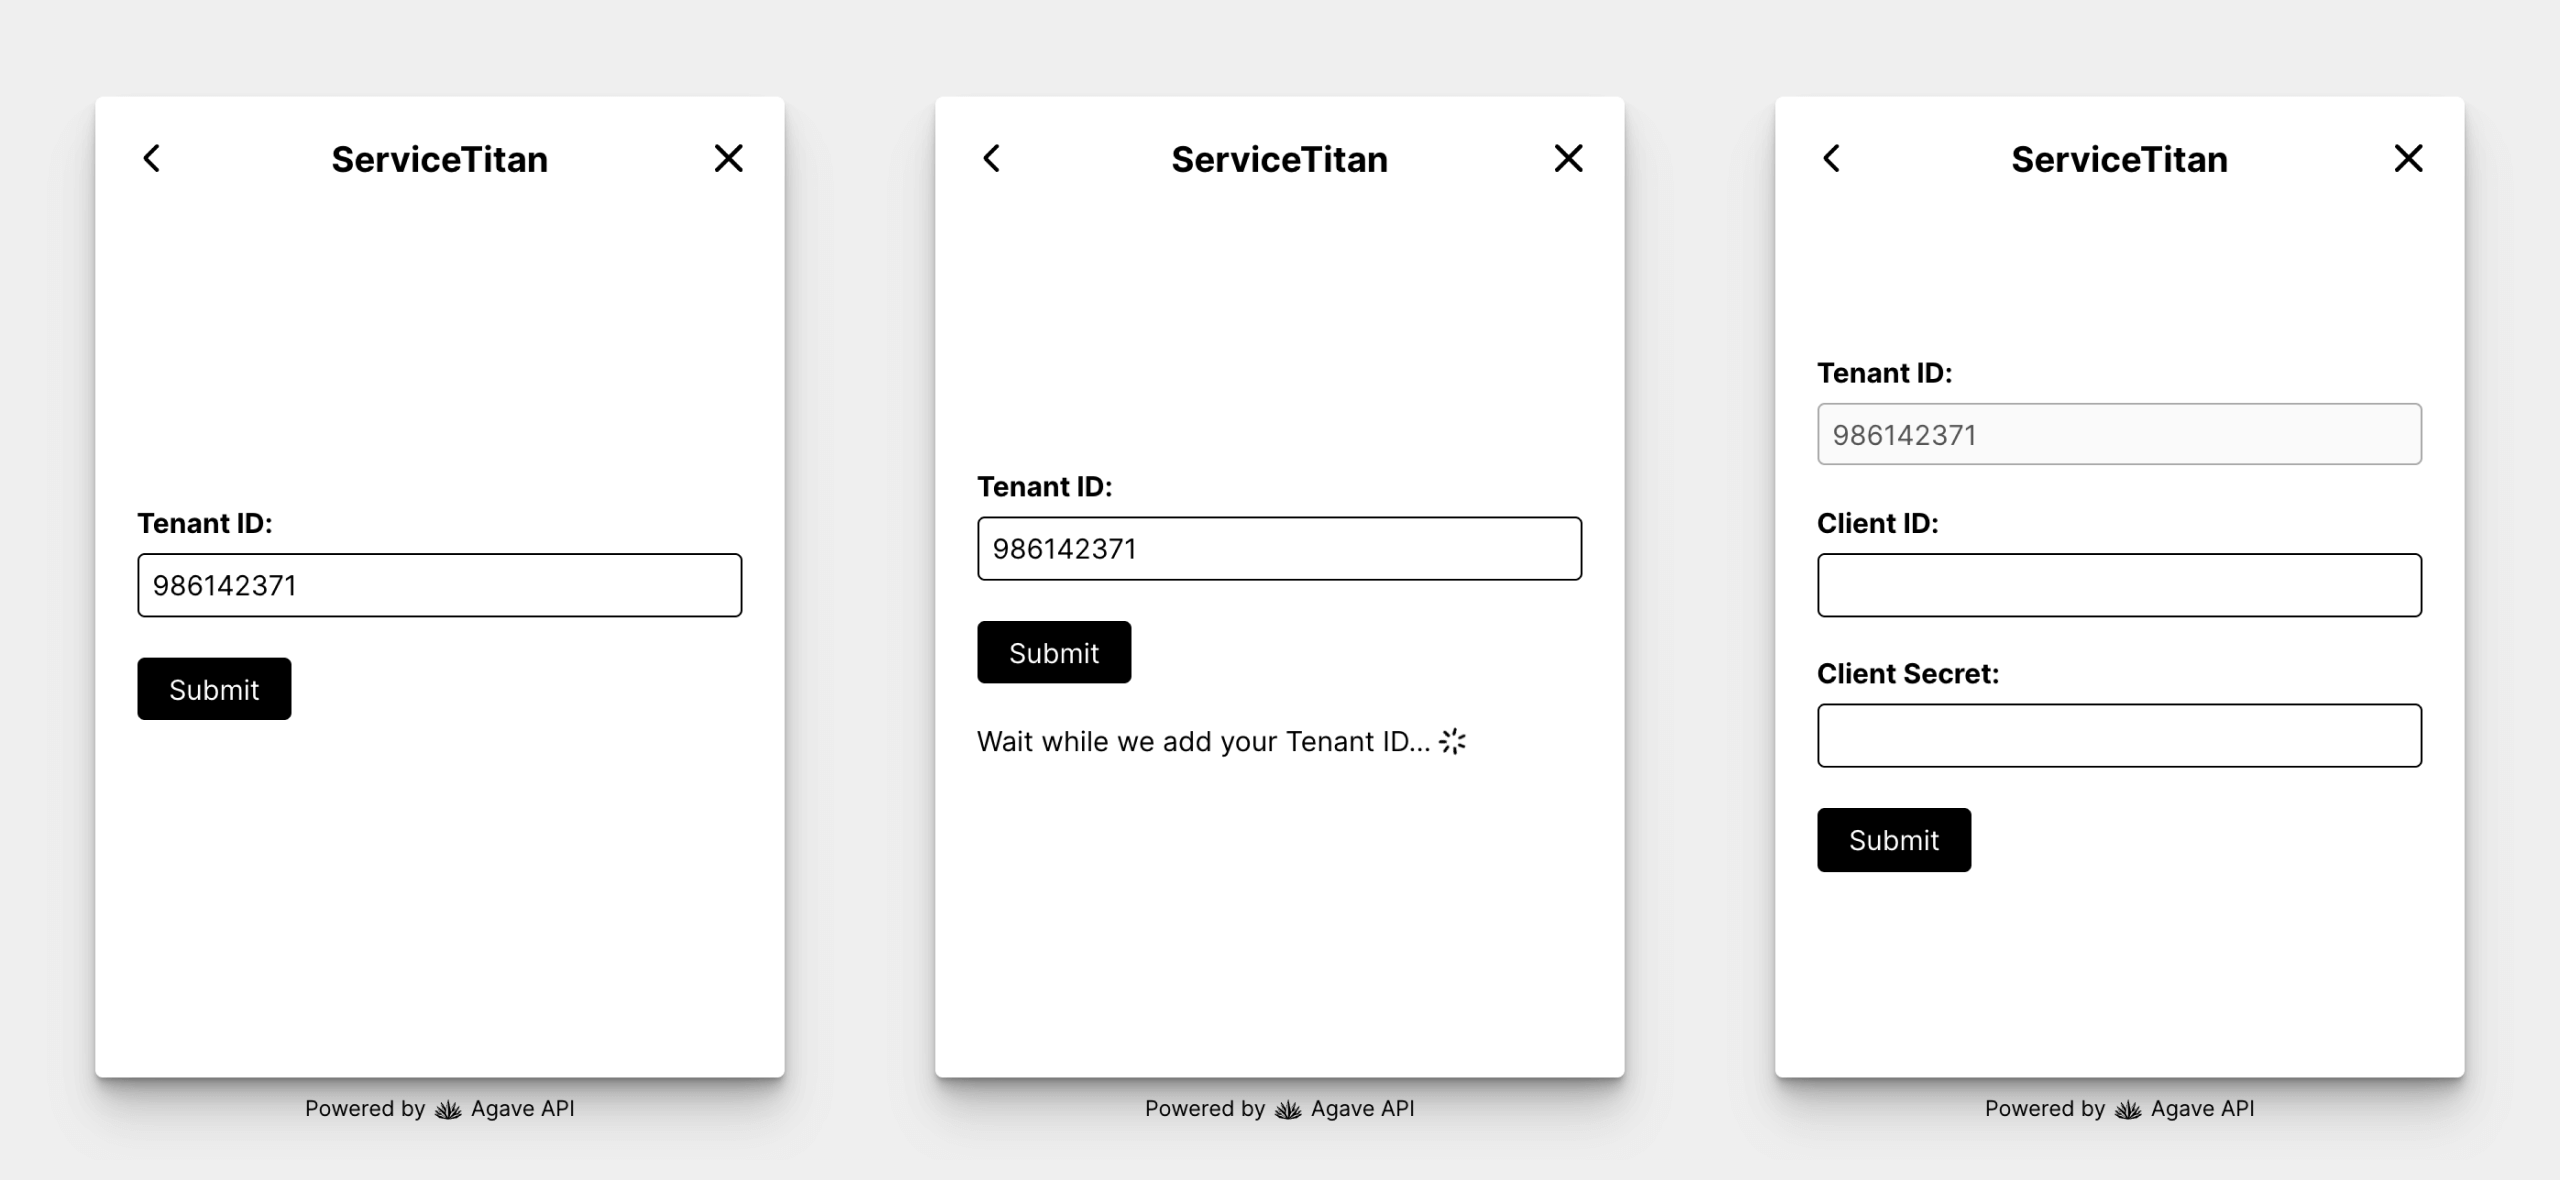
Enter your Tenant ID in Agave Link. It might take a minute for Agave to enable the Integration for your ServiceTitan account. Once this is complete, you should see options for you to fill in your Client Id and Client Secret.
Step 2: Connect New App
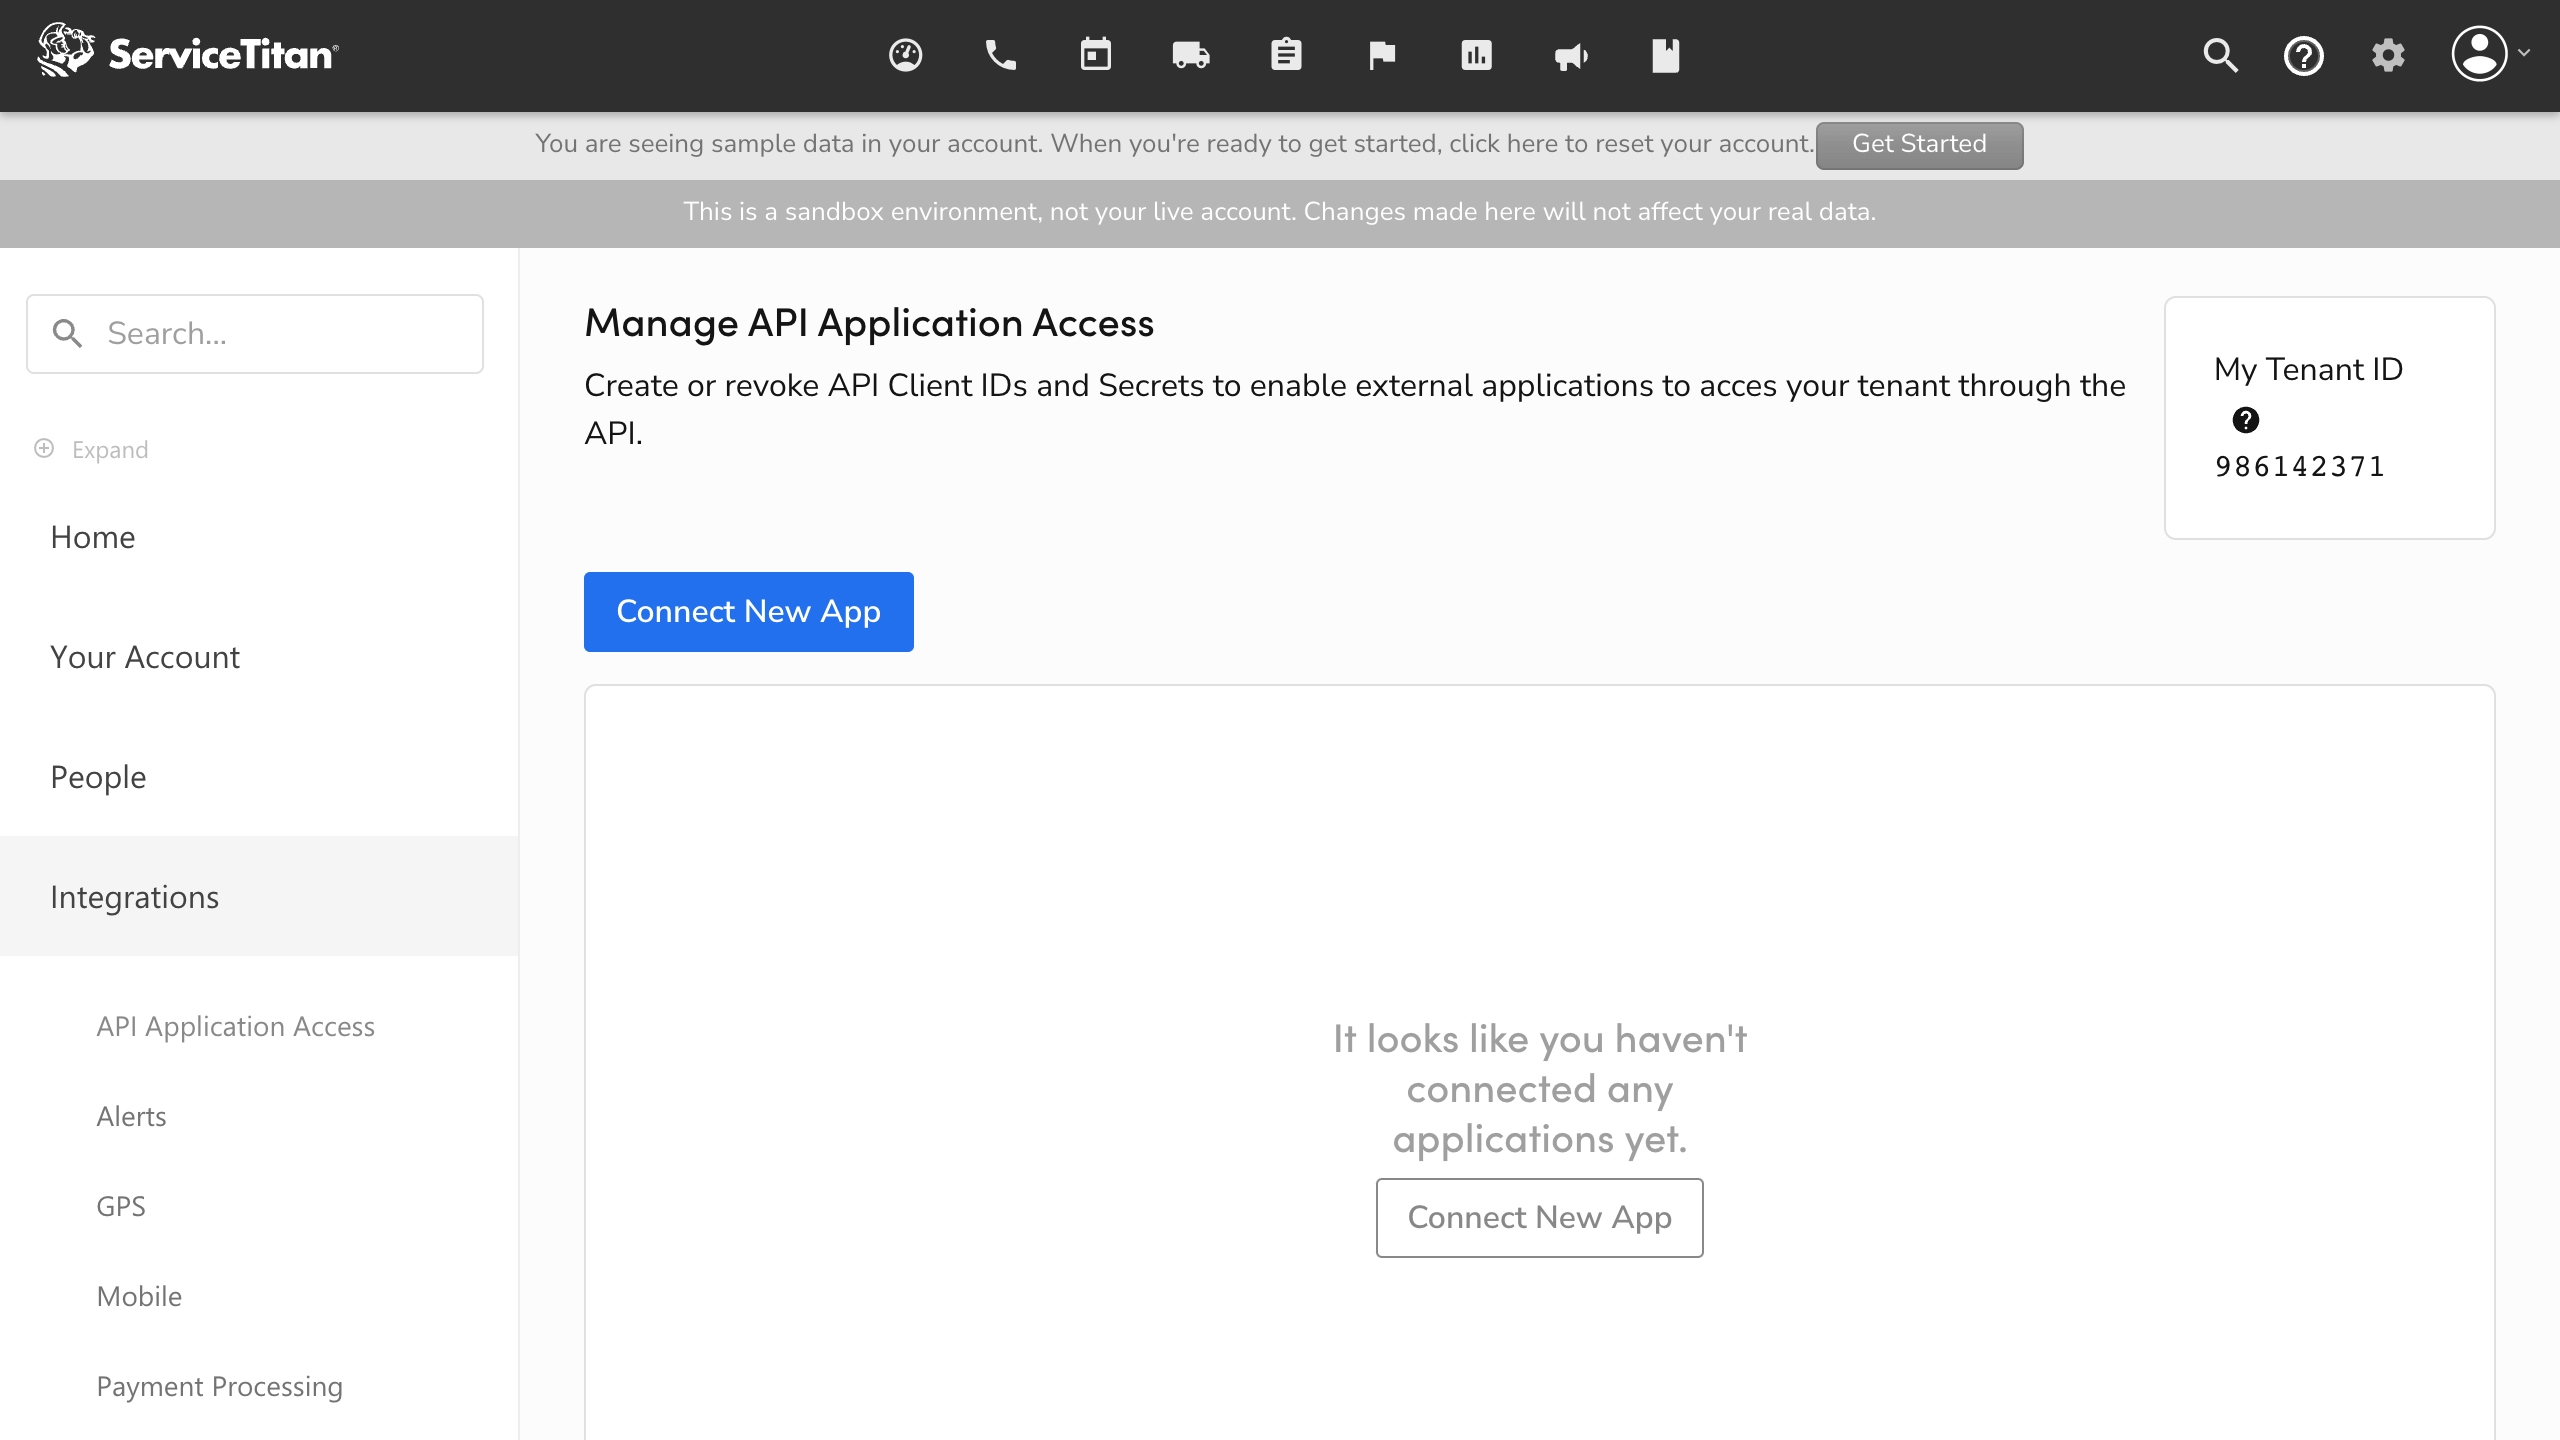
Next, return to your ServiceTitan account and "Connect New App".
Select "Agave API Connector" and press "Connect".
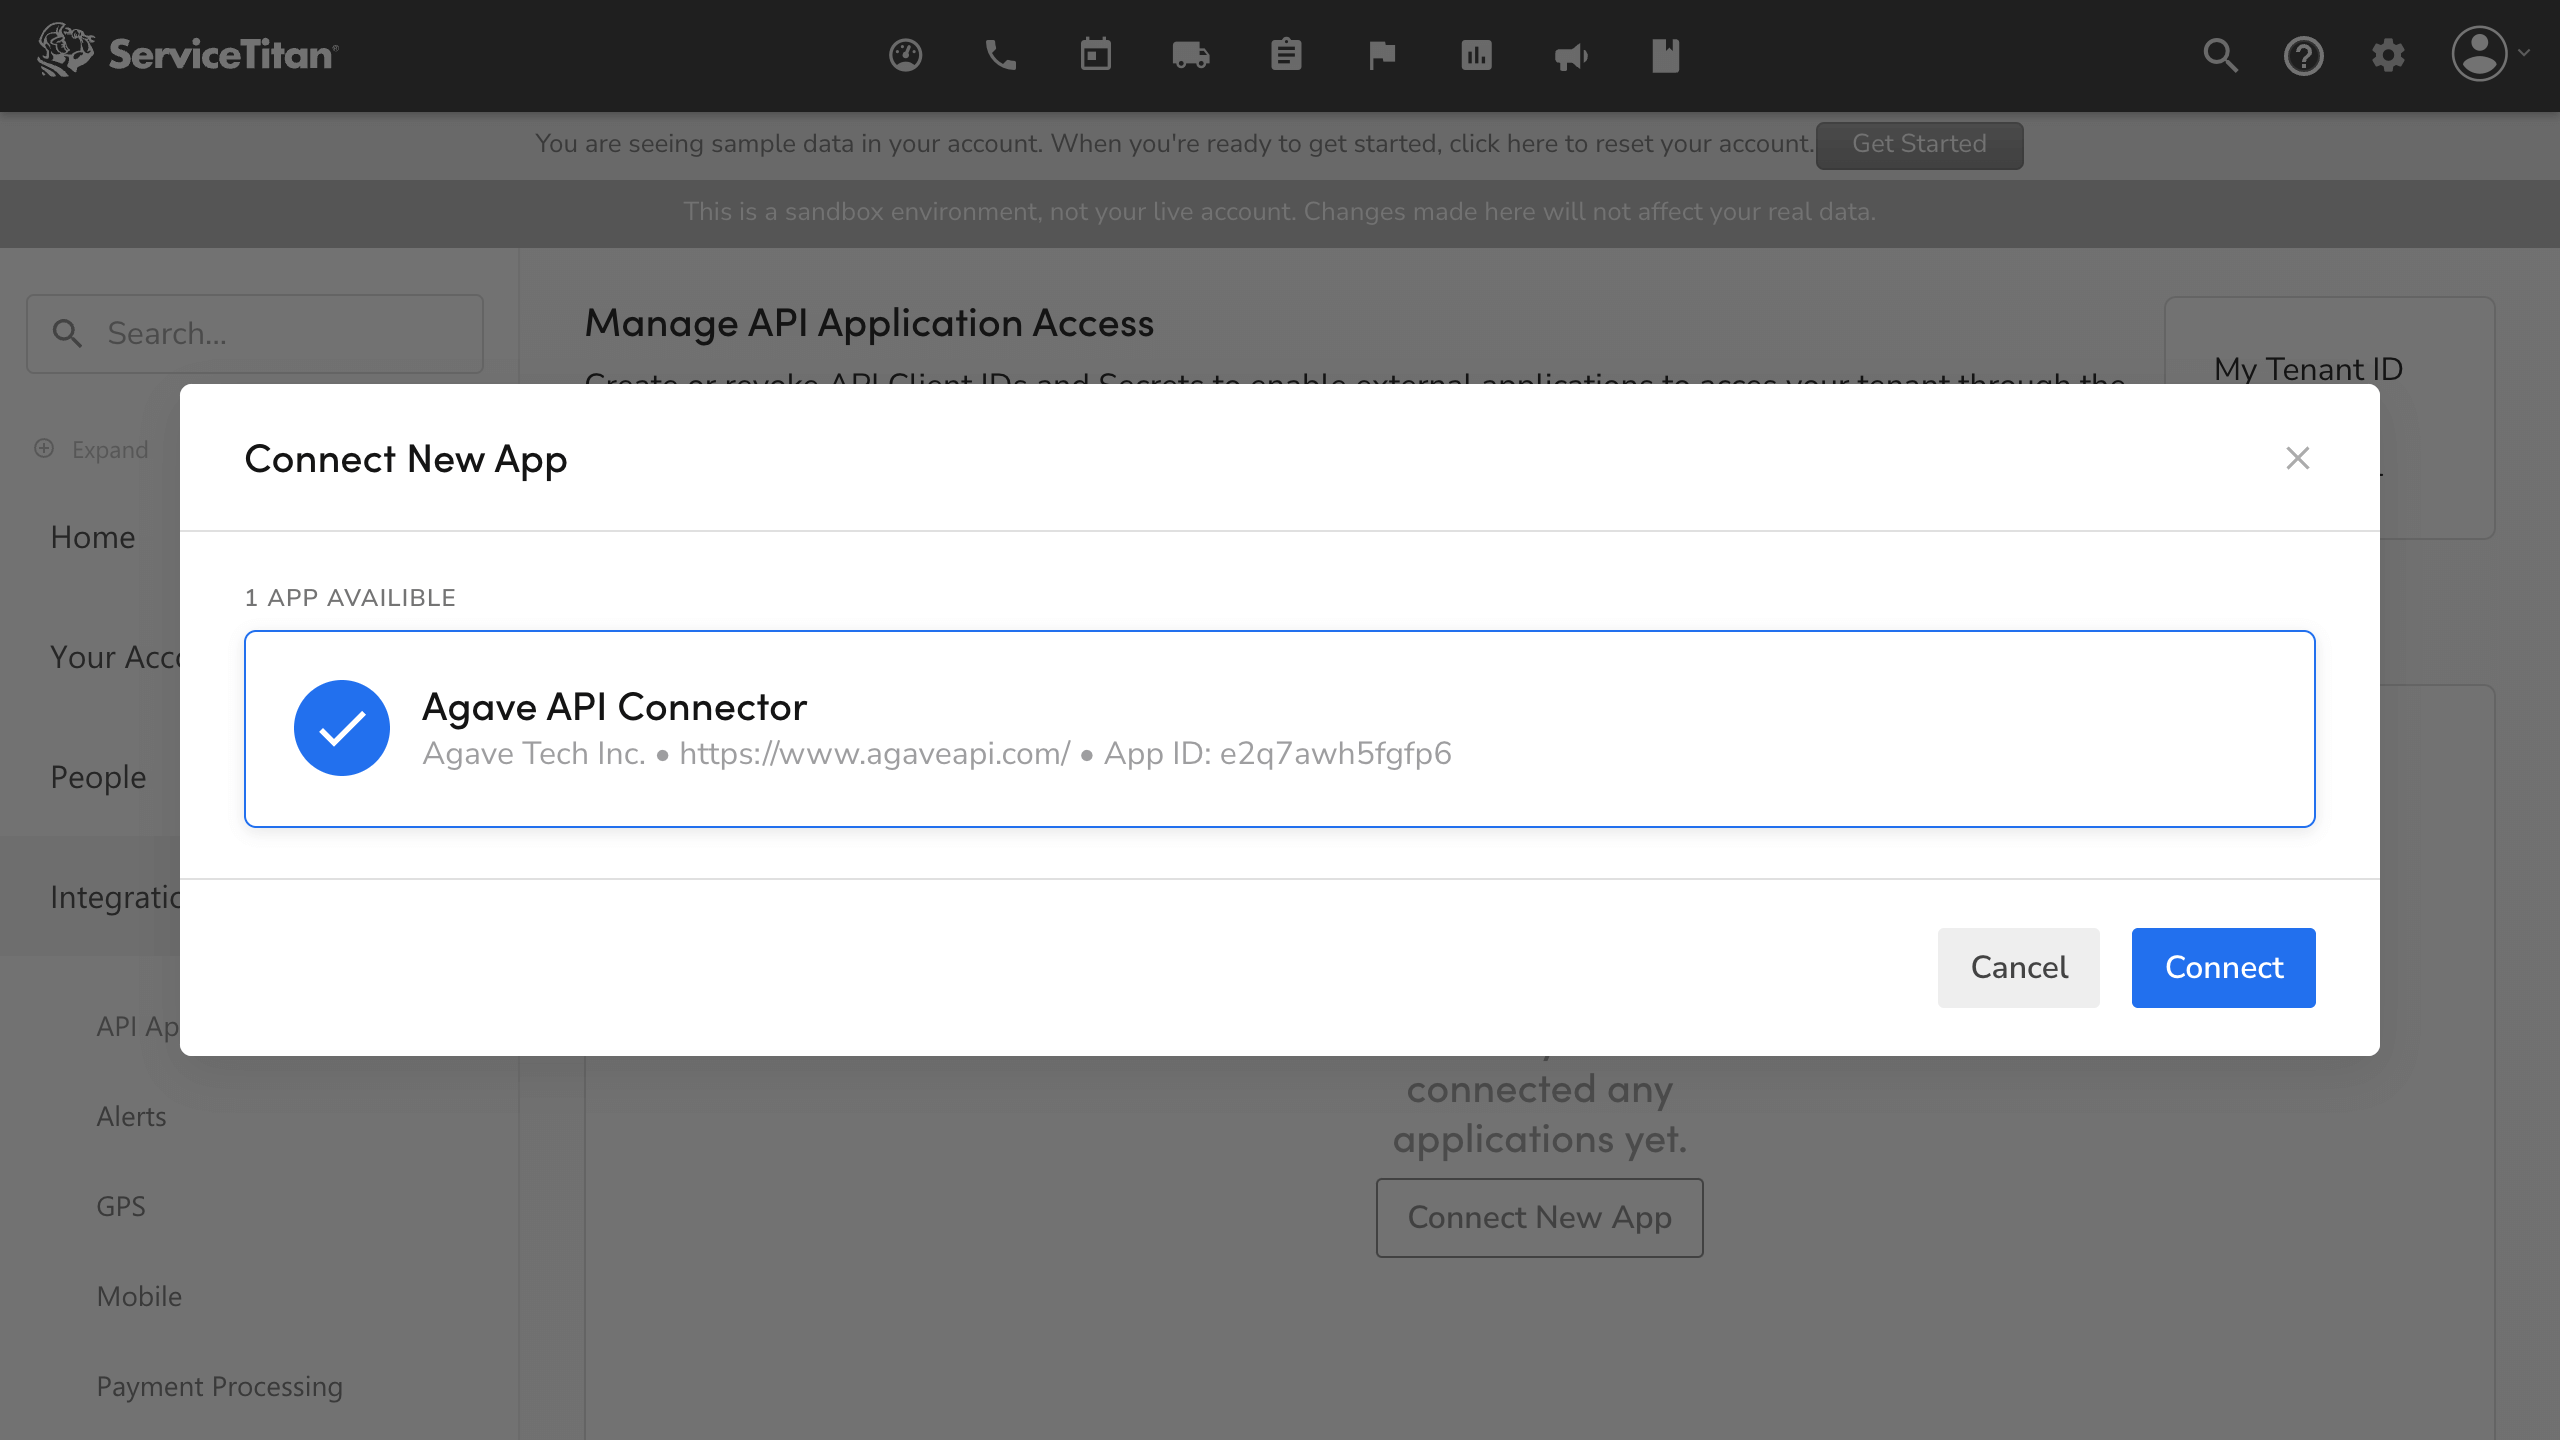
Finally, select "Allow Access".

Ask your Agave account manager to whitelist your tenant ID
Step 3: Get Client Id and Client Secret
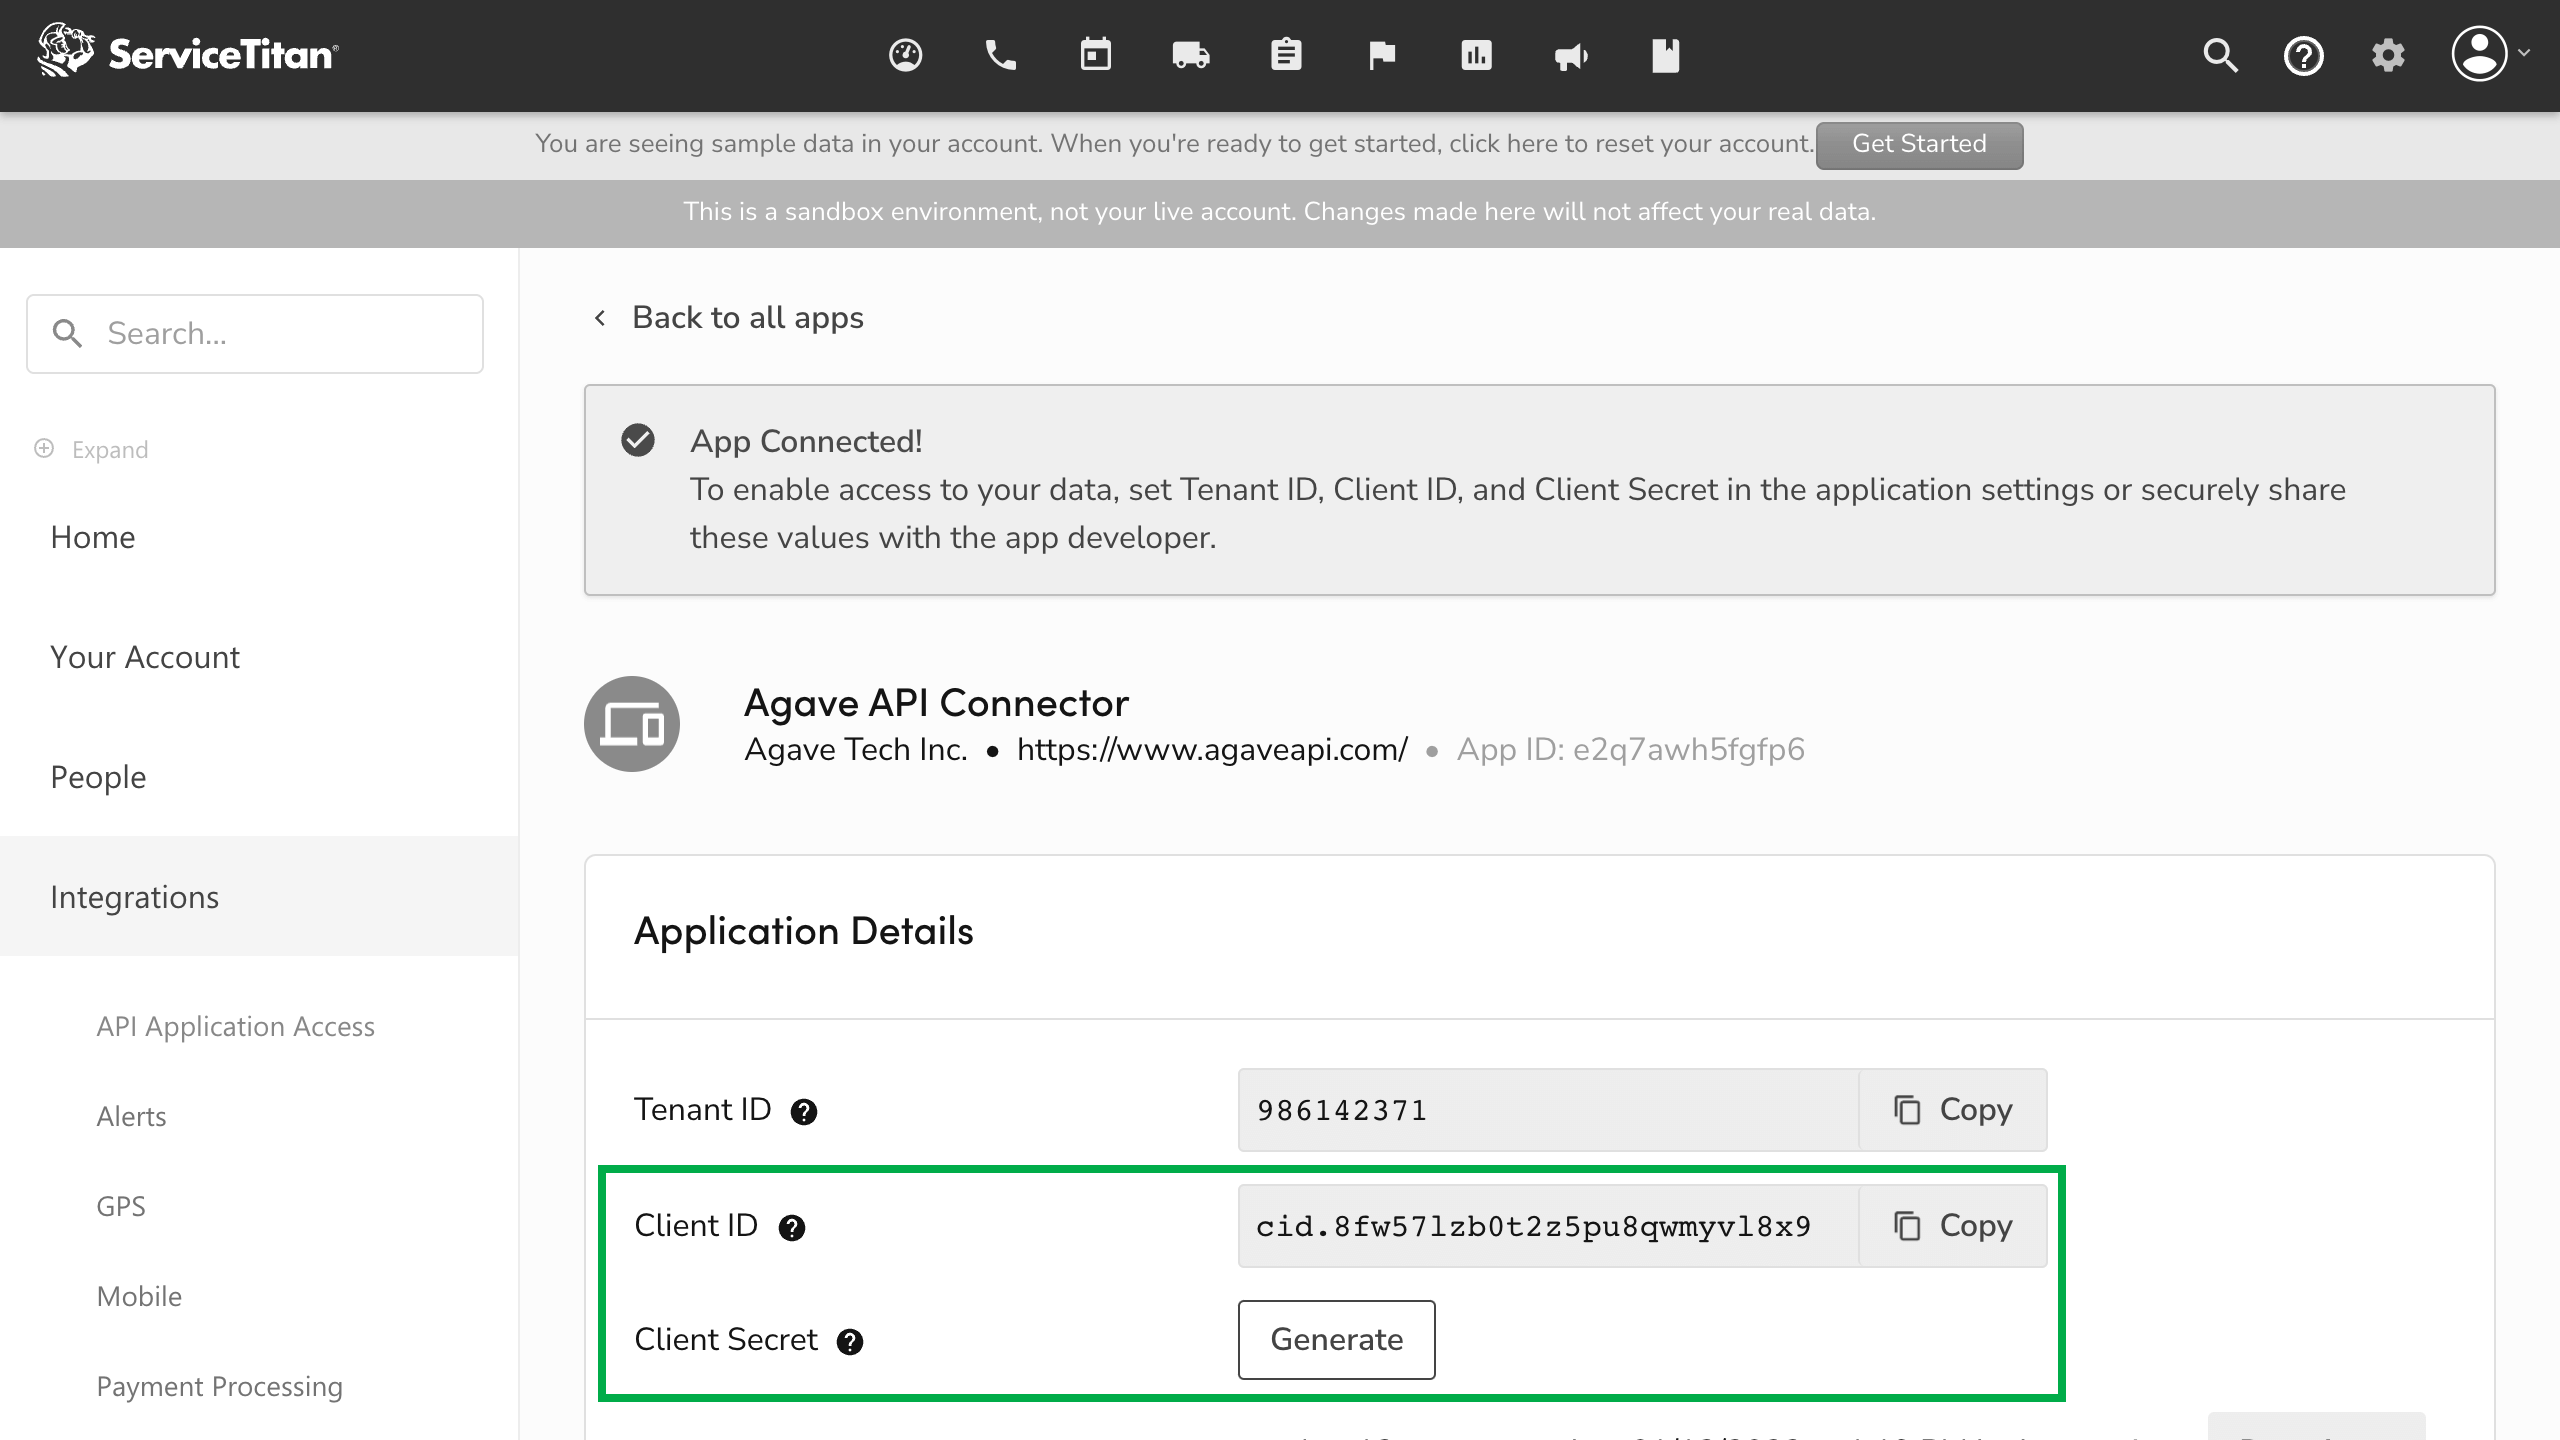
Now that you have connected the Agave API app, you can get your Client Id and Client Secret by pressing "Edit".
Then, you can copy Client Id and generate a Client Secret.
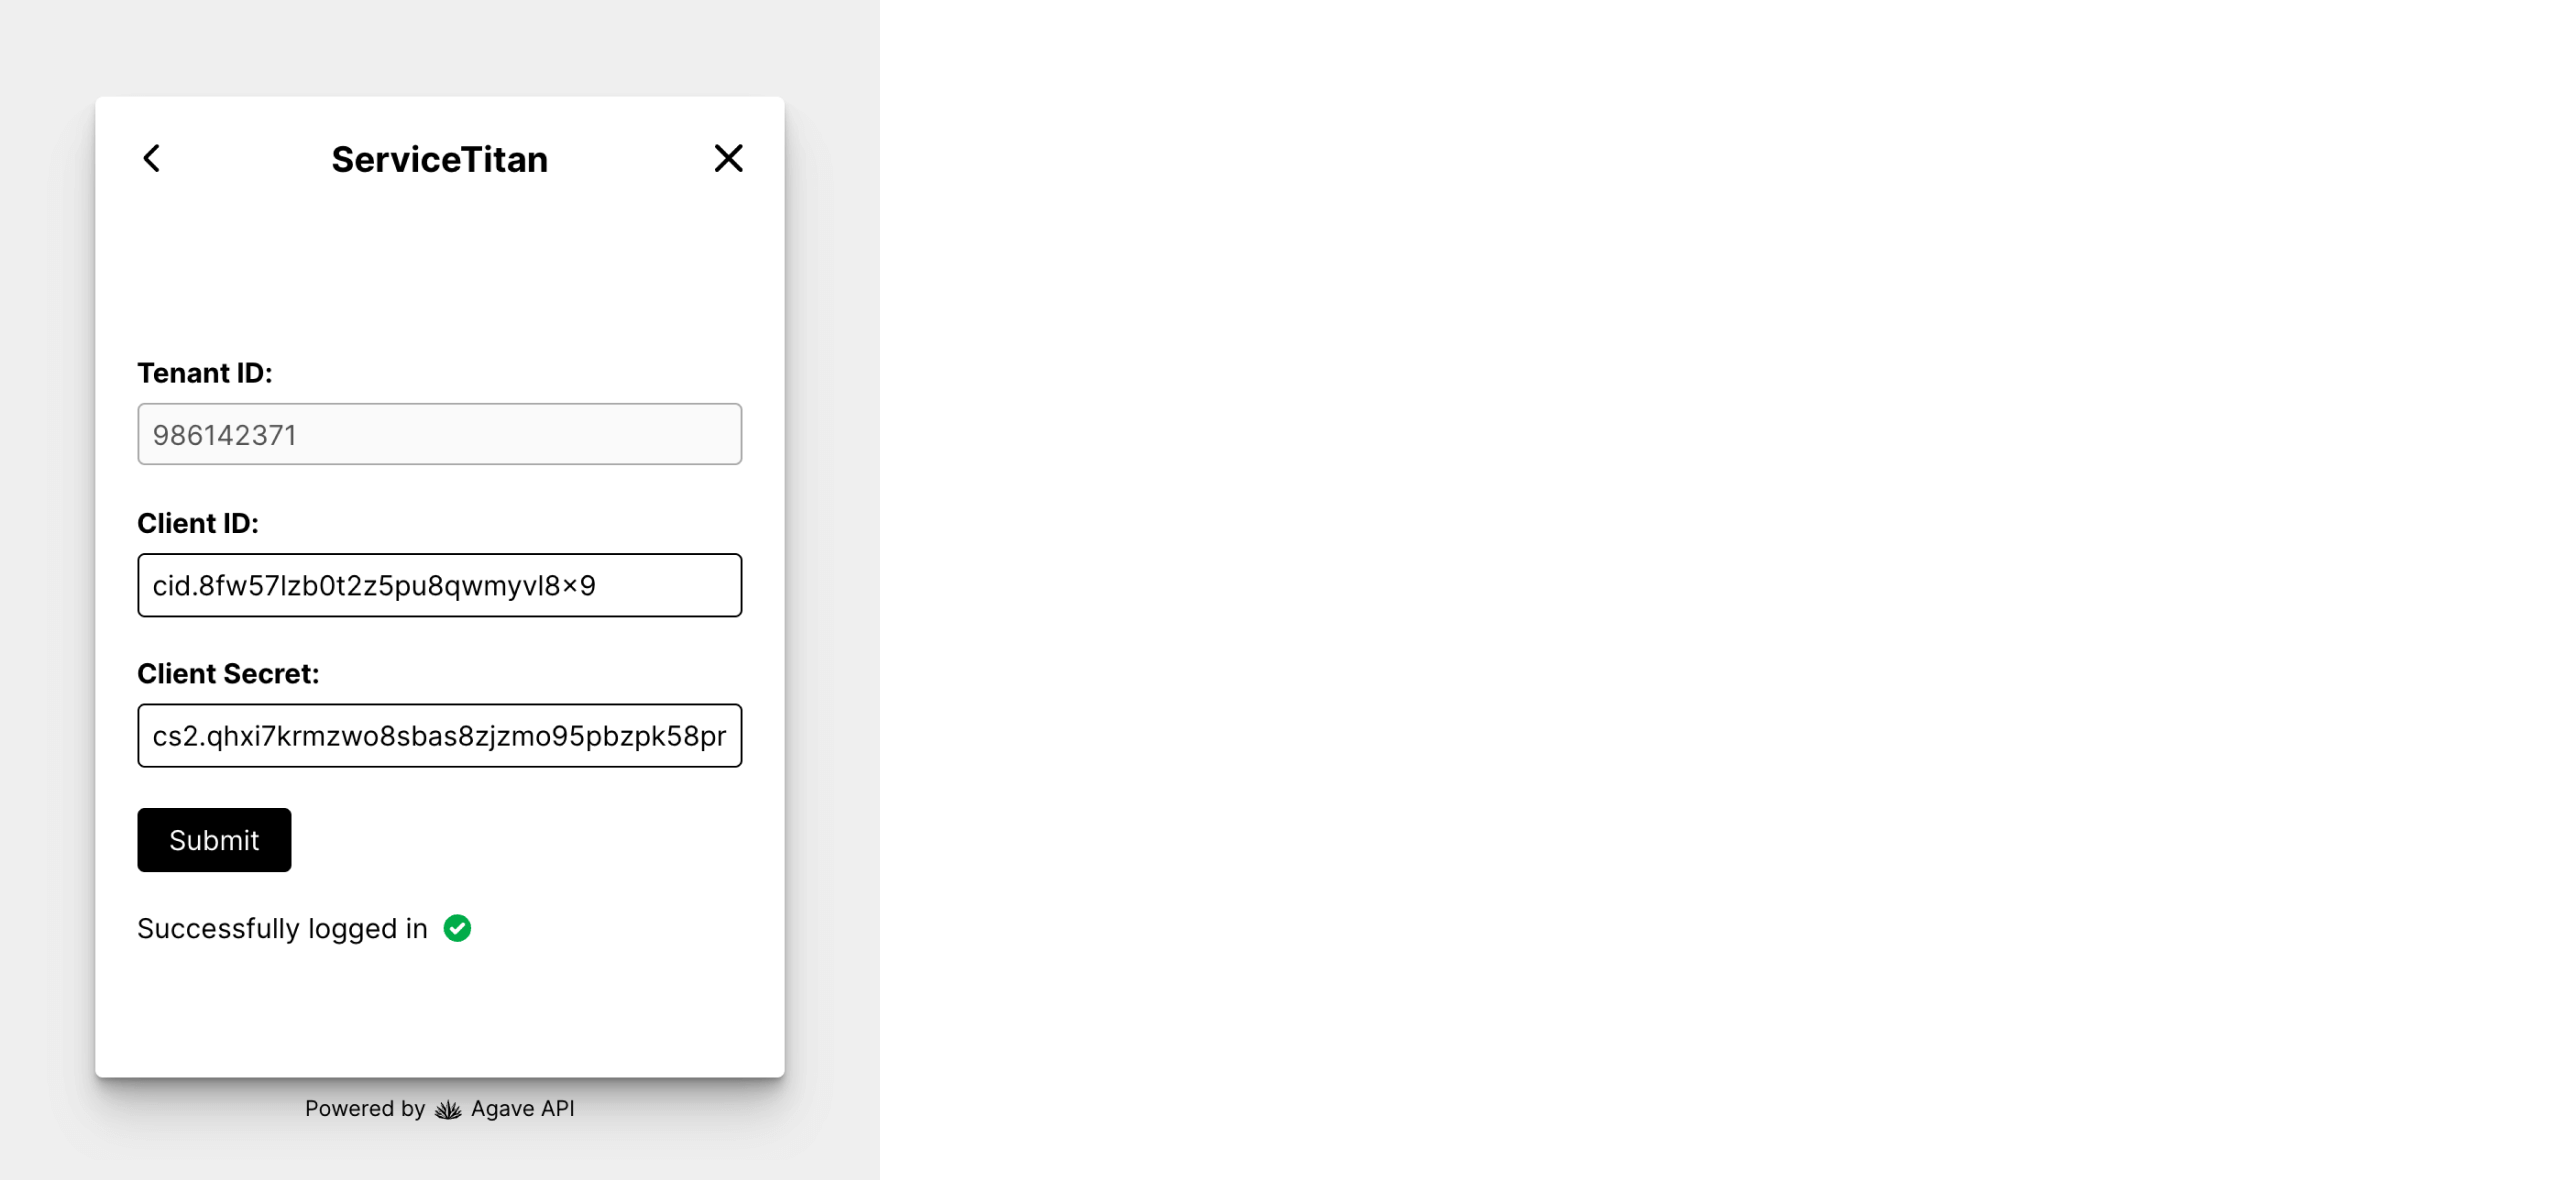
Step 4: Login
With the Client Id and Client Secret, you can now login to ServiceTitan in Agave Link 🎉.
Importing Actual Production Quantities
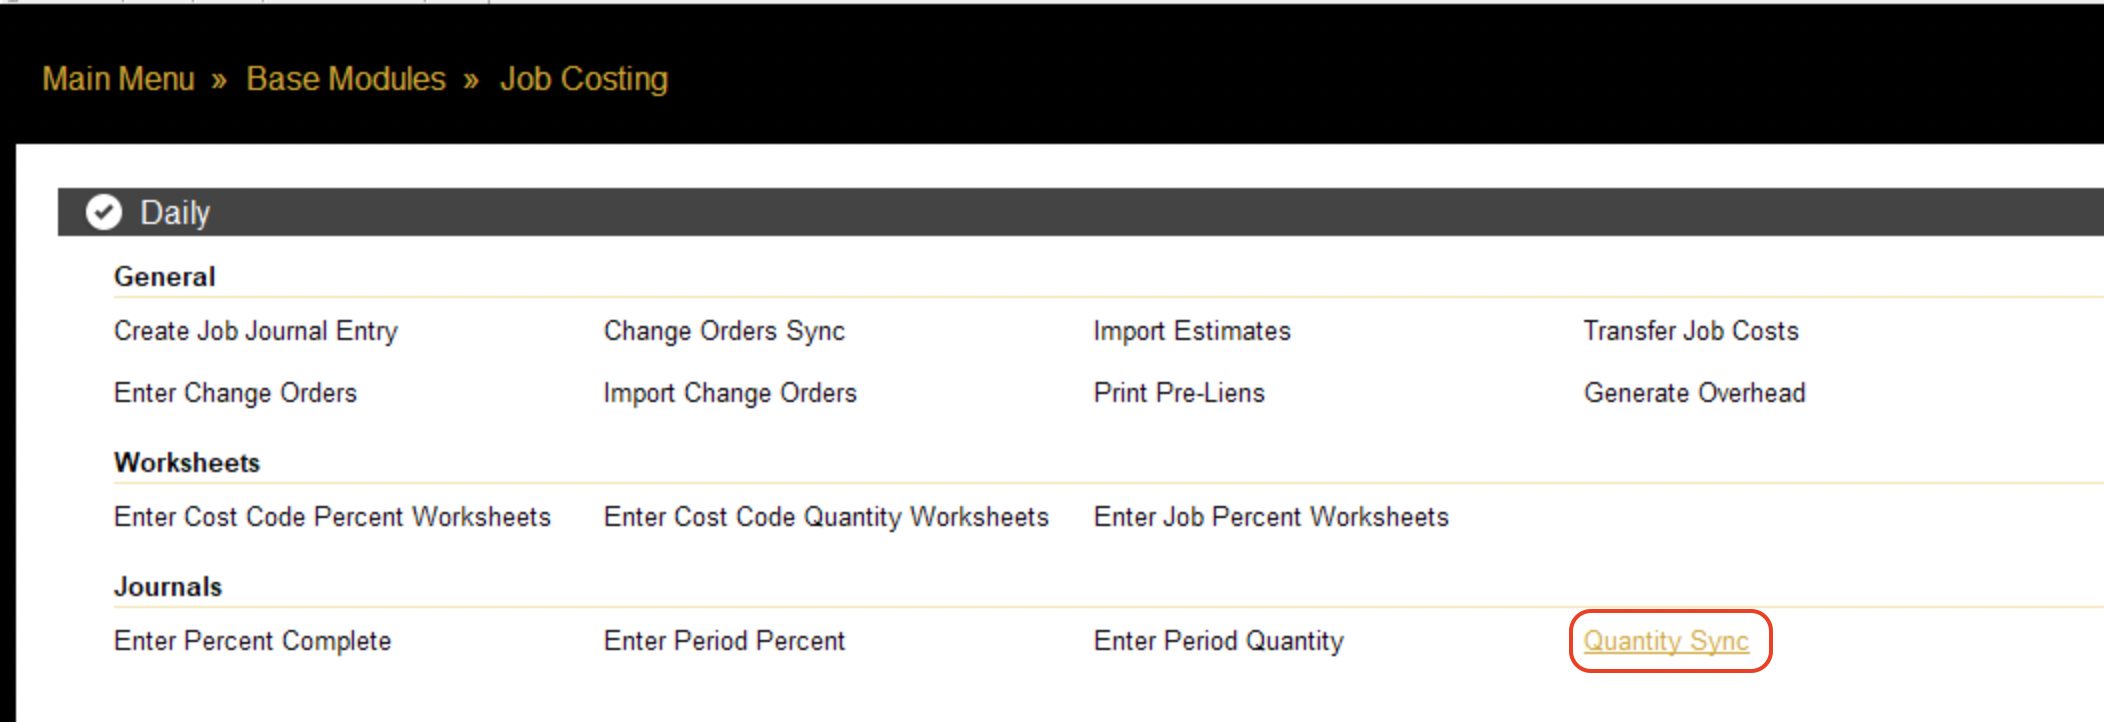
After exporting an Actual Production Quantity, you can find it in Foundation by following these steps:
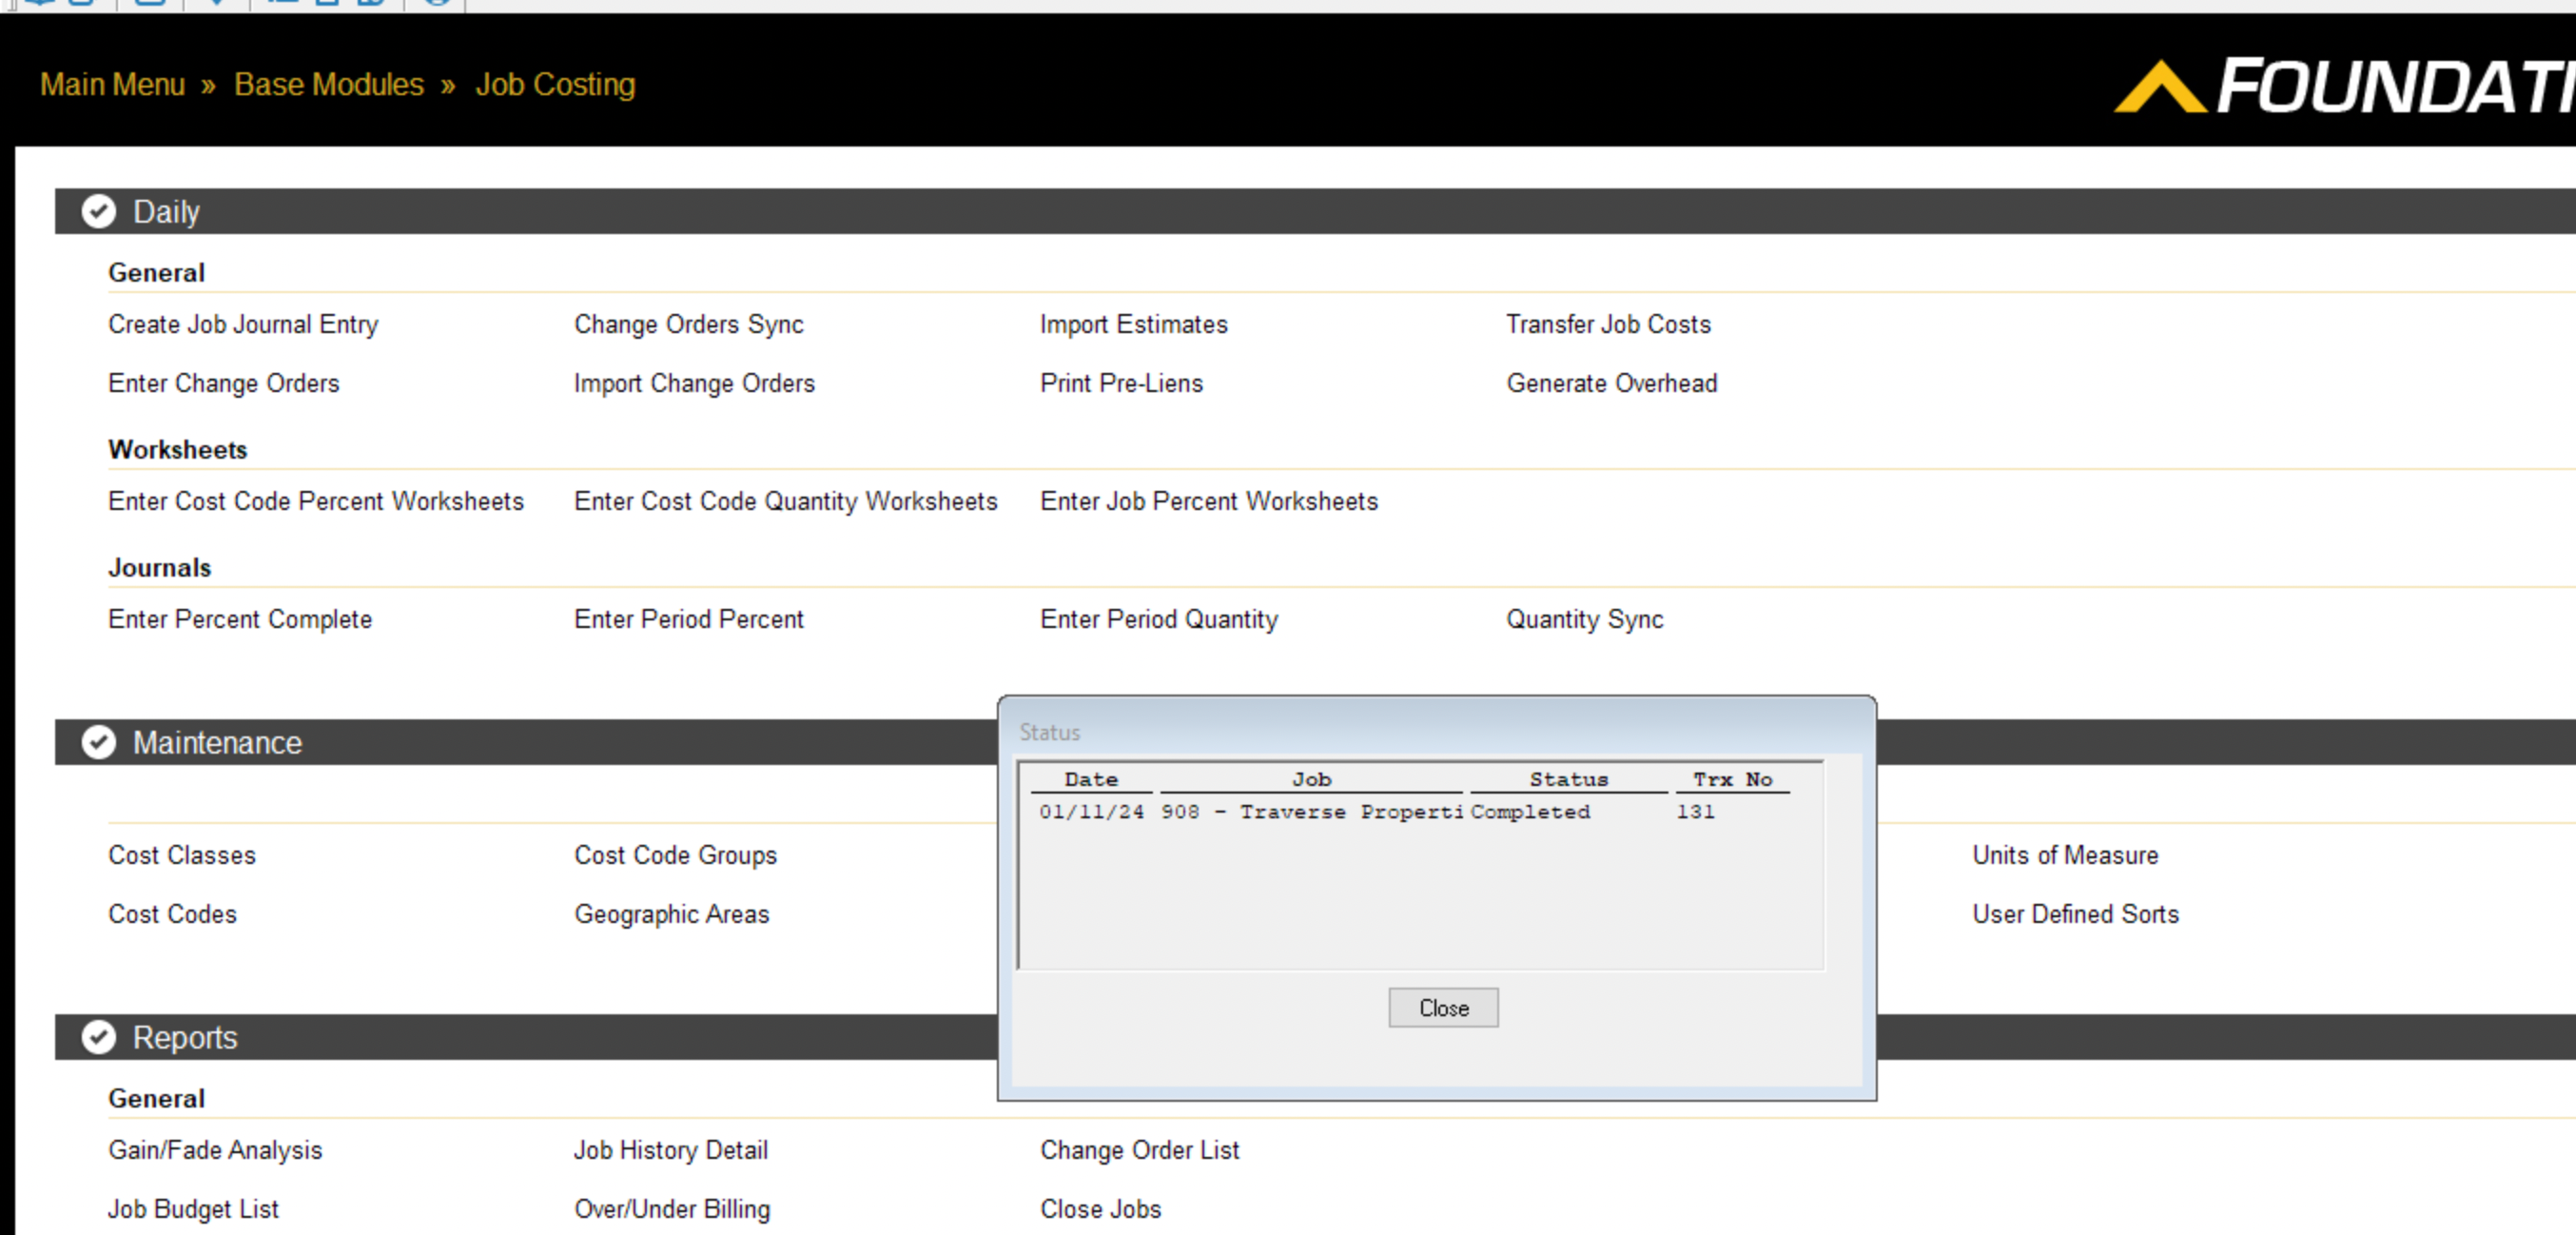
- From the Foundation homepage, go to Job Costing-->Daily-->Quantity Sync:
- Enter criteria and press the Report tab:
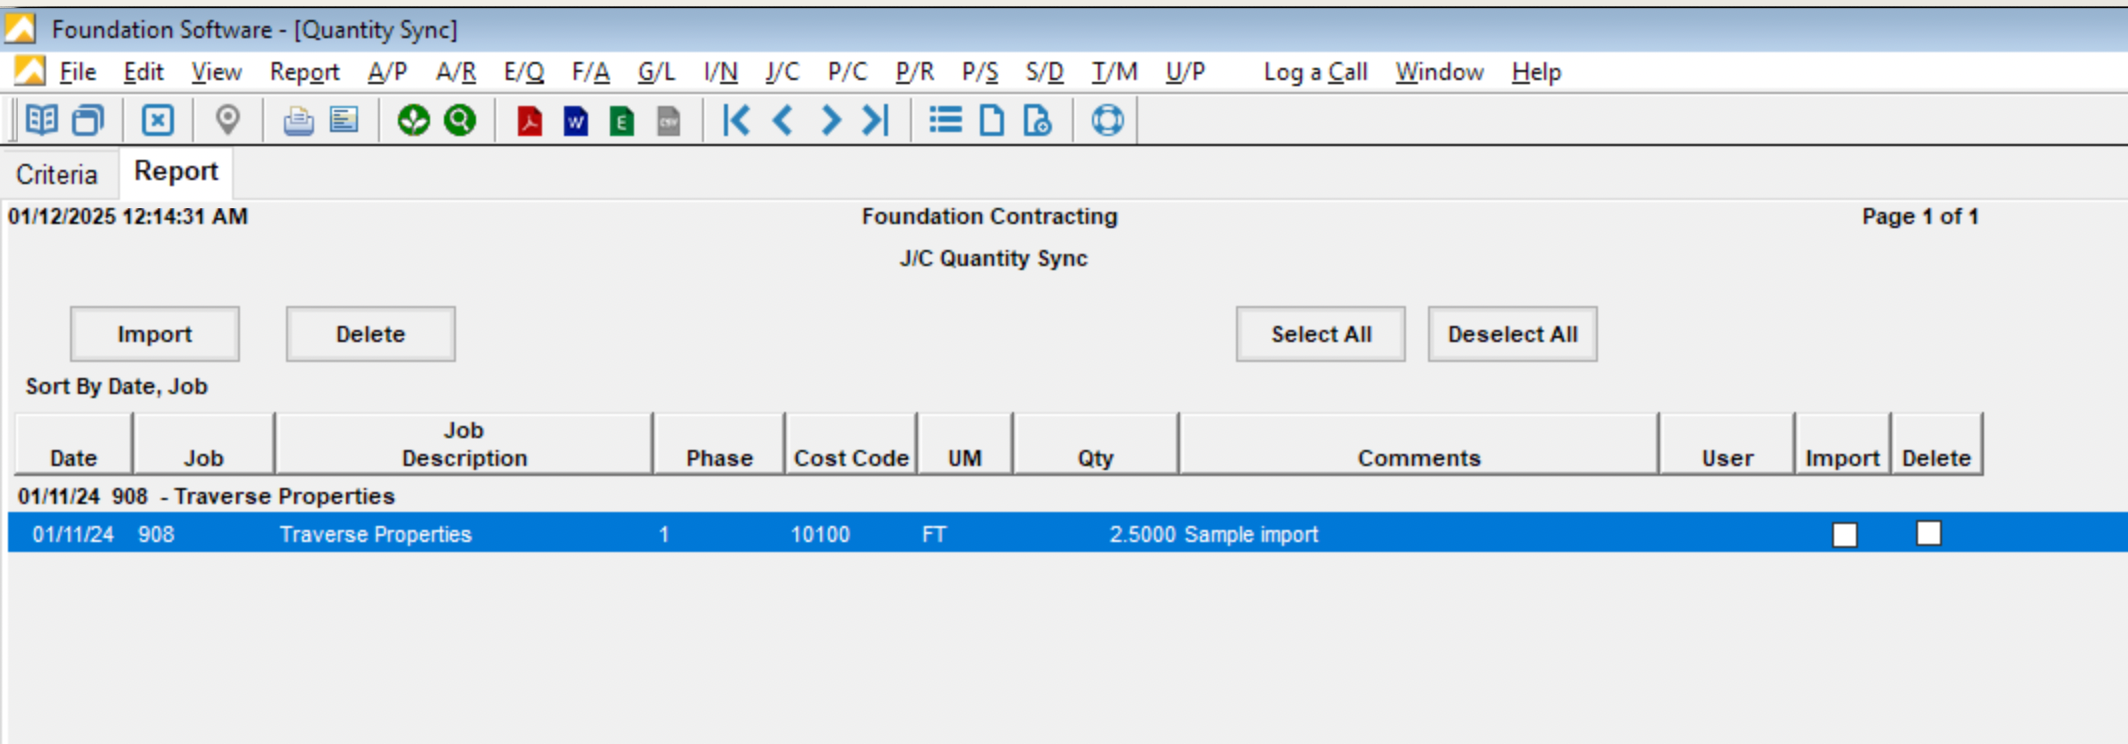
- Select the record and press Import:
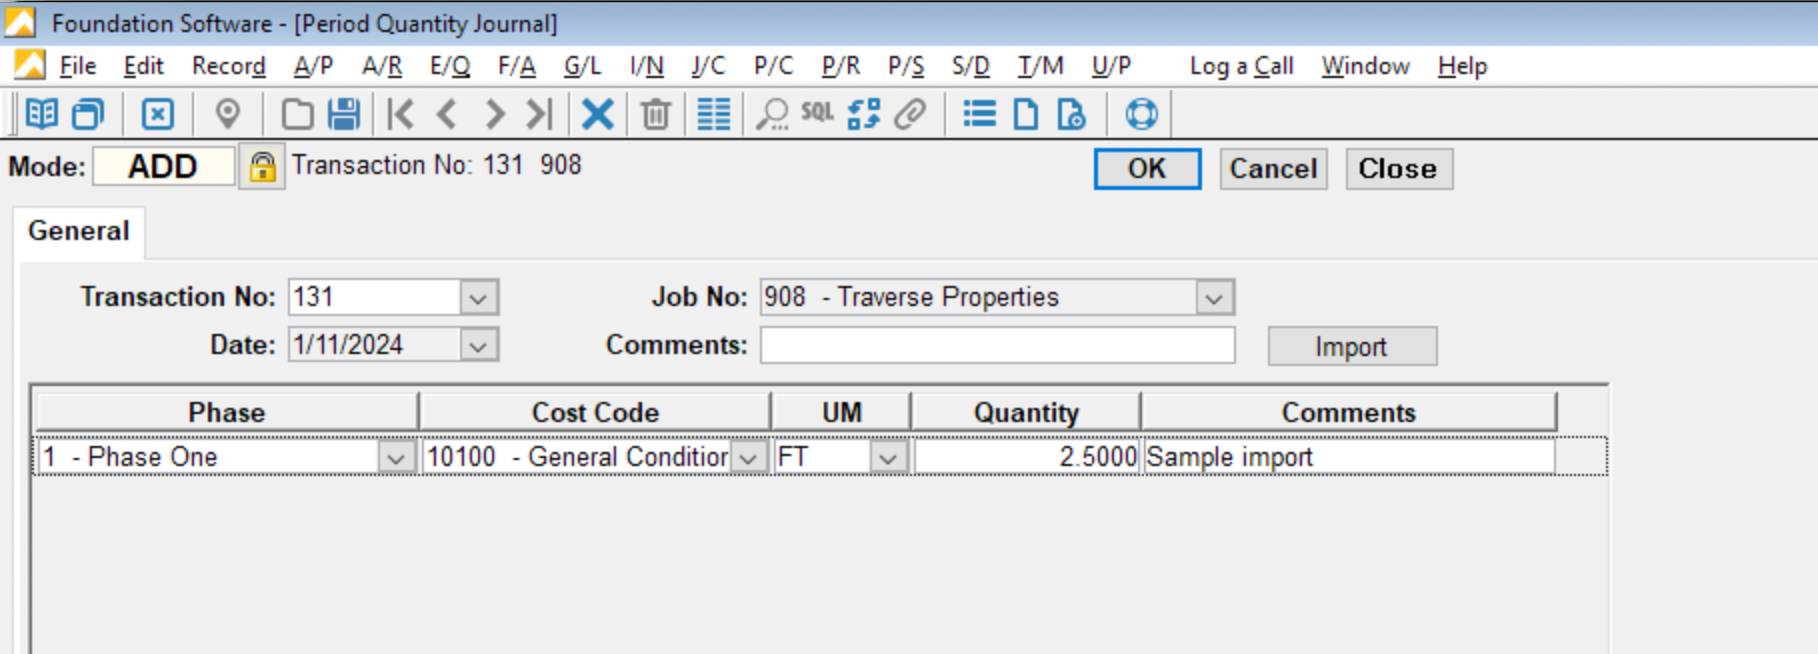
- Press OK to finish the import:
AP Invoices
How does Agave know which AP Invoice FSI Importer defaults to use?
Agave Sync references two locations to determine the FSI Importer defaults:
- For the Expense Ledger Account, Agave Sync uses the same Ledger Accounts references in Subcontracts and Purchase Orders (under System --> Controls --> P/S).
- For other defaults, Agave Sync references the AP Control file in Foundation (under System --> Controls --> A/P). These defaults include:
| Default | Control File | Notes |
|---|---|---|
| A/P G/L Account | Control A/P File | - |
| Cash G/L Account | Control A/P File | - |
| Credit Card G/L Account | Control A/P File | - |
| Discount G/L Account | Control A/P File | - |
| Expense G/L Account | None - see Notes | Defaults to the Expense Ledger Account from the Purchase Order or Subcontract Line Item |
| Division 1 | Control A/P File | - |
| Division 2 | Control A/P File | - |
| Division 3 | Control A/P File | - |
| Division 4 | Control A/P File | - |
| EFT G/L Account | Control A/P File | - |
| Is Phase Enabled? | Control J/C File | - |
| Lien Waiver Flag | Control A/P File | - |
| Payment Type | None - see Notes | Always set to "Regular" |
| Retainage G/L Account | Control A/P File | - |
| Terms | Control A/P File | - |
Do I need to have the FSI Importer installed for AP Invoice syncs to work?
Yes. We leverage the same technology that Foundation uses for the FSI Importer as part of this sync.
Do I need the Agave Connector to be opened/minimized for AP Invoice syncs to work?
Yes - we recommend keeping it open and minimized.
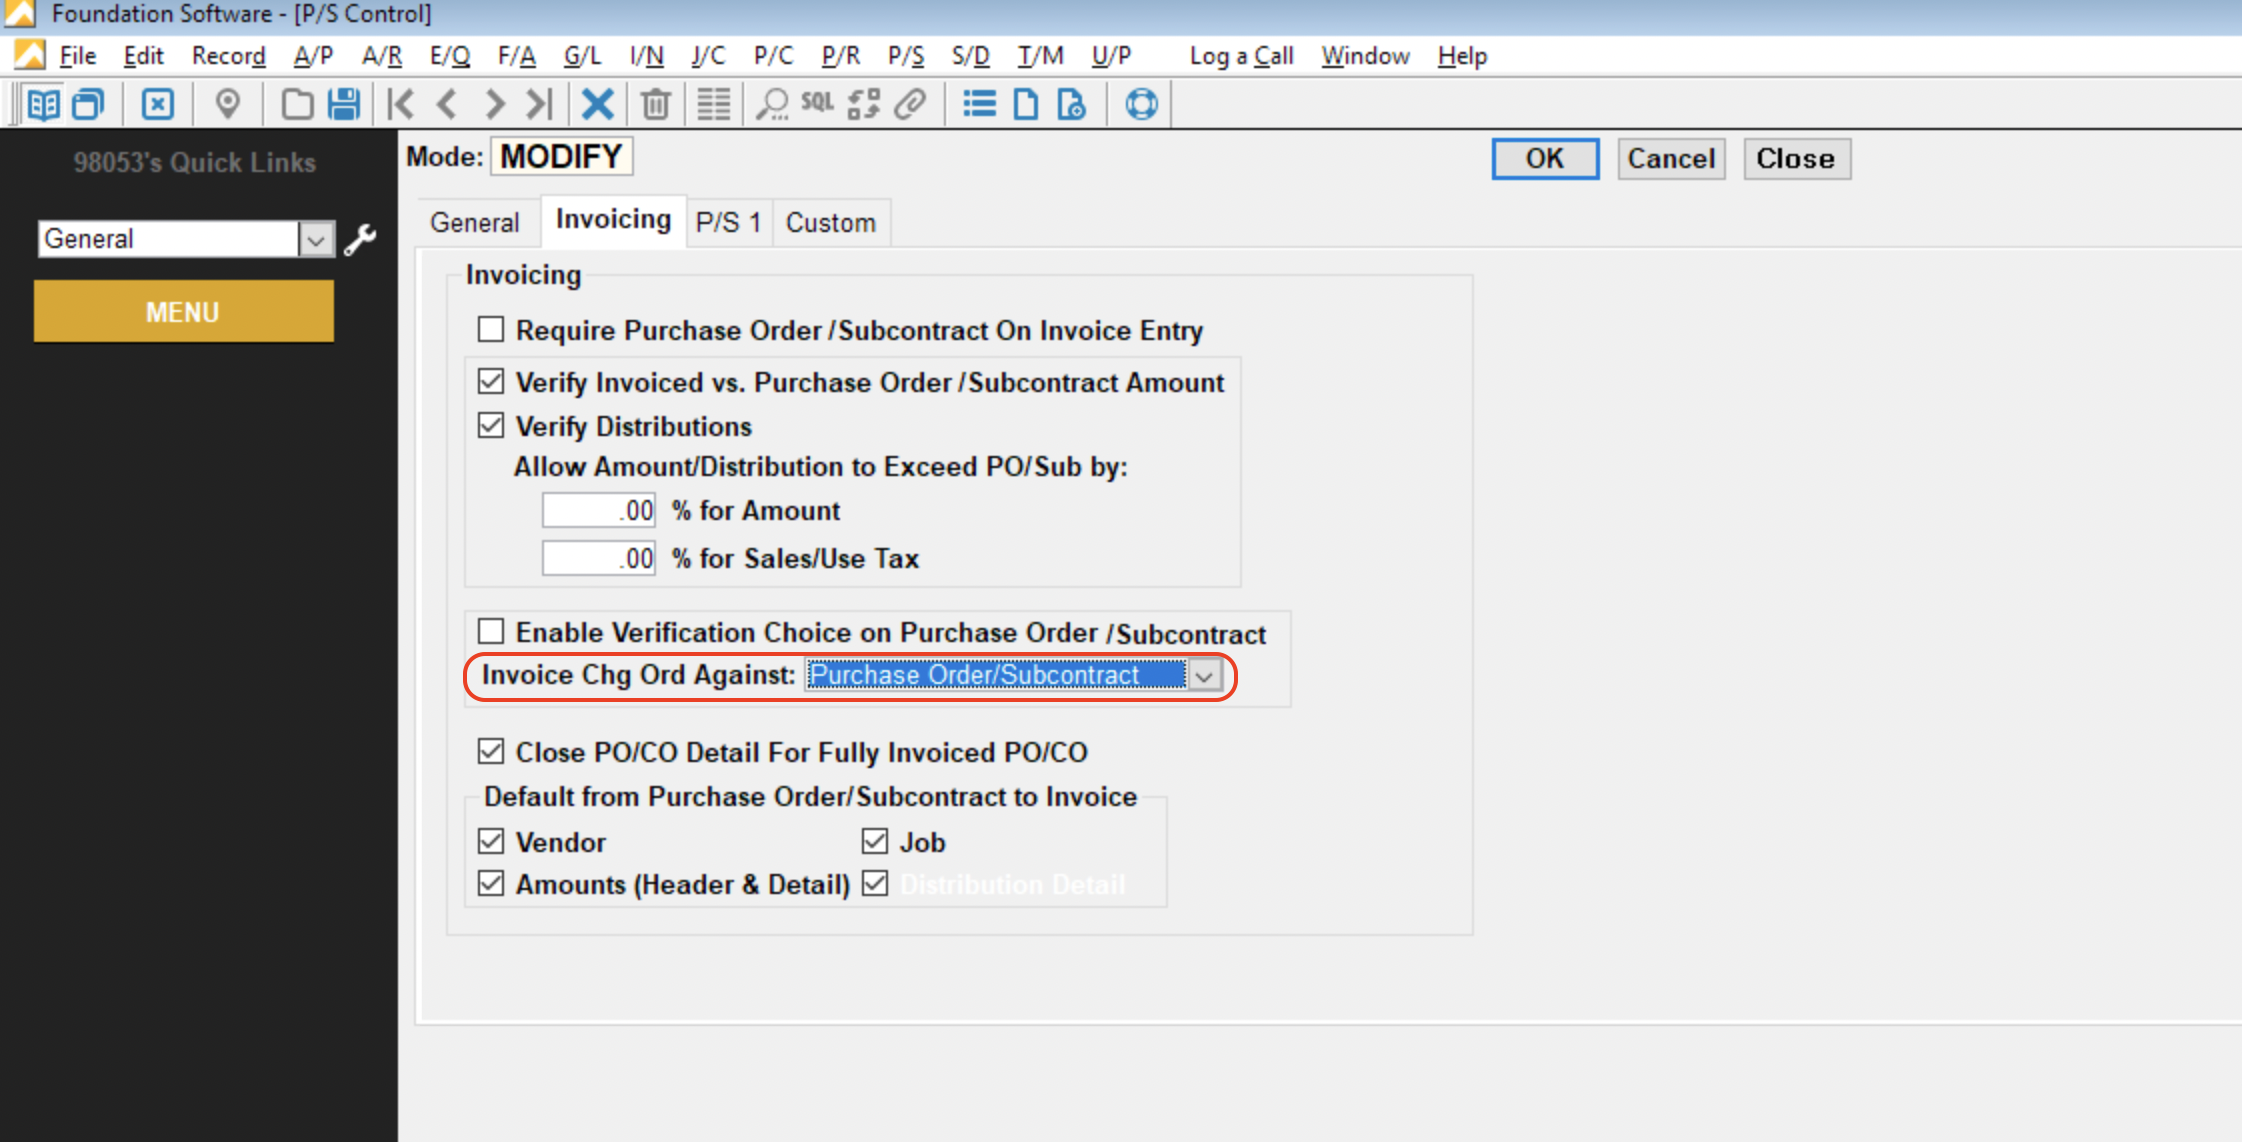
Can I sync AP Invoices against Subcontract or Purchase Order Change Orders?
Yes insofar as you have the following setting in Controls-->P/S-->Invoicing enabled:
Is releasing retention supported?
No, releasing retention is not supported in sync for Foundation.
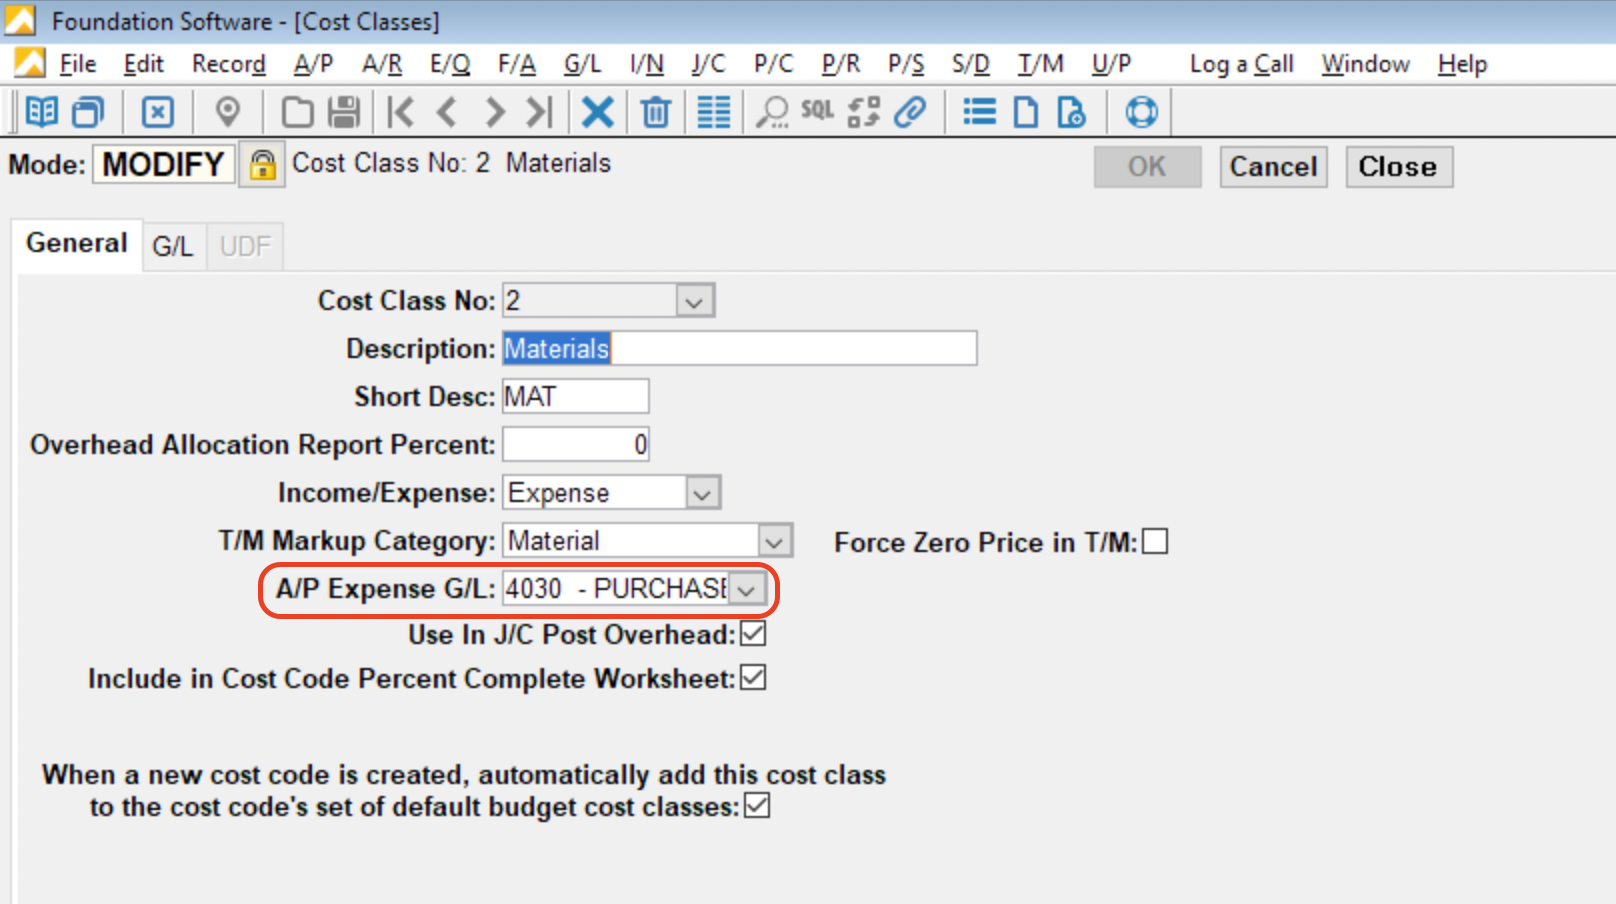
Error: No Ledger Account ID found for provided Foundation Cost Type.
Foundation requires a Ledger Account ID for AP Invoice line items. Since Procore does not have a Ledger Account field in Subcontractor Invoices, Agave Sync uses the value from the A/P Expense G/L field for the Cost Type (Cost Class). If this field is not populated, Agave Sync will generate an error.
AR Invoices
Is releasing retention supported?
No, releasing retention is not supported in sync for Foundation.
Error: The Ledger Account ID Field is Required
Foundation requires a Ledger Account to be applied when exporting AR Invoices from other systems. Because your Project Management System does not have Ledger Accounts, you will need to supply your Agave Account Manager with default (1) Accounts Receivable, and (2) Accounts Receivable Retention Ledger Accounts that you would like Agave to apply to all AR Invoices exported from your Project Management System going forward.
Note these two Ledger Accounts appear in the G/L section of the A/R Enter Invoices form in Foundation:
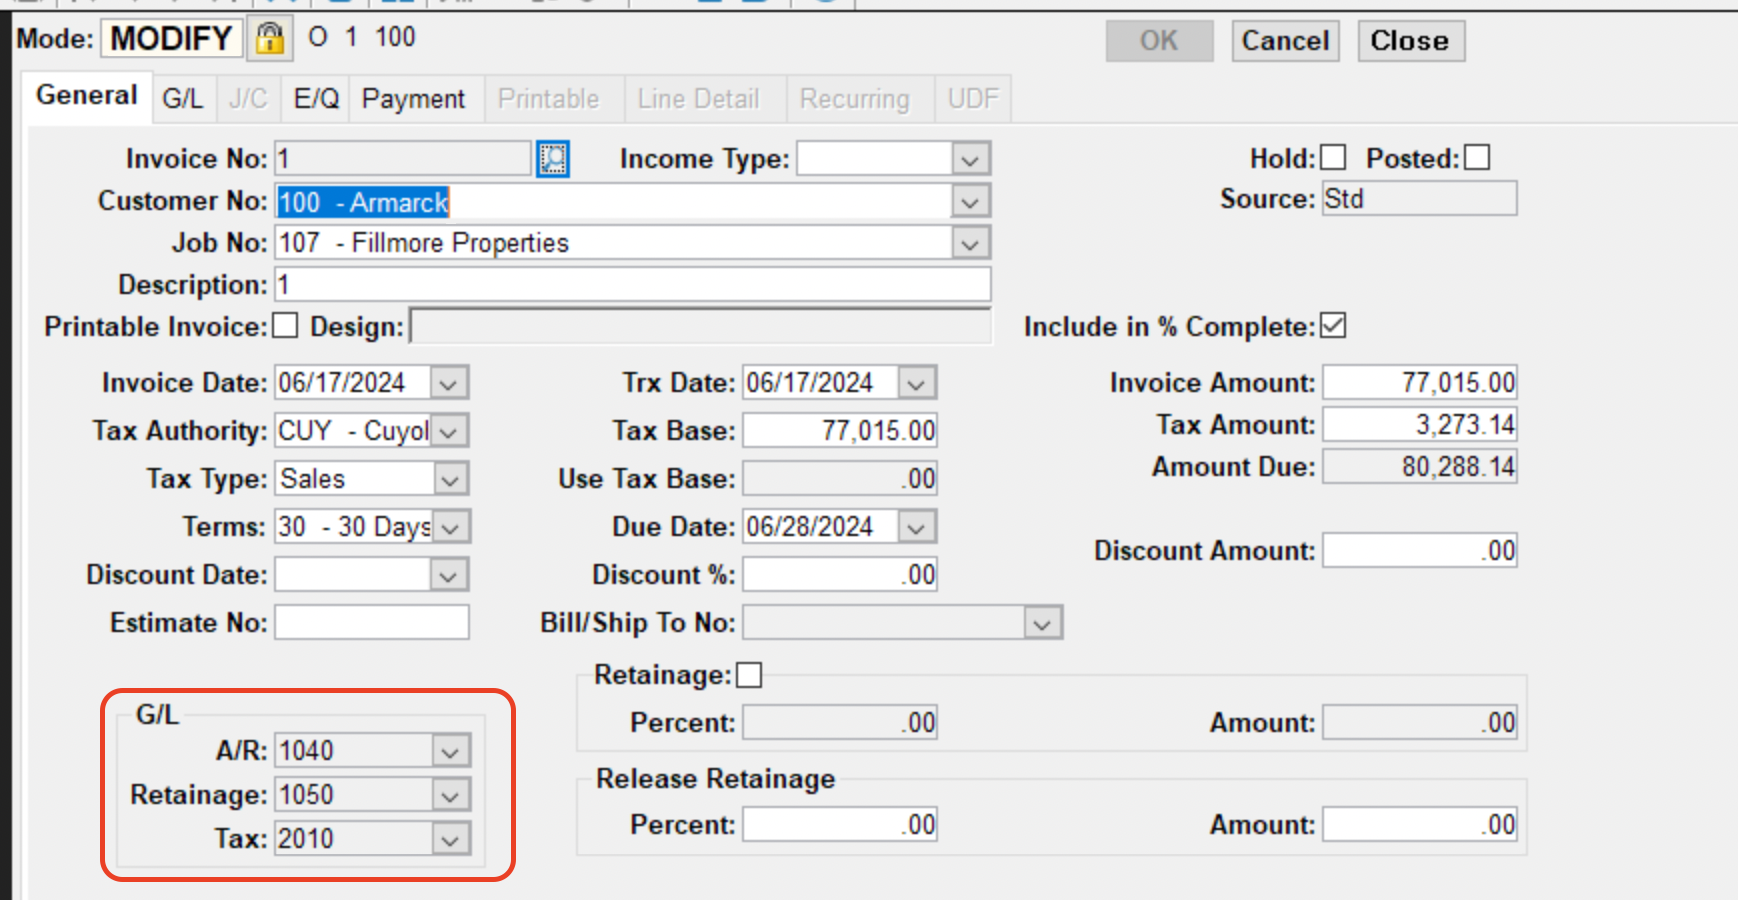
Error: The Retainage GL Account is Required
Foundation also requires a Retainage Ledger Account to be applied when exporting AR Invoices from other systems. Because your Project Management system does not have Ledger Accounts, you will need to supply your Agave Account Manager with a default Retainage Ledger Account (e.g. "Accounts Receivable - Retention") that you would like Agave to apply to all AR Invoices exported from your Project Management System going forward.
Agave Sync does not yet support retention releases.
Error: AR Invoice with Code "#" Already Exists
Agave uses Foundation's built-in "Next Number" feature when creating AR Invoices in Foundation. If you receive the error Foundation: An AR Invoice with code "X" already exists, it is from the "Next Number" already being in use in Foundation.
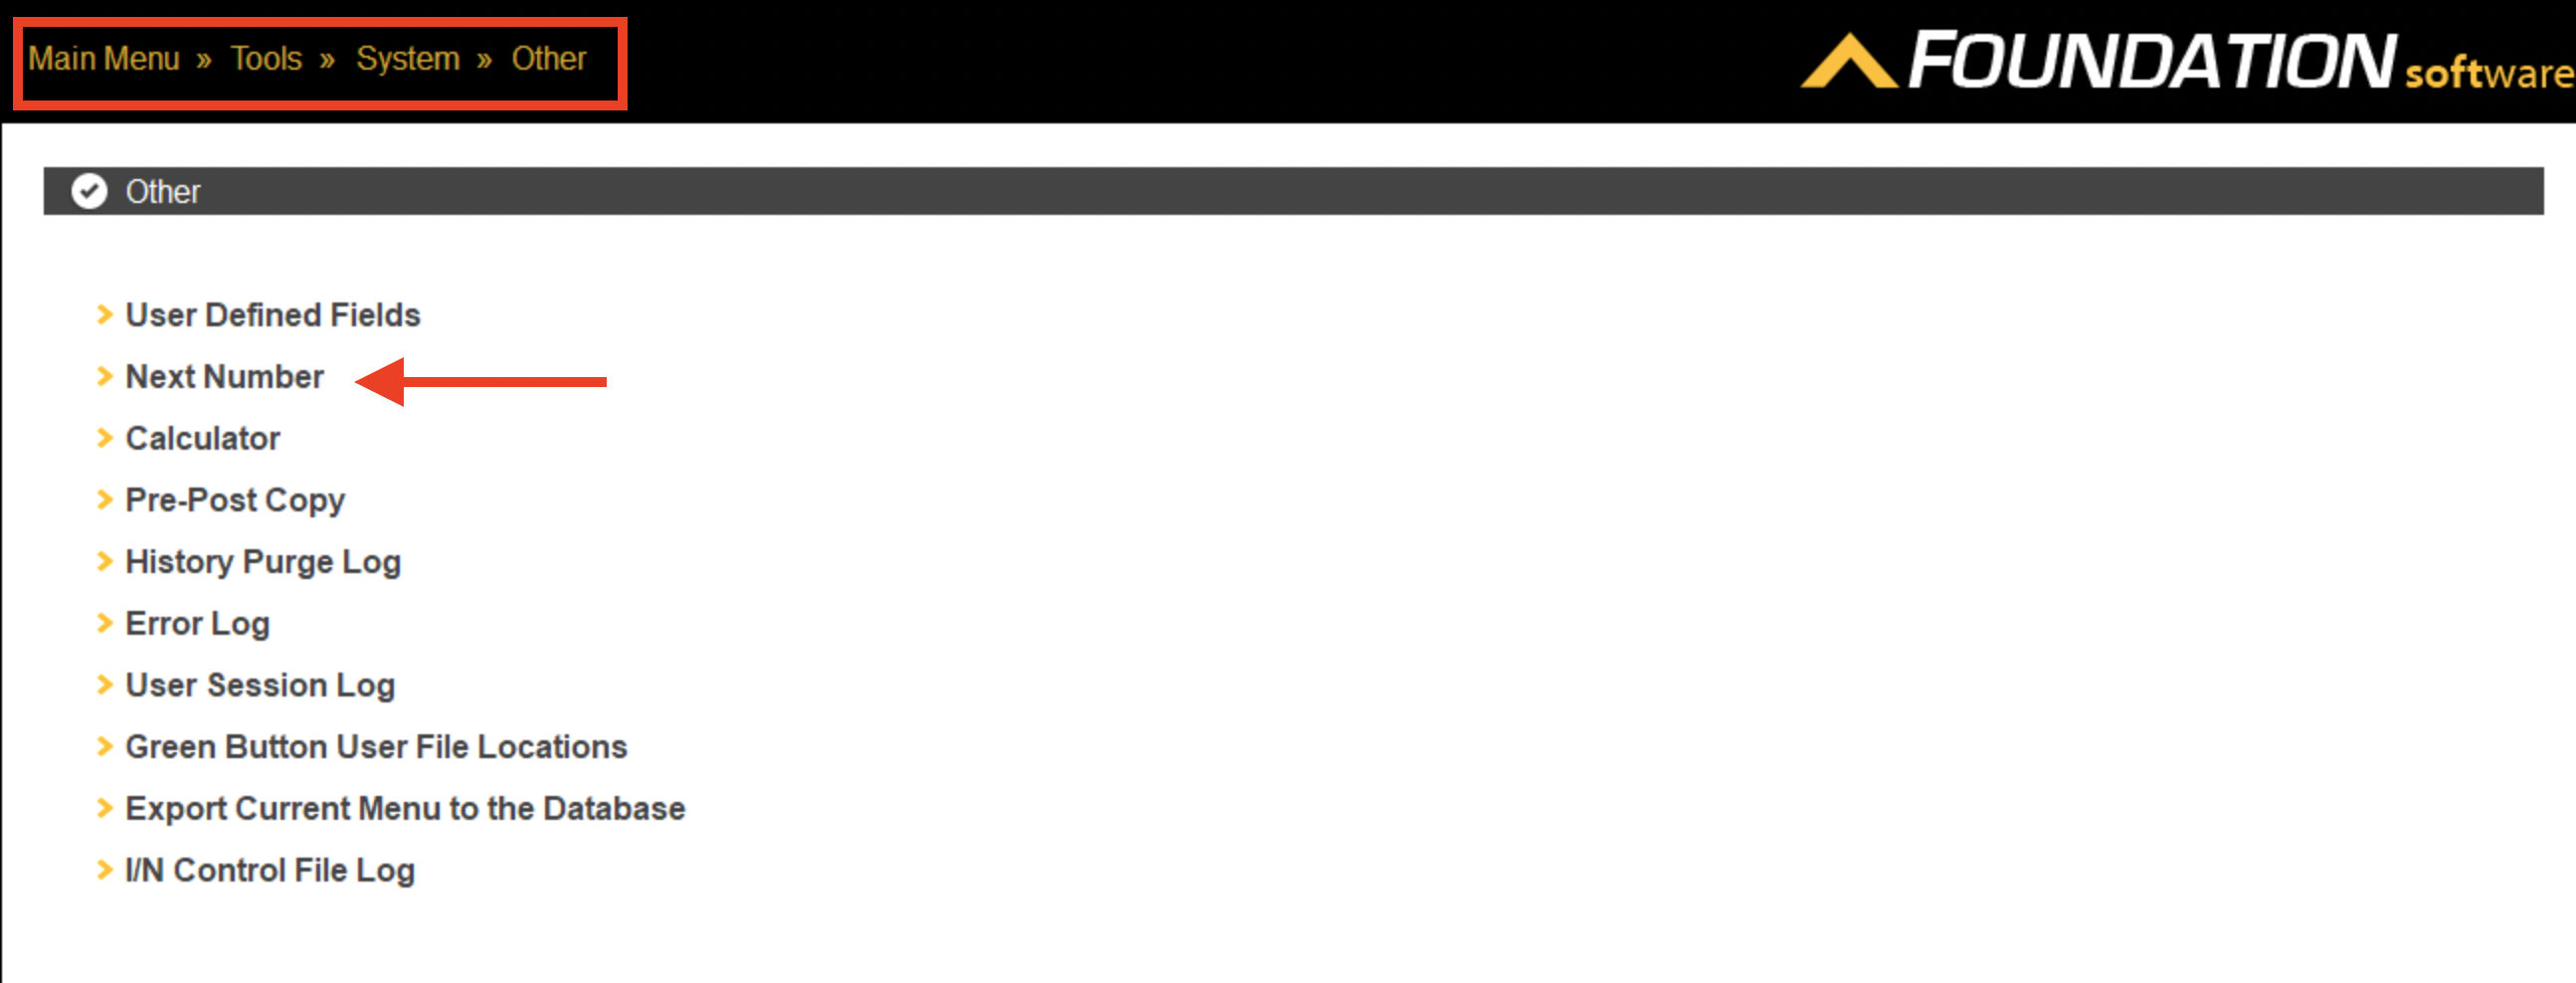
To reset the "Next Number" in Foundation:
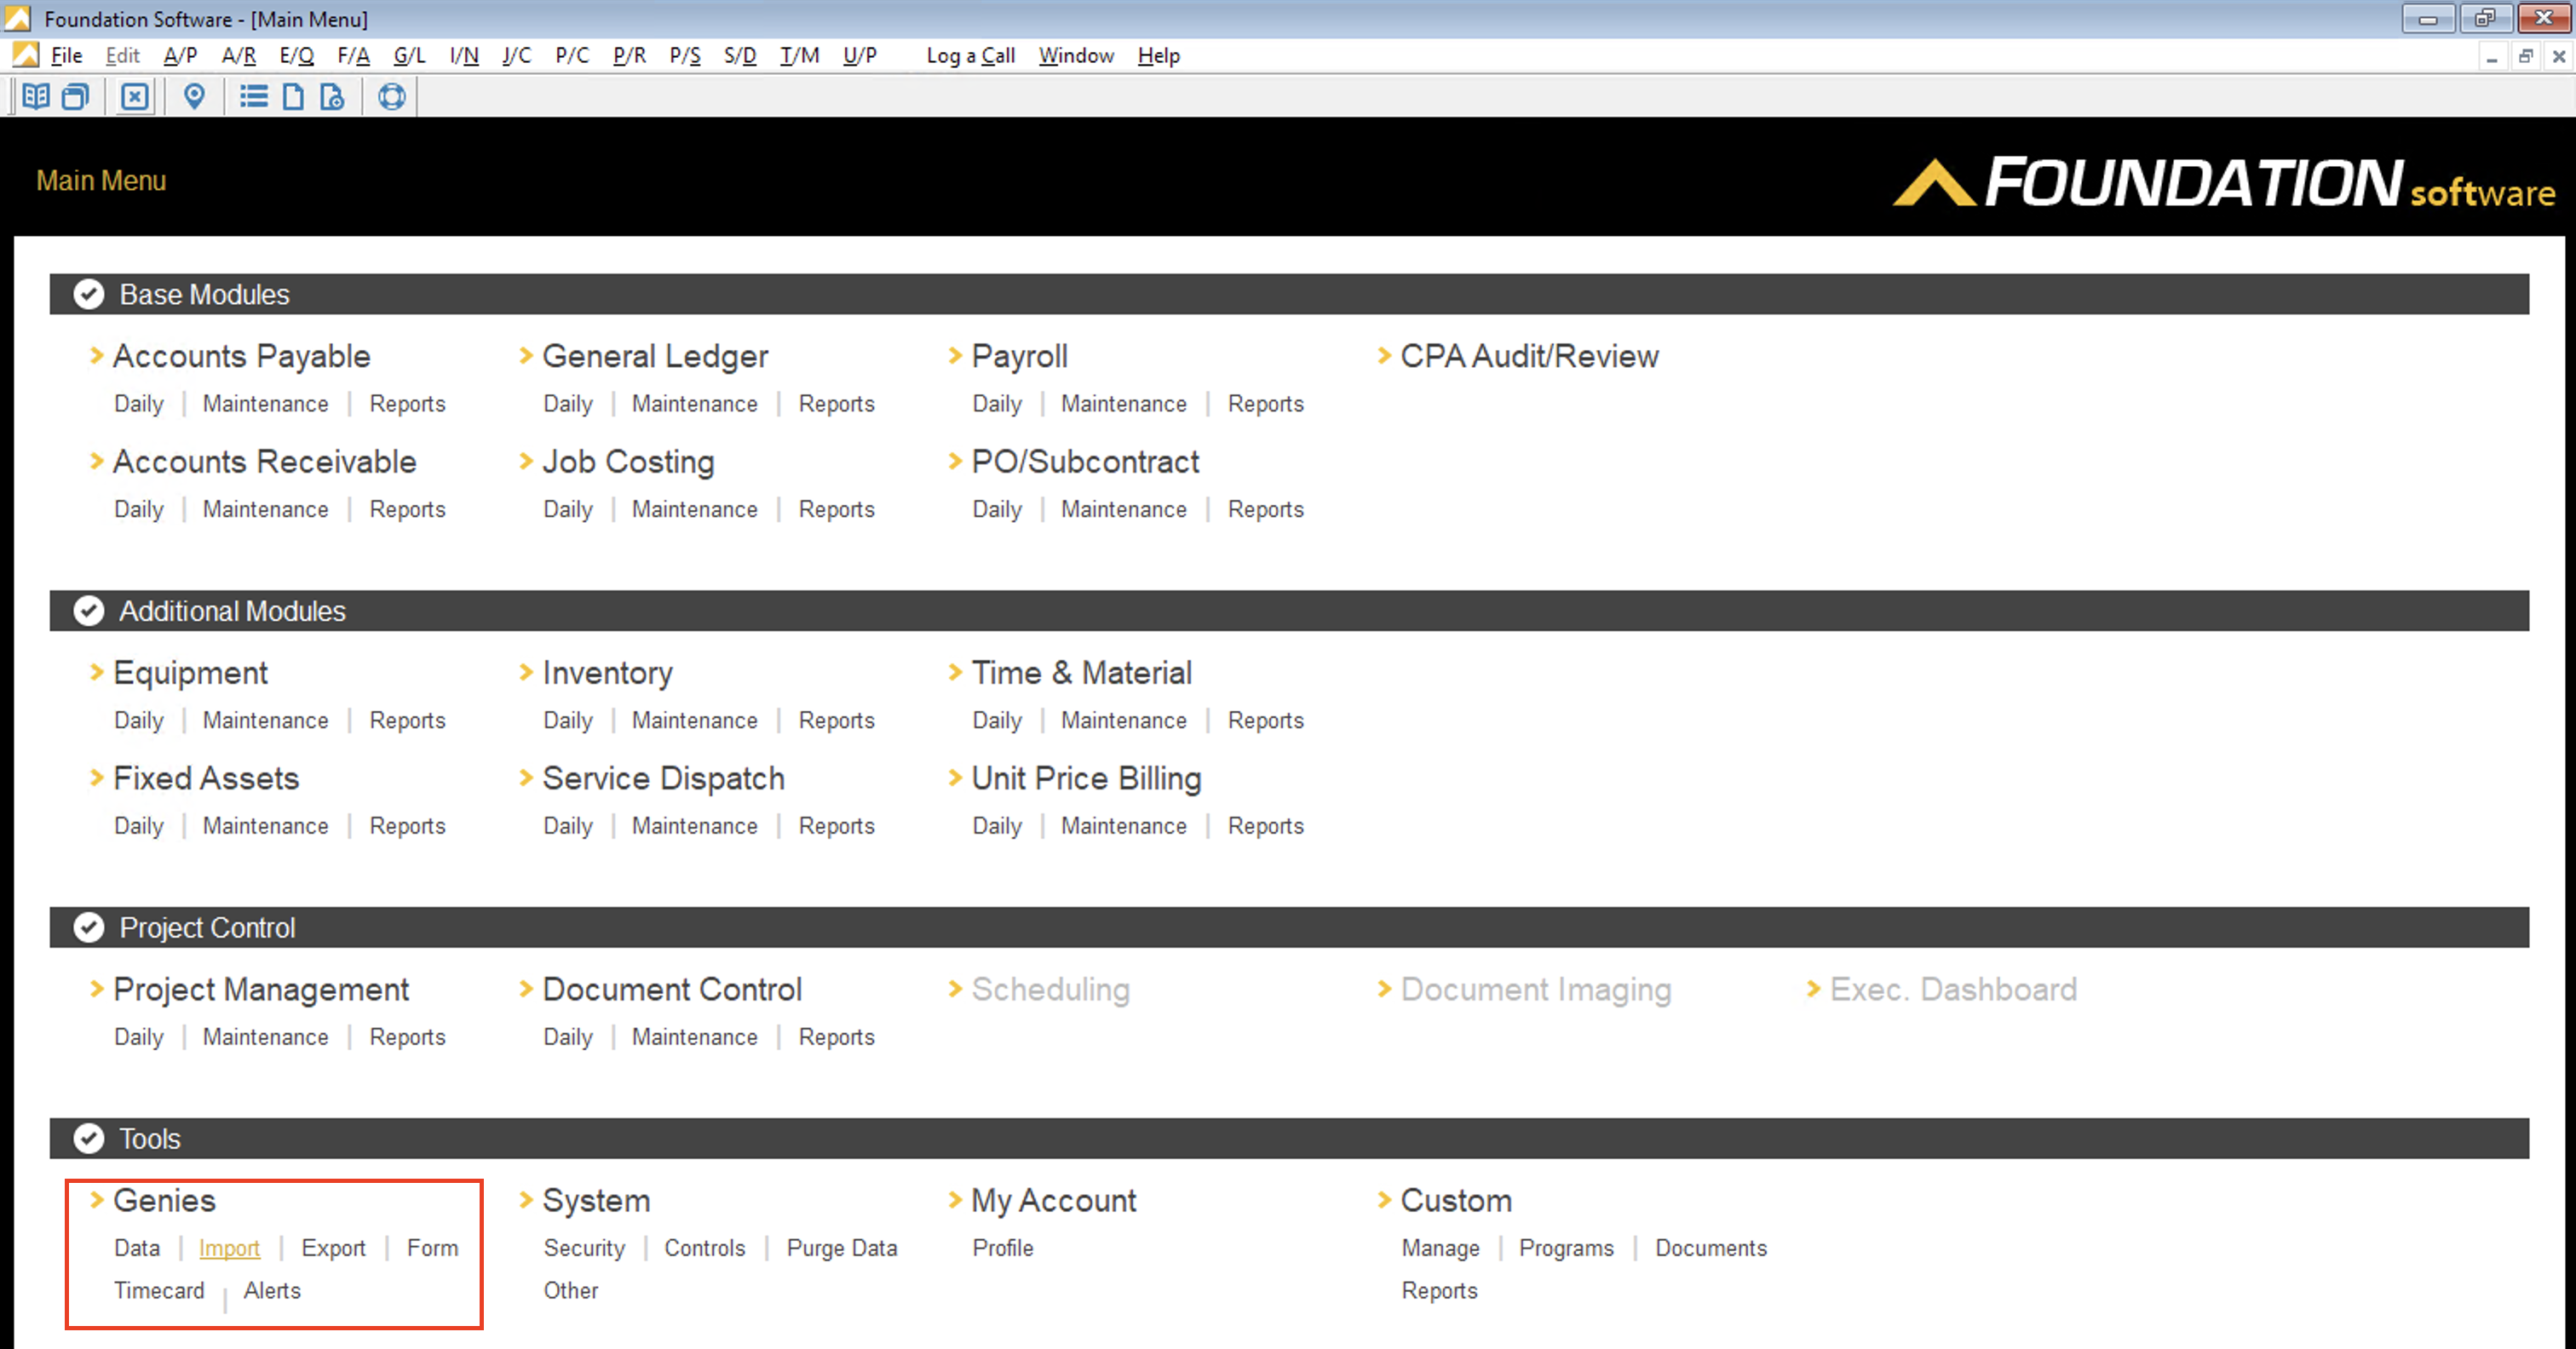
- Navigate to Main Menu > Tools > System > Other and select Next Number:
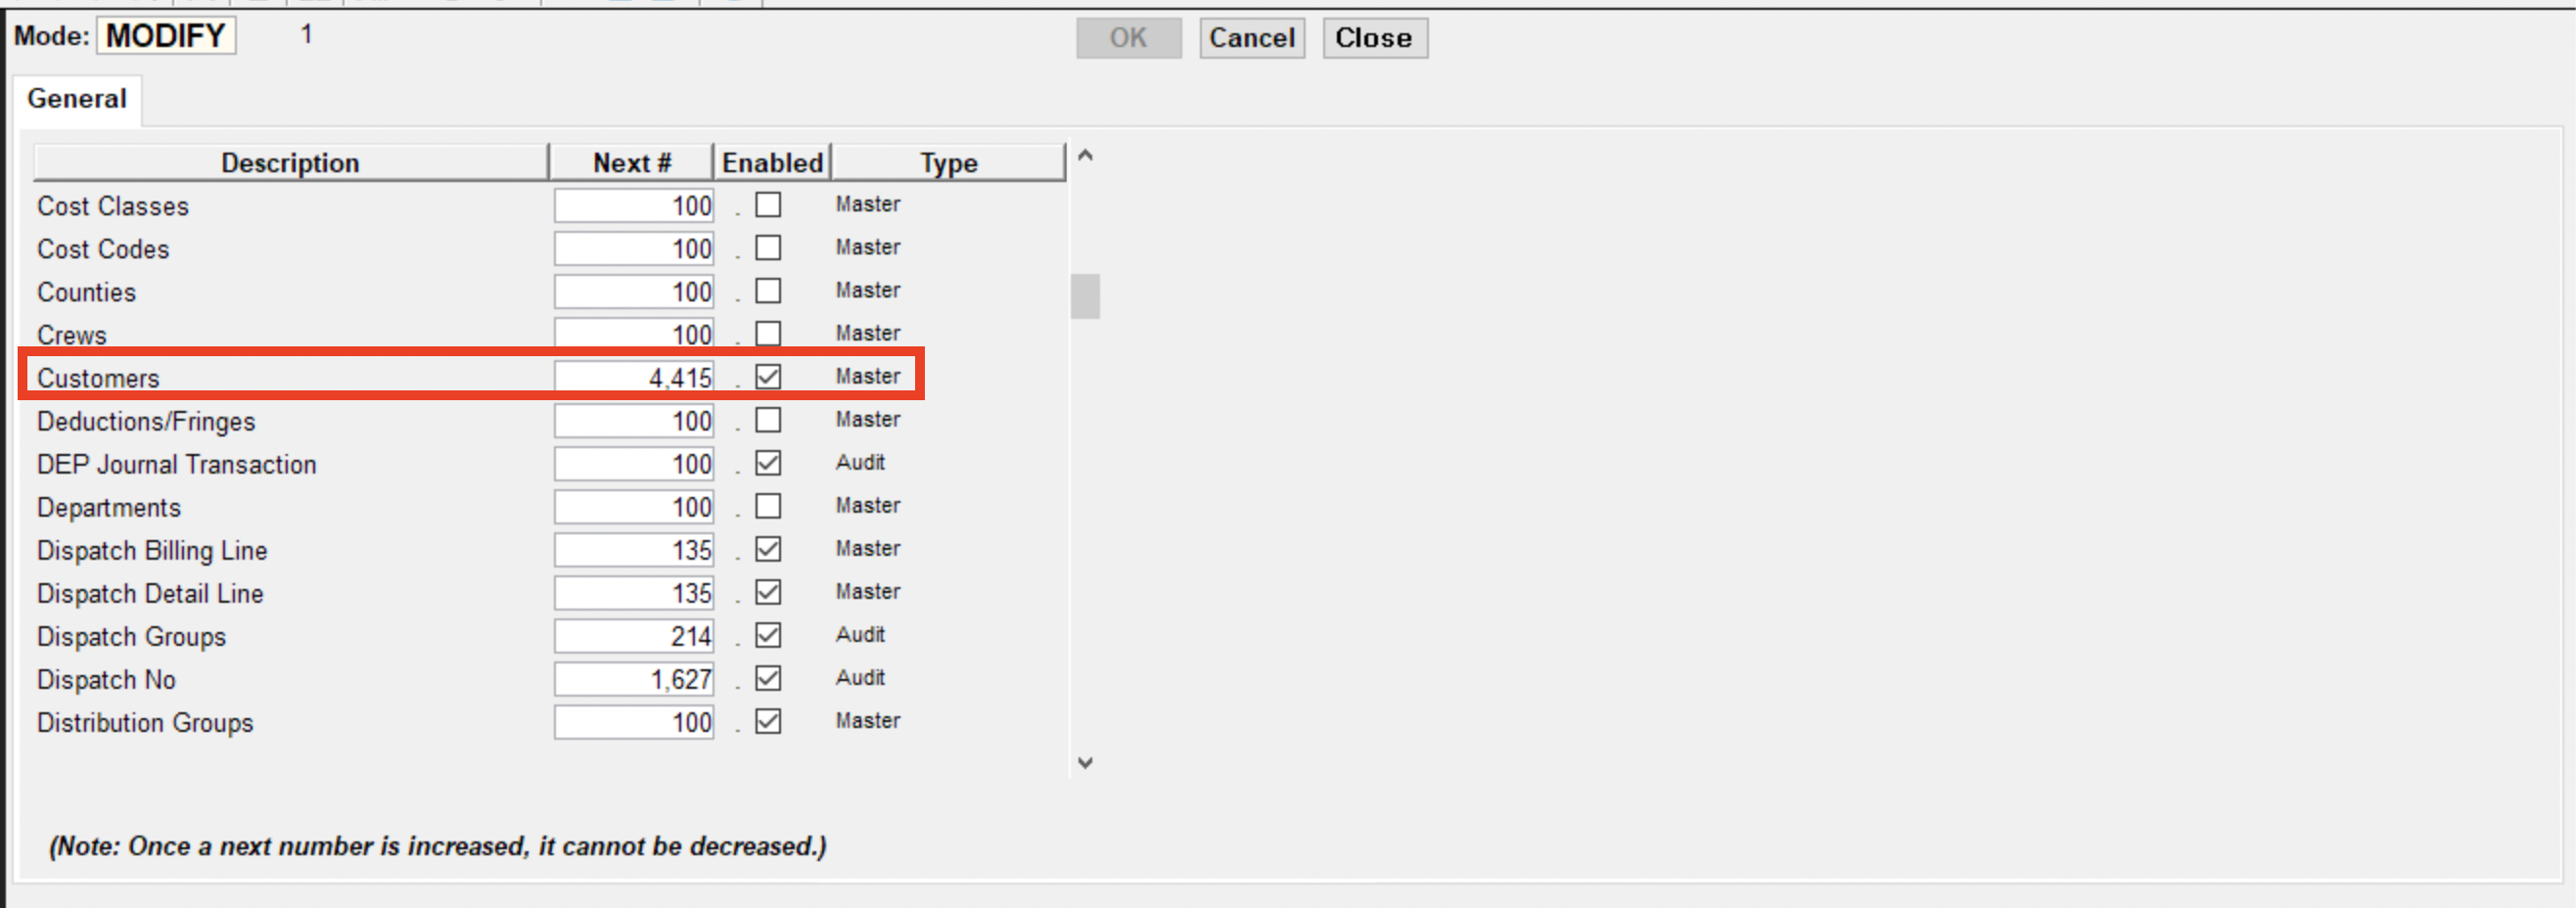
- Select the relevant data type (Customer in this example) and reset its number (i.e. to a later number):
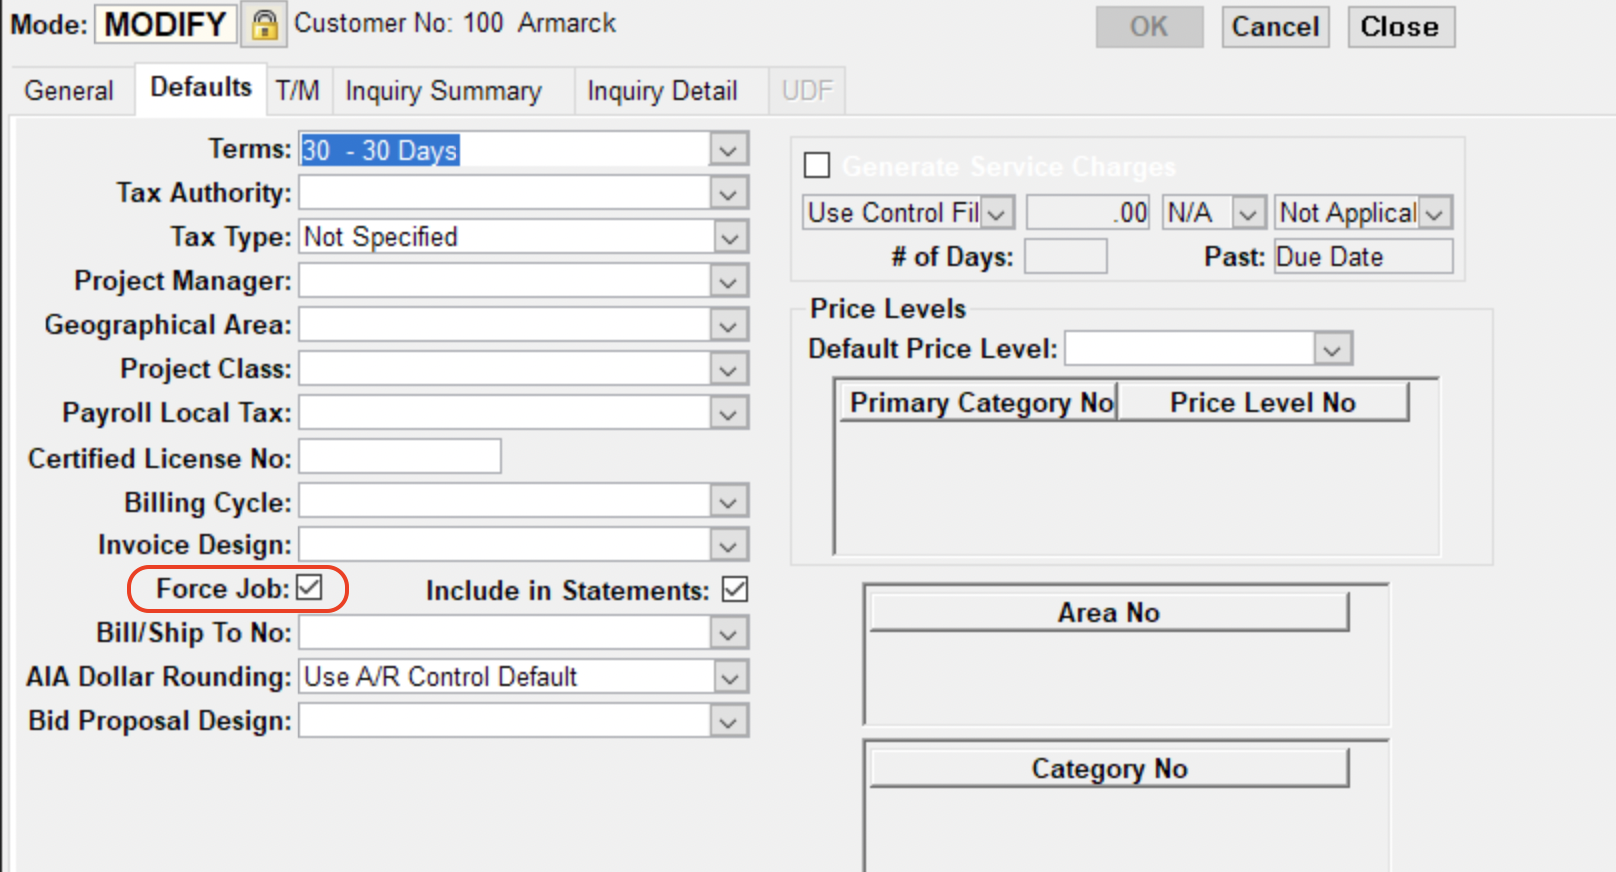
Error: This Customer has the "Force Job" Checkbox Enabled
This error occurs because a Foundation Customer-related setting is enabled, which requires every AR Invoice for the Customer to be linked to a Job.
To resolve this error, you need to either:
- Associate the AR Invoice with a Job in ServiceTitan, or
- Uncheck the "Force Job" option for the customer in Foundation by navigating to Customers → Defaults:
Budget Line Items (Job Budgets)
To set up Budget Line Item imports to Foundation, you will need to follow the below steps:
Create DataGenie Importer for J/C Budgets
If you have not yet set up a Data Genie for Imports in Foundation:
- From the Foundation homepage, go to Genies --> Import:
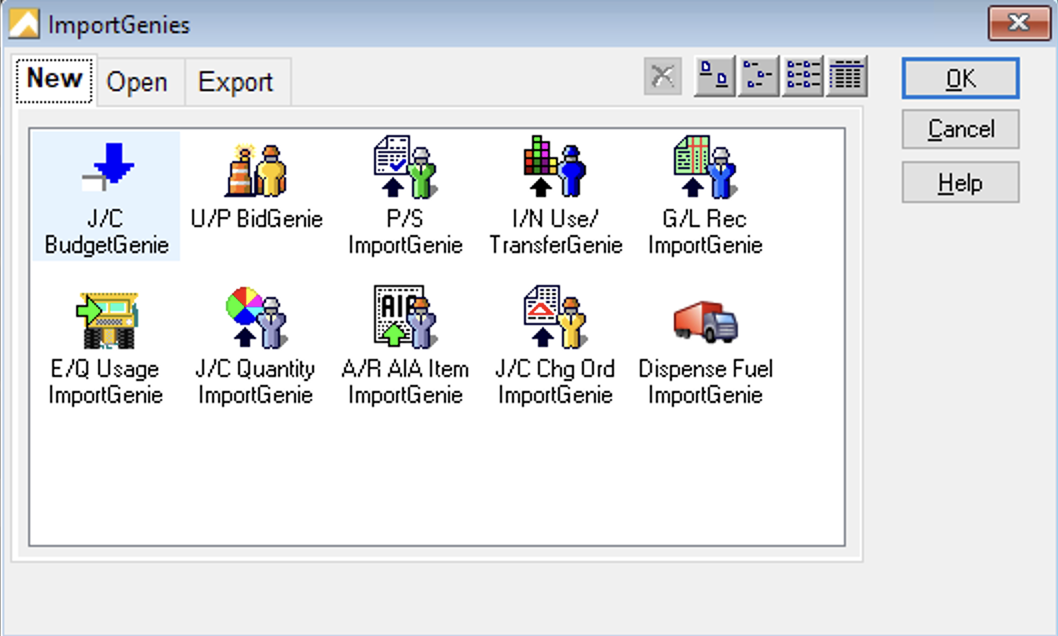
- In the ImportGenies window, select J/C BudgetGenie and then OK:
-
Select J/C Budget Only.
-
Select each individual column and press Add->. You will need to add all columns outside of "Original Est Dollars For" and "Original Est Units For" first, which includes:
- Bid Amount
- Cost Code Certified Payroll
- Cost Code Description
- Cost Code No
- Job No
- Job Original Estimated Cost
- Phase Description
- Phase No
Do not add the Original Quantity, Unit of Measure, Unused Numeric, and Unused String columns. The Original Quantity and Unit of Measure columns are imported separately in the Budget Prodution Quantities model.
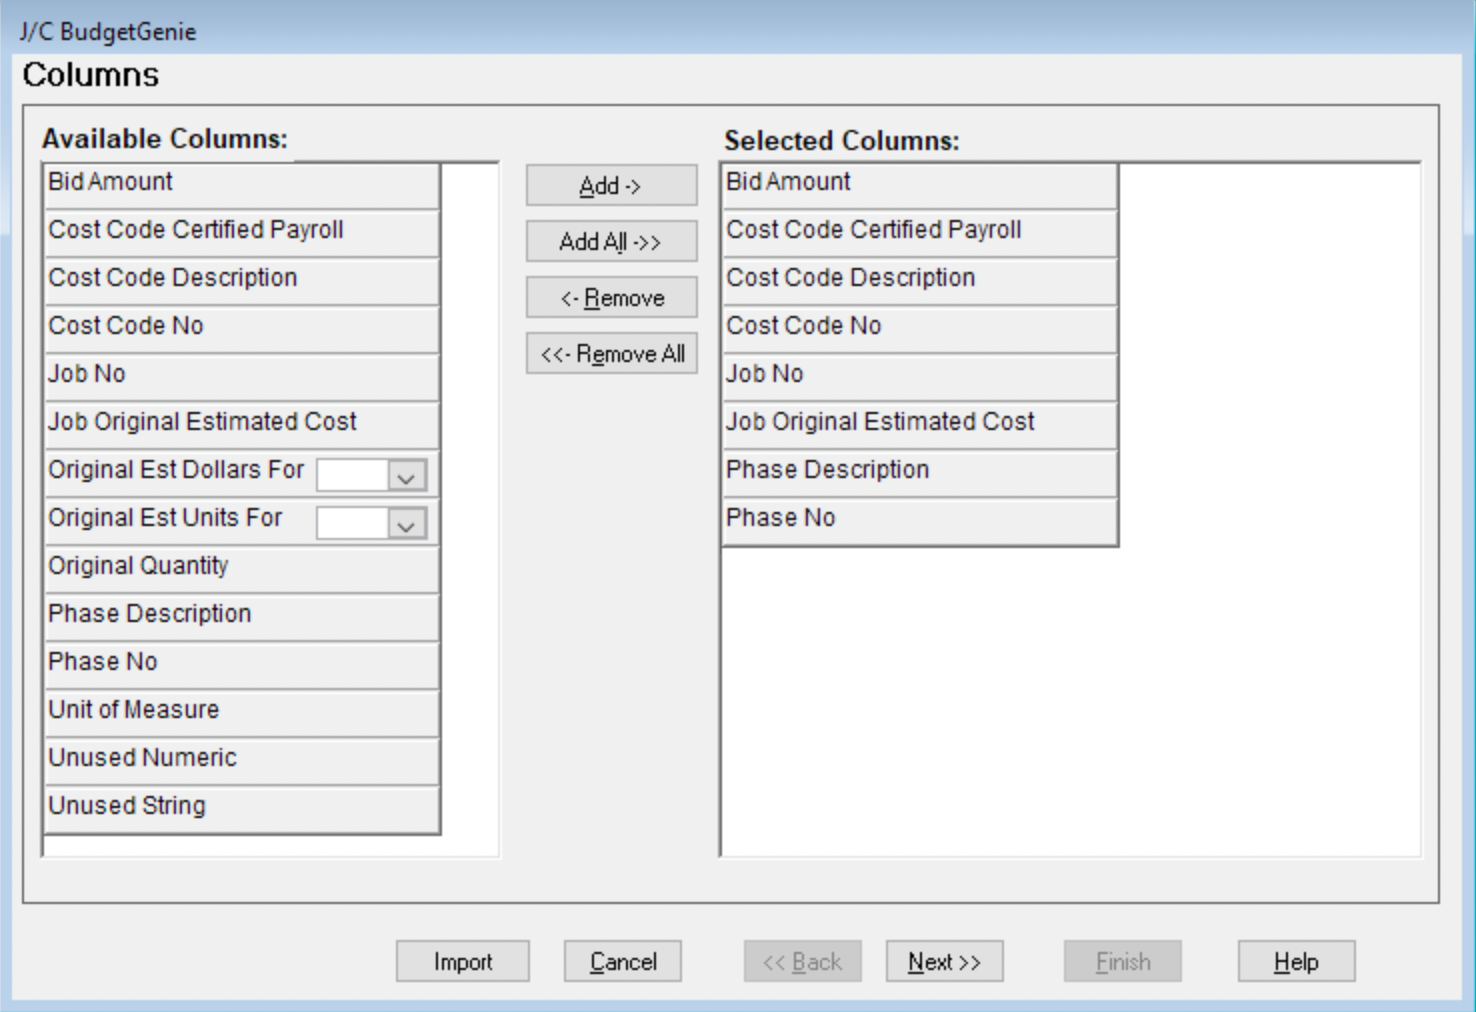
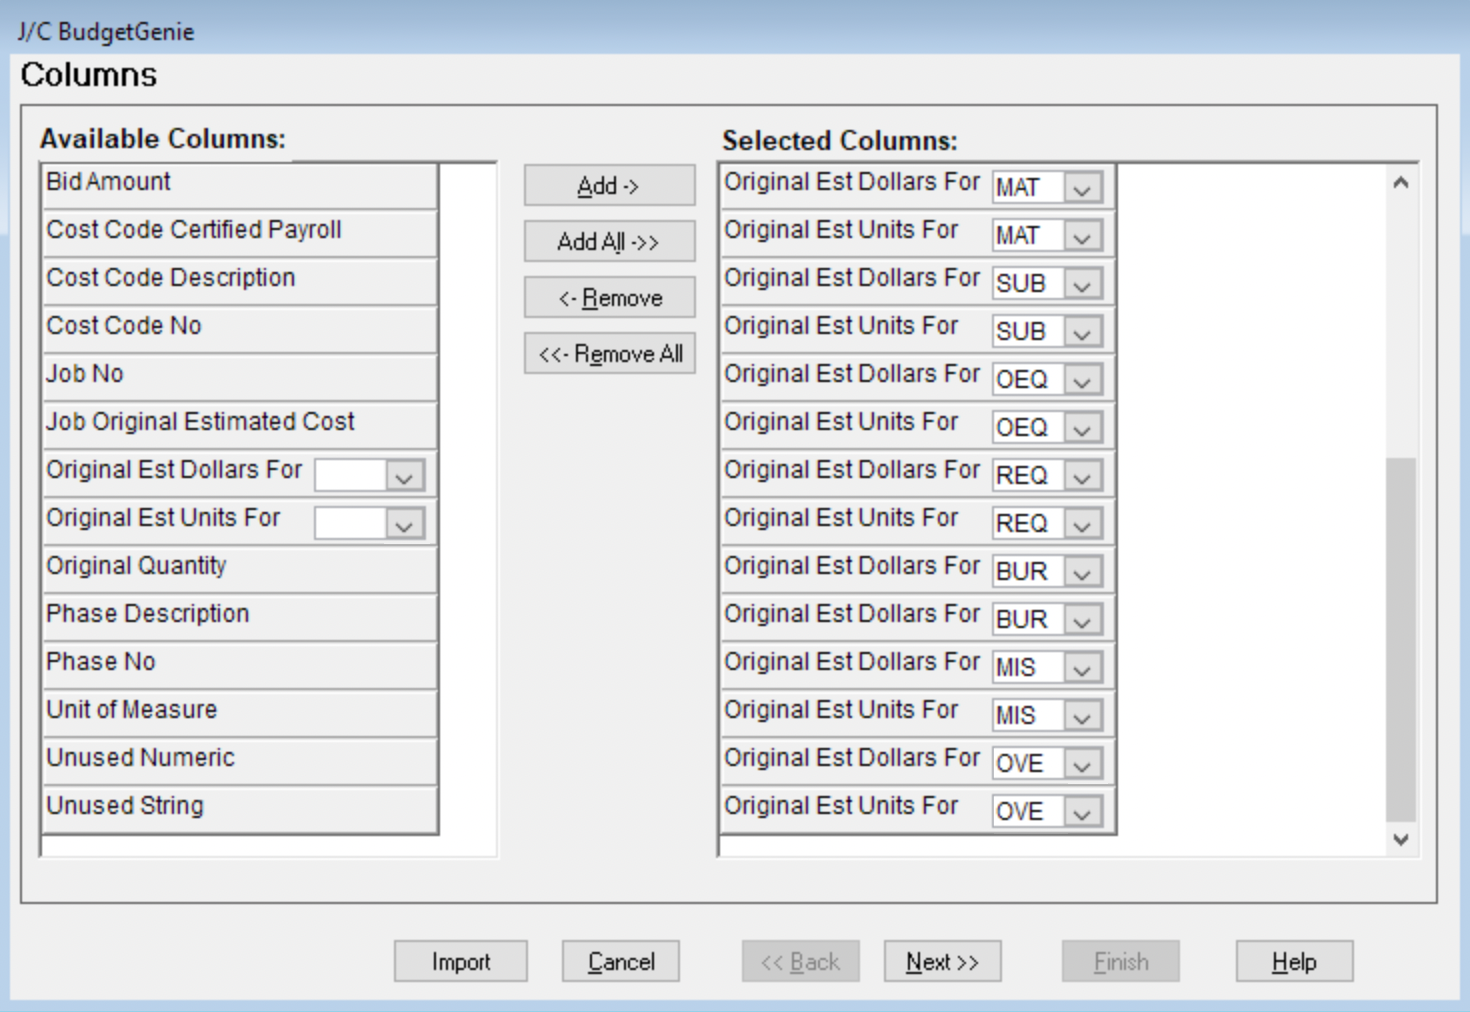
- Select the columns For "Original Est Dollars For" and "Original Est Units For":
- You will need to specify each Cost Class in the input box for each column.
- You will need to include each Cost Class you sync to Procore except for the "Quantity" Cost Class (we can't import Budgets to this Cost Class).
- Do not add the fields "Unused Numeric" and "Unused String" to the Data Genie.
The below is what your list should look like and how it maps to your list of Cost Classes:

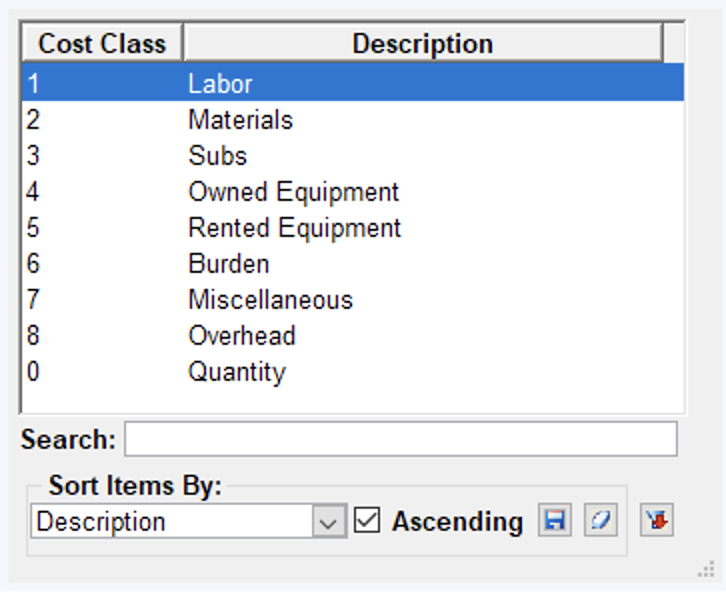
All Cost Classes shown above must be present and in this exact order in your Job Budget (i.e., matching the J/C BudgetGenie) or it can result in misaligned data upon export.
-
Once you are finished adding columns, select Next>>.
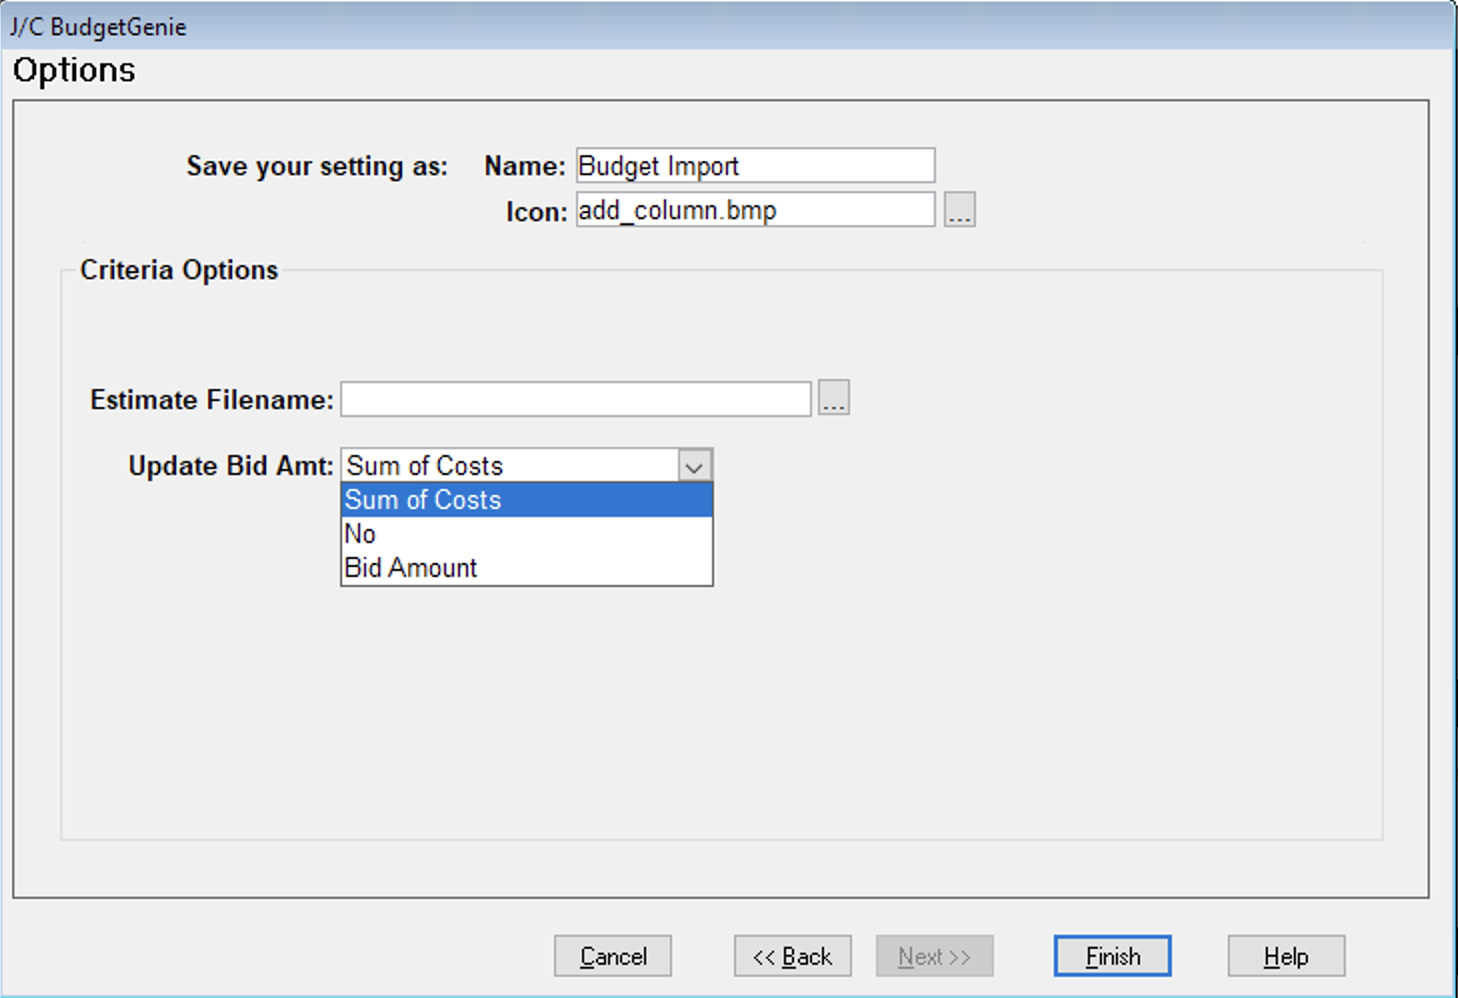
-
Add a memorable name (e.g. Budget Import), and then select Sum of Costs under Update Bid Amt. Then press Finish:
Import Budgets into Foundation
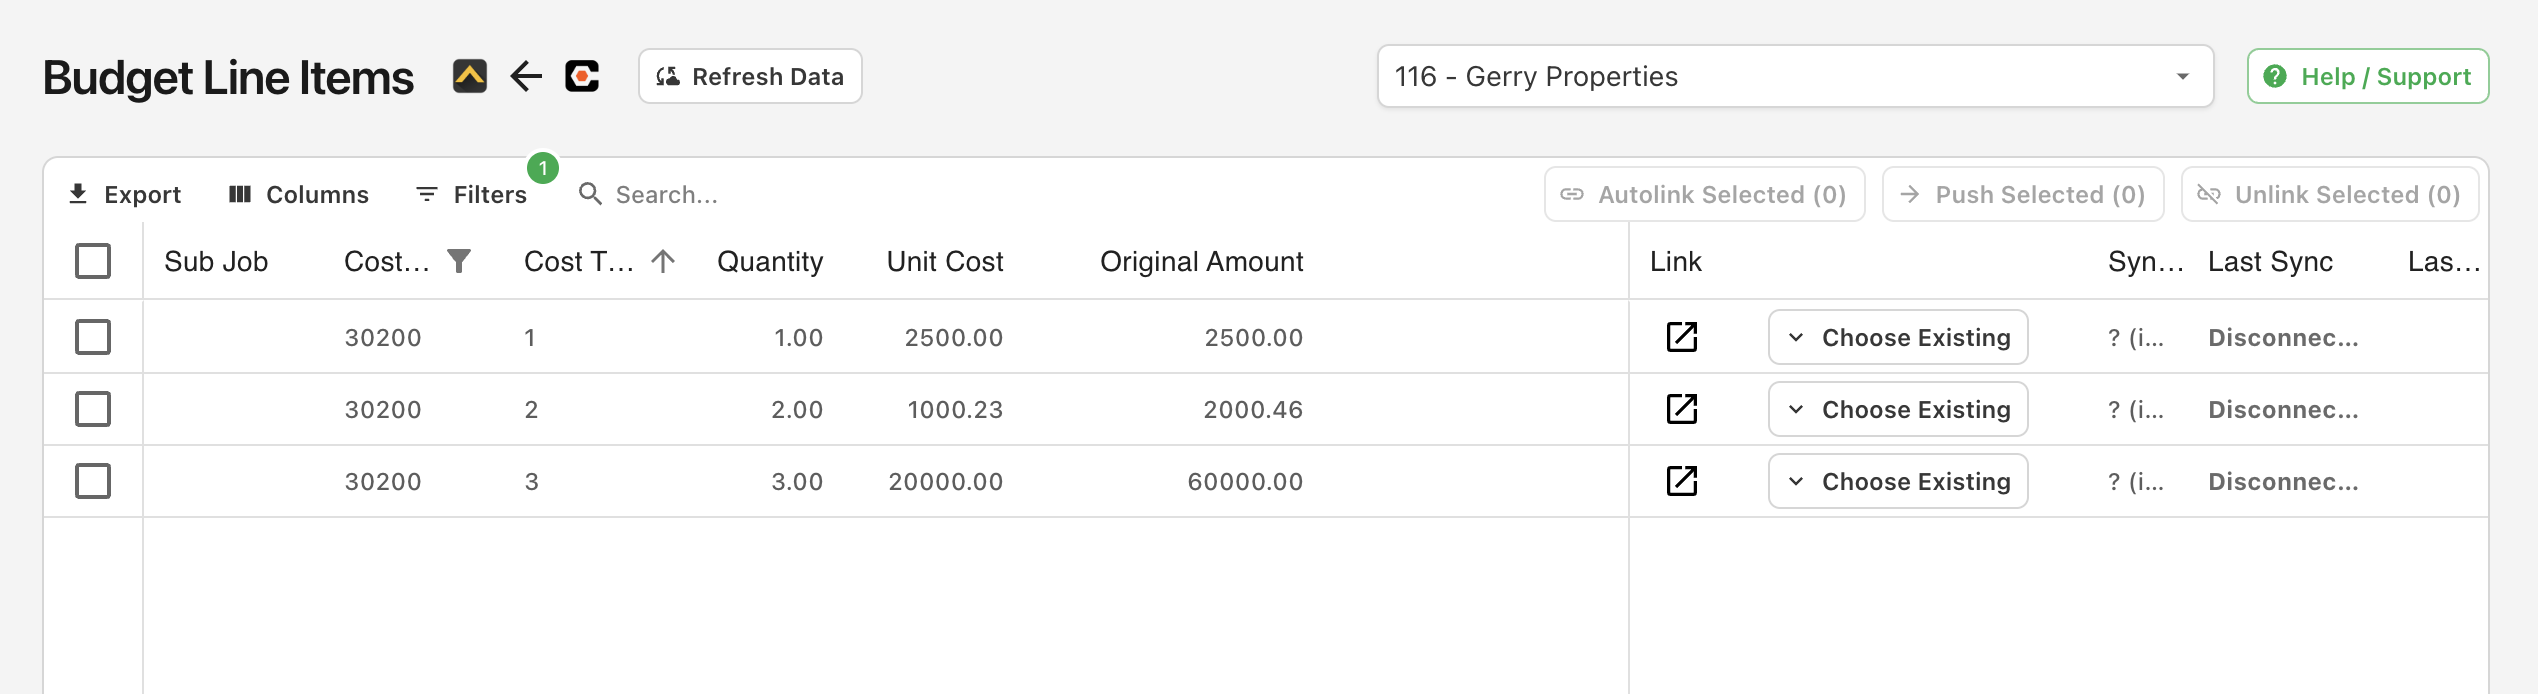
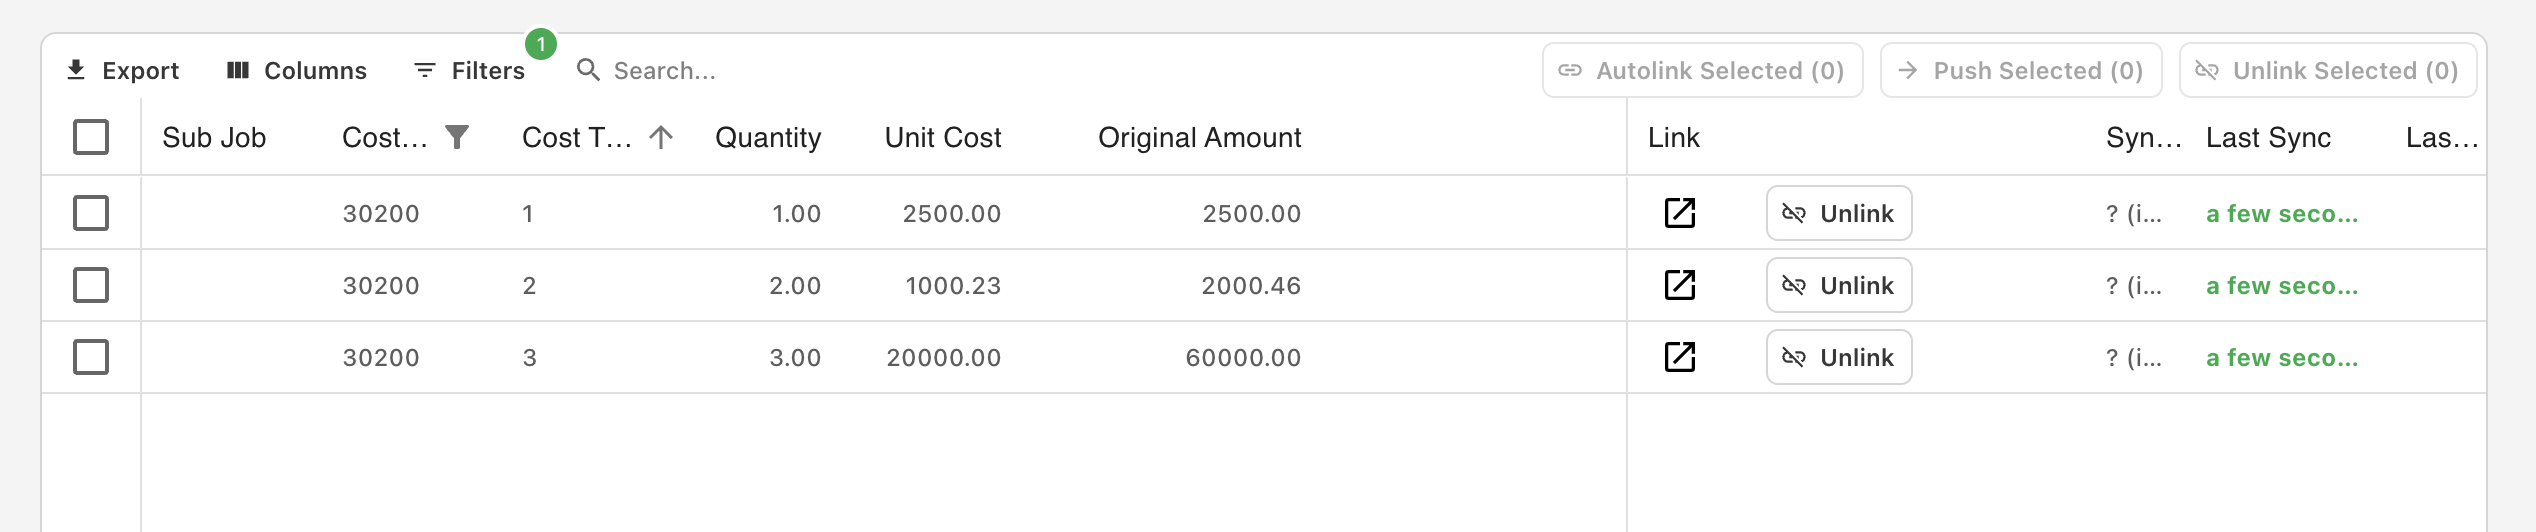
Let's say I want to export the following three Budget Line Items to Foundation from my Project Management system:
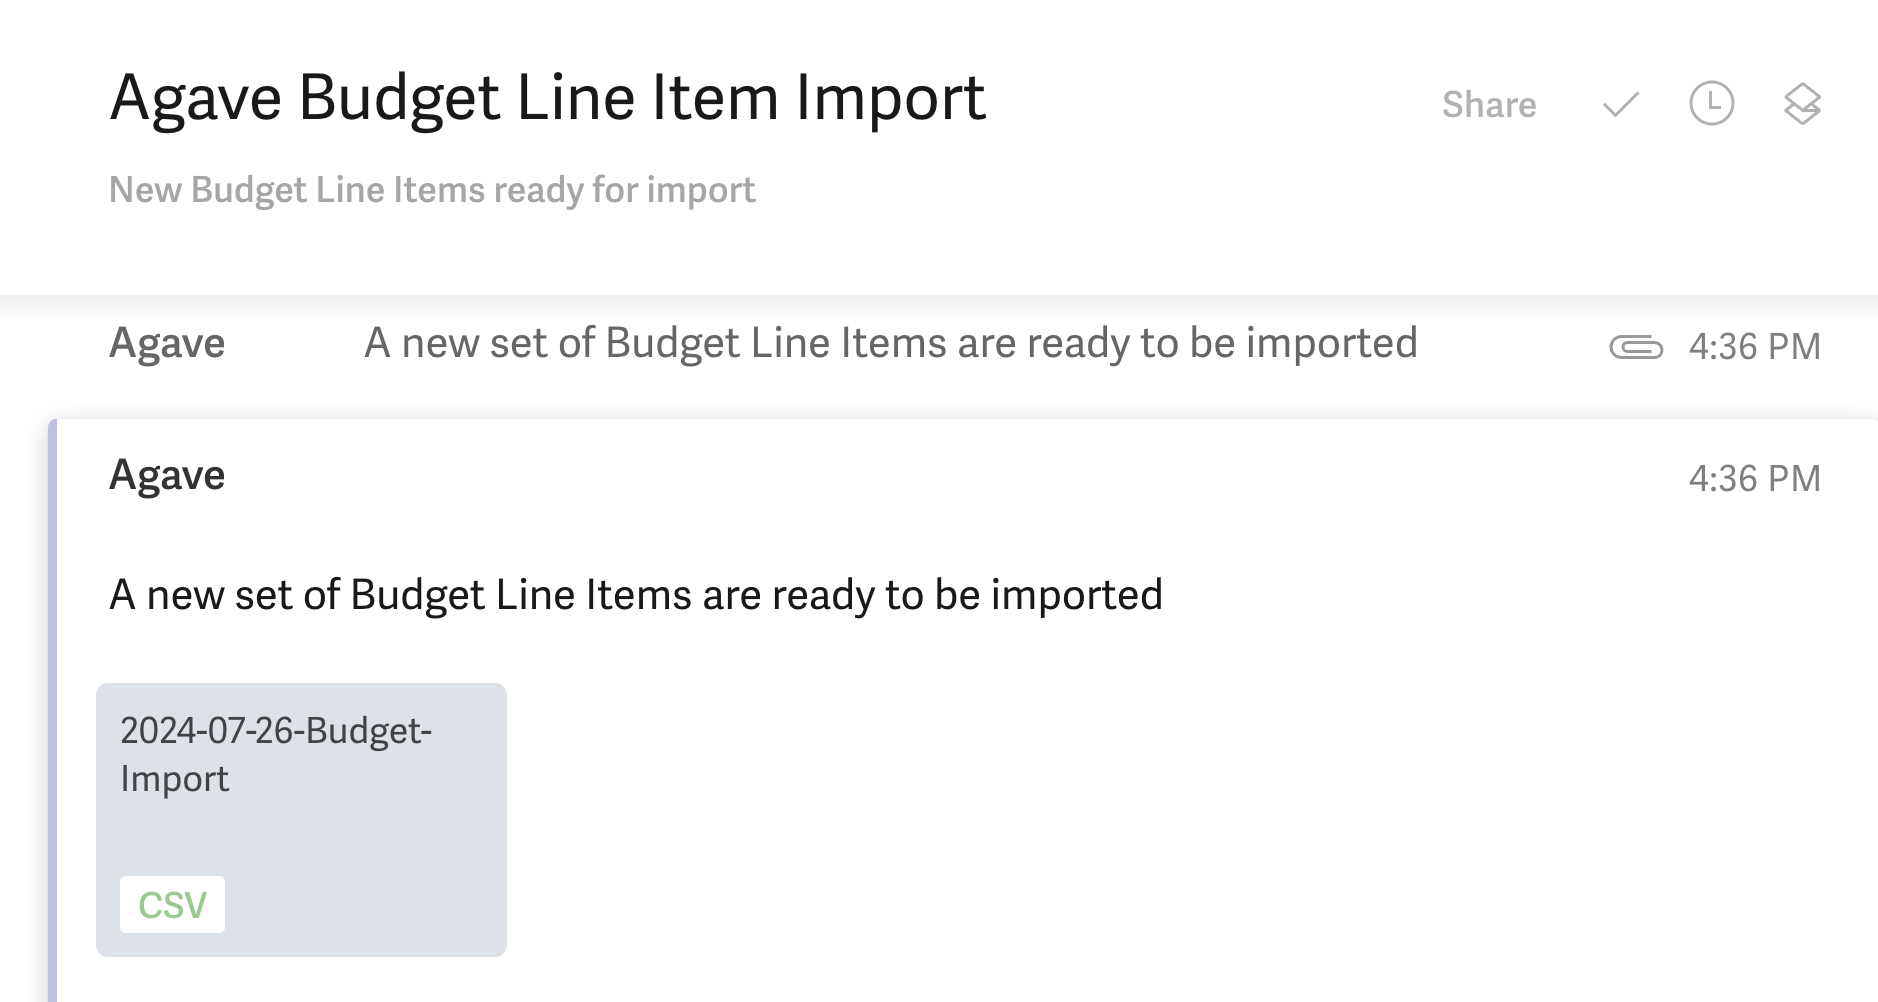
- After exporting a Budget from Procore, you should receive an email with a TXT file that you can import to Foundation. Open the email and download the file to your downloads folder:
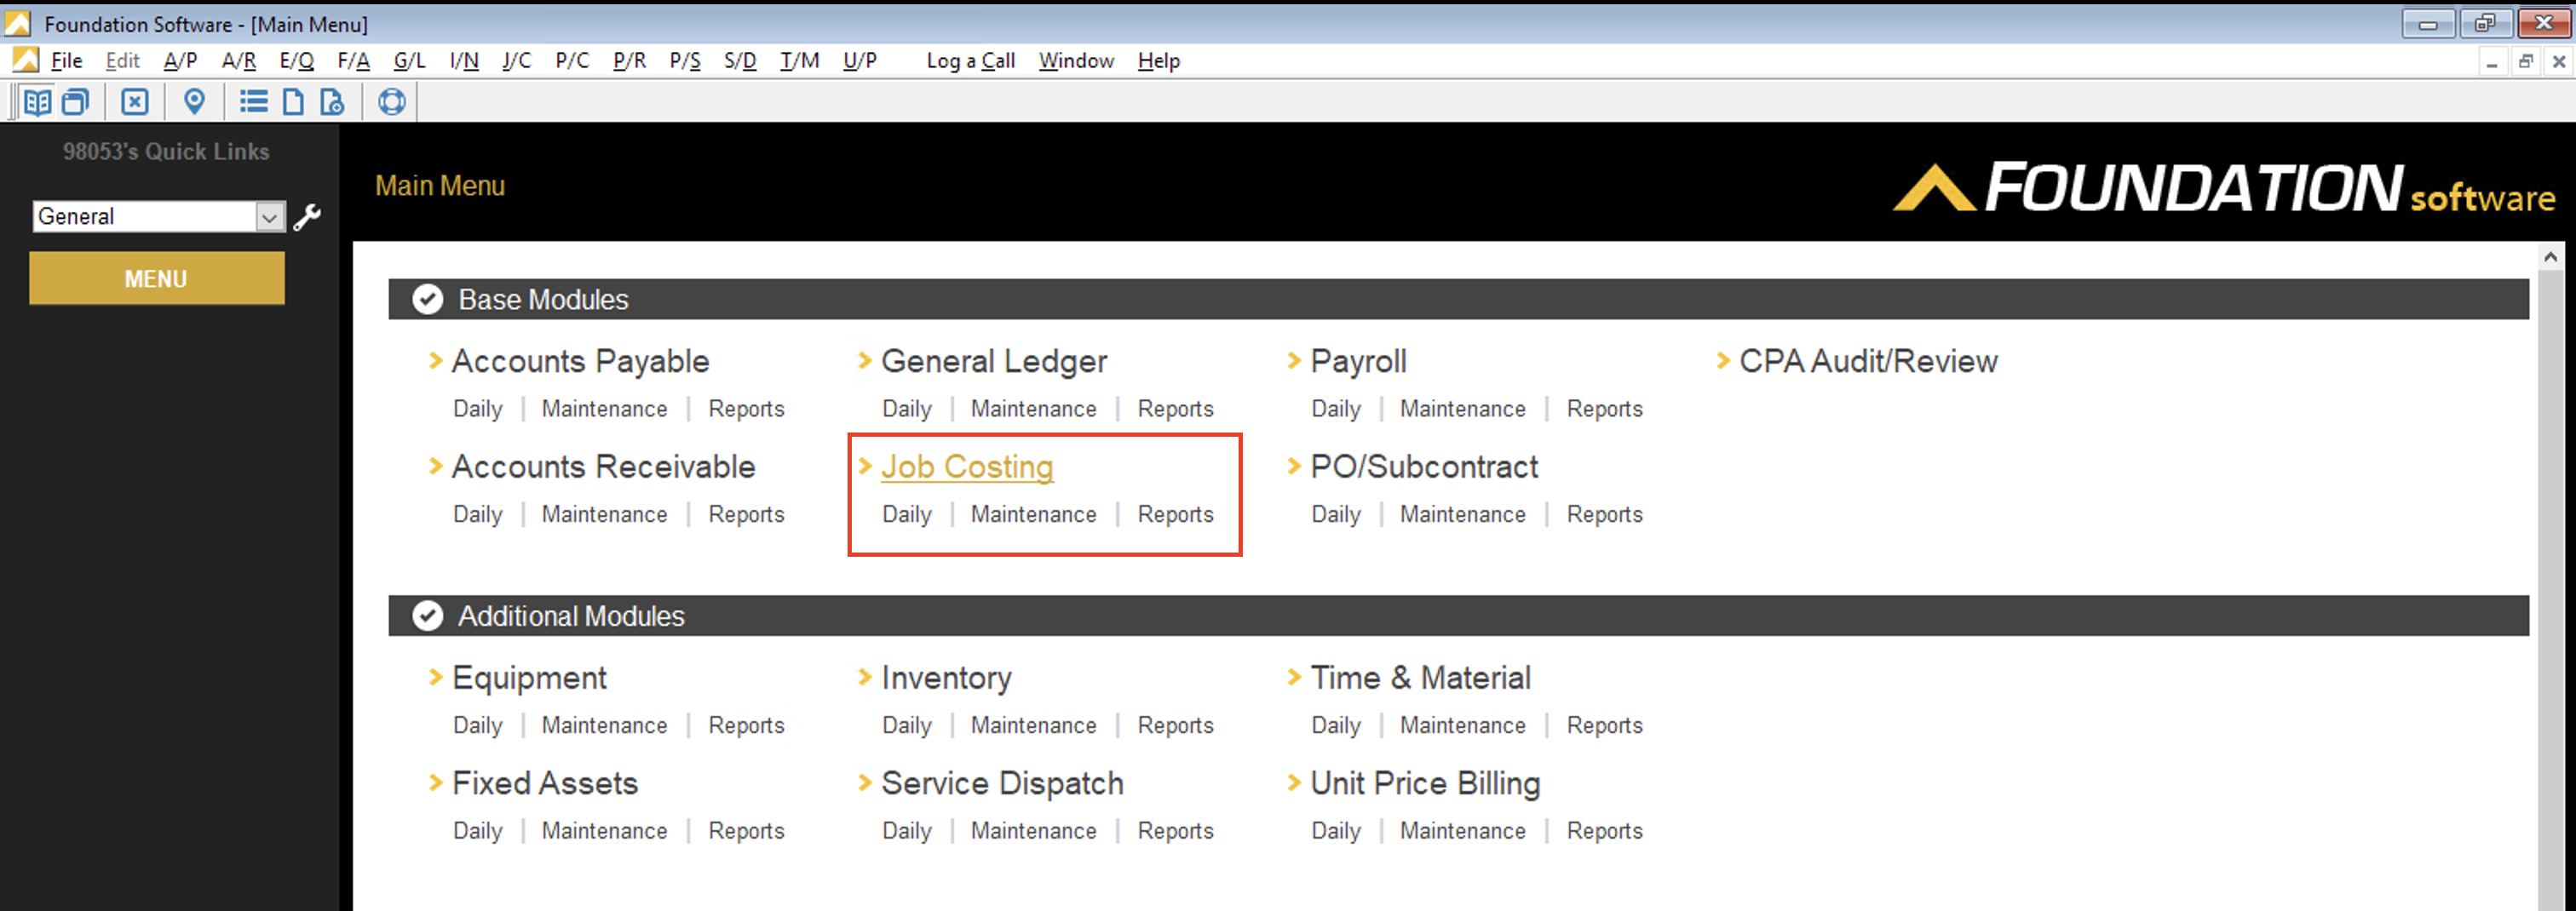
- Go to the Foundation homepage and select Job Costing:
- Under Daily, select Import Estimates:

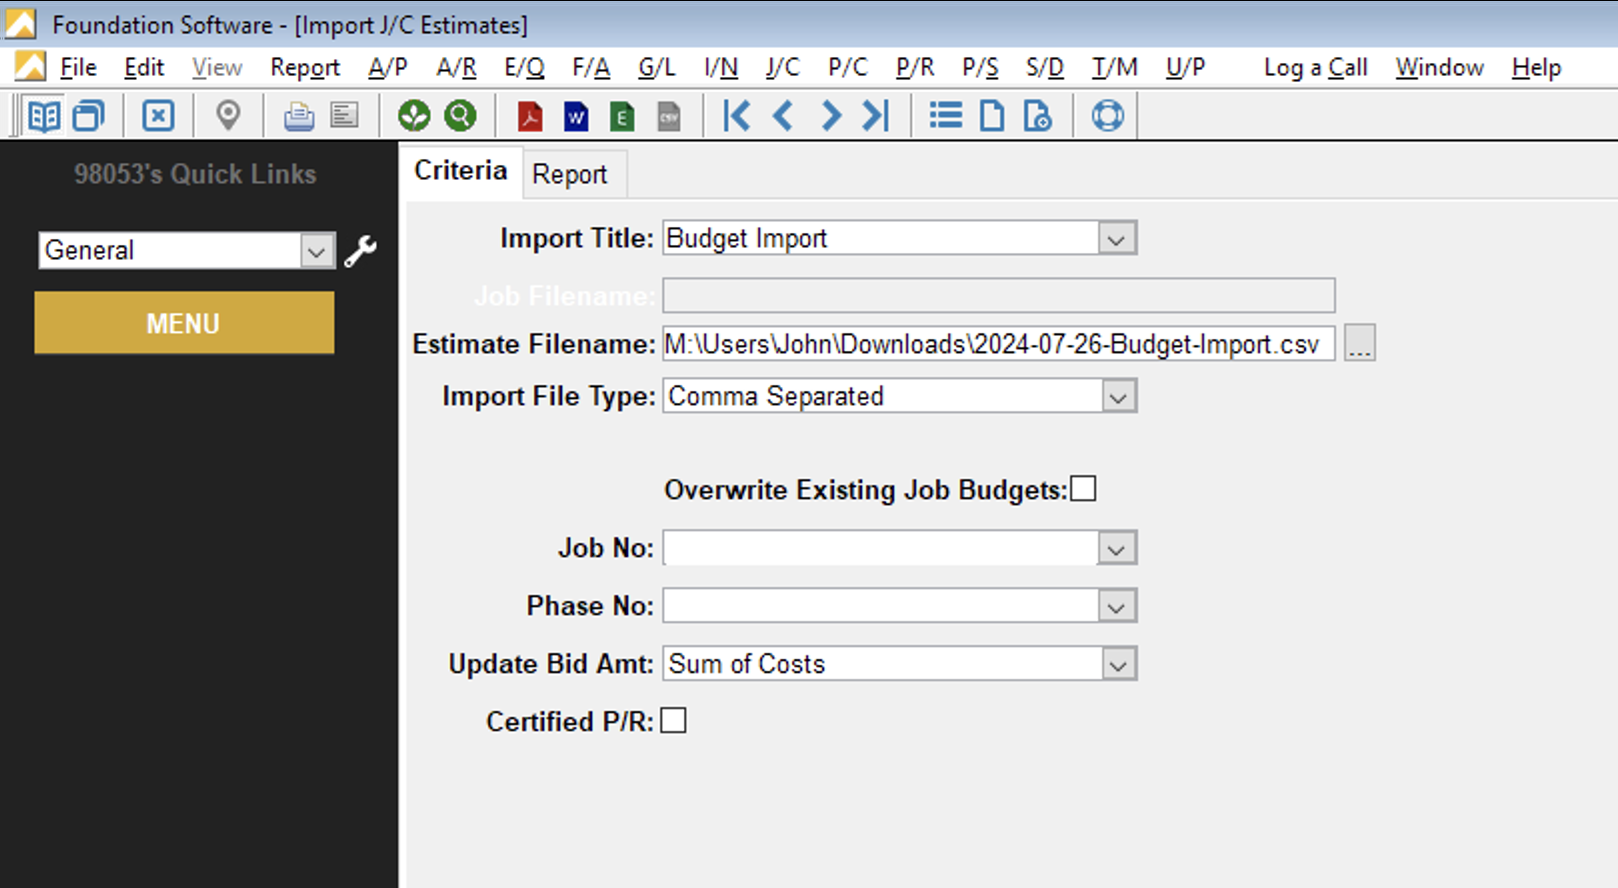
- Under the Criteria tab:
- For Import Title, select the DataGenie you created for Budget Imports.
- For Estimate Filename, select the filepath for the TXT file you downloaded from the email in step 1 above. If you downloaded the file to your Downloads folder, the filepath is likely "M:\Users\Your PC Name\Downloads\date-budget-import.txt (e.g. "M:\Users\John\Downloads\2024-07-26-Budget-Import.txt").
- For Import File Type, select "Comma Separated".
- If this is an update to an existing Budget in Foundation, select Overwrite Existing Job Budgets.
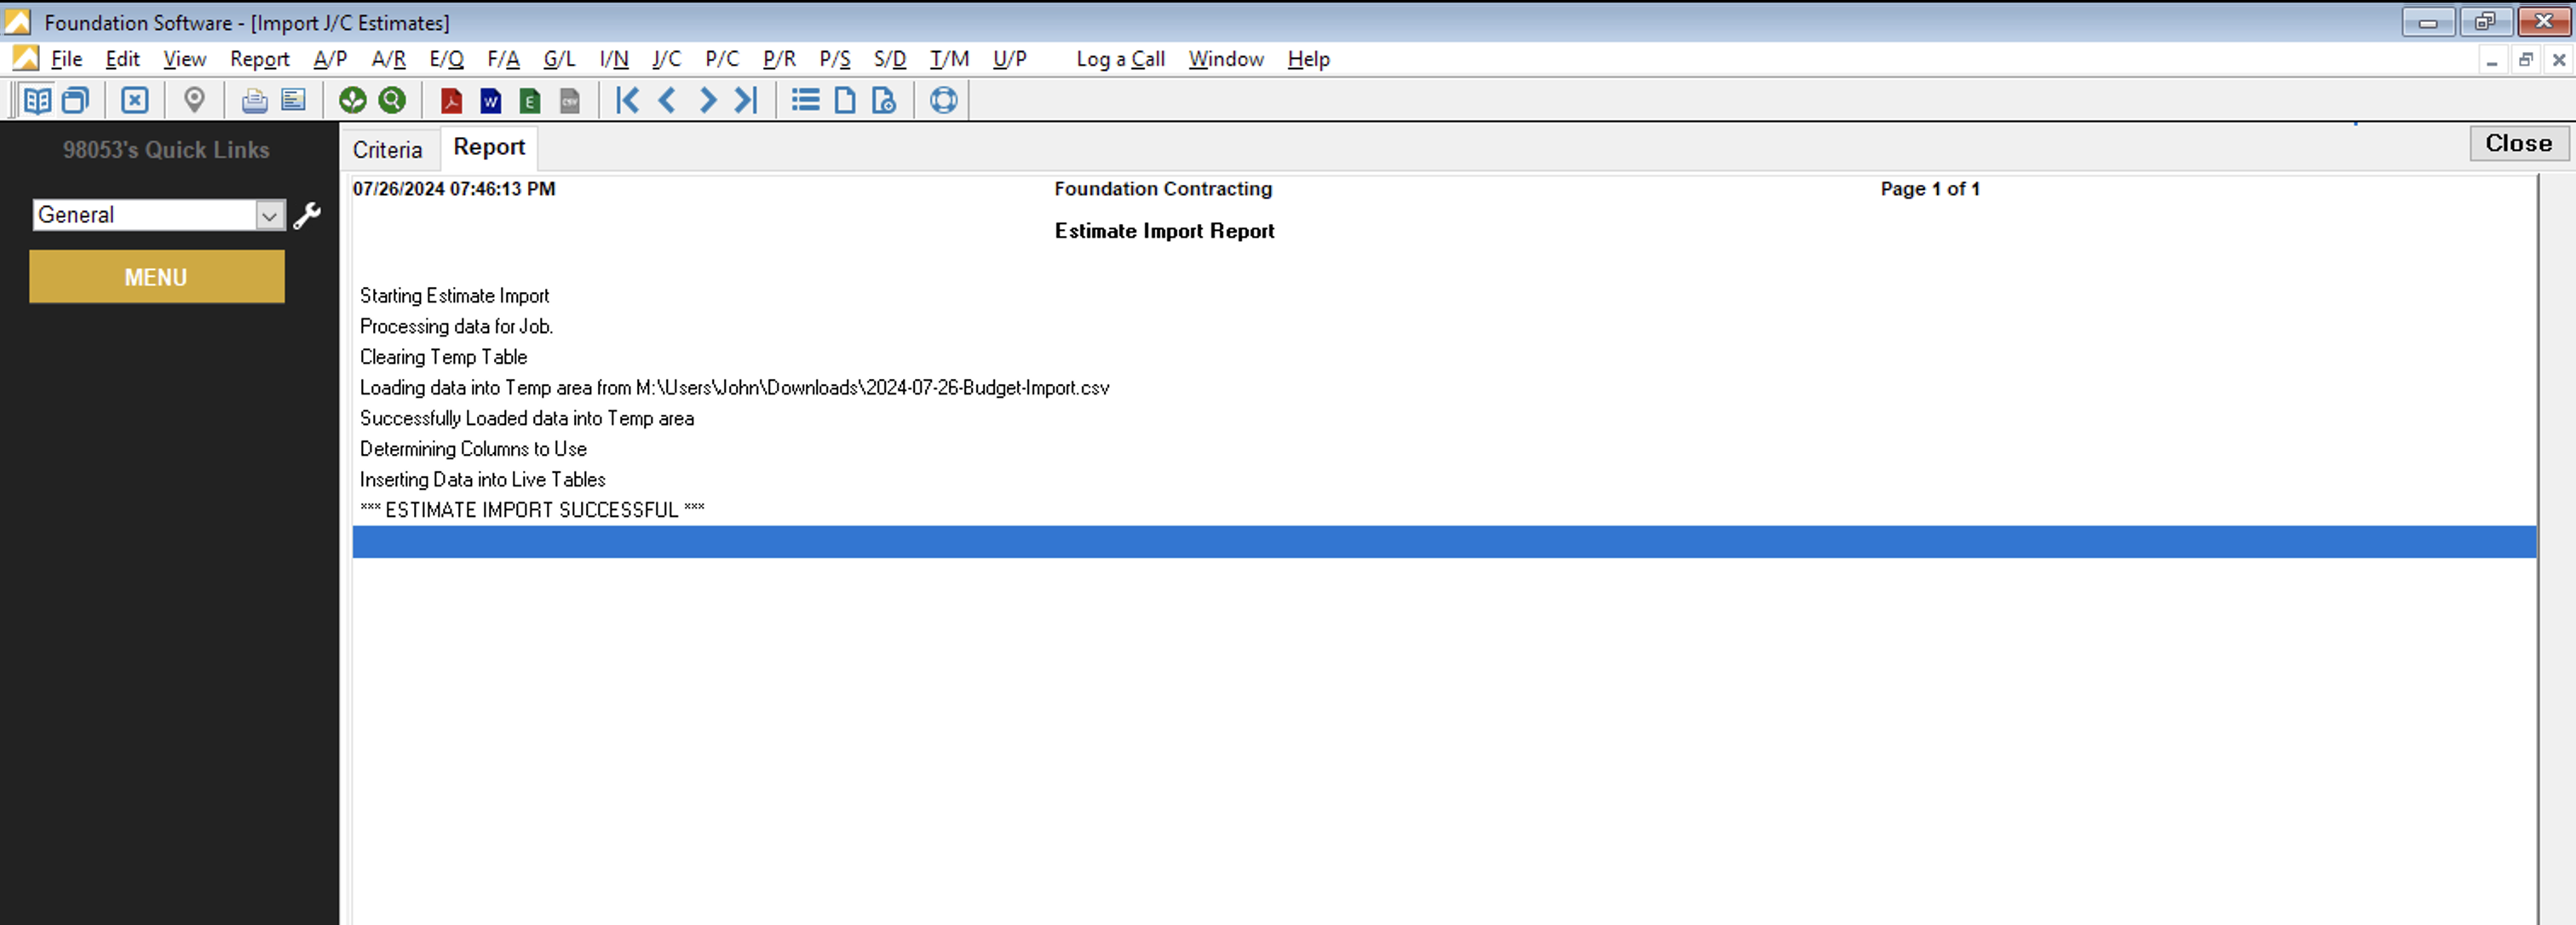
- Select the Report tab. An import will now begin. If the import is successful, you will see a message like the below:
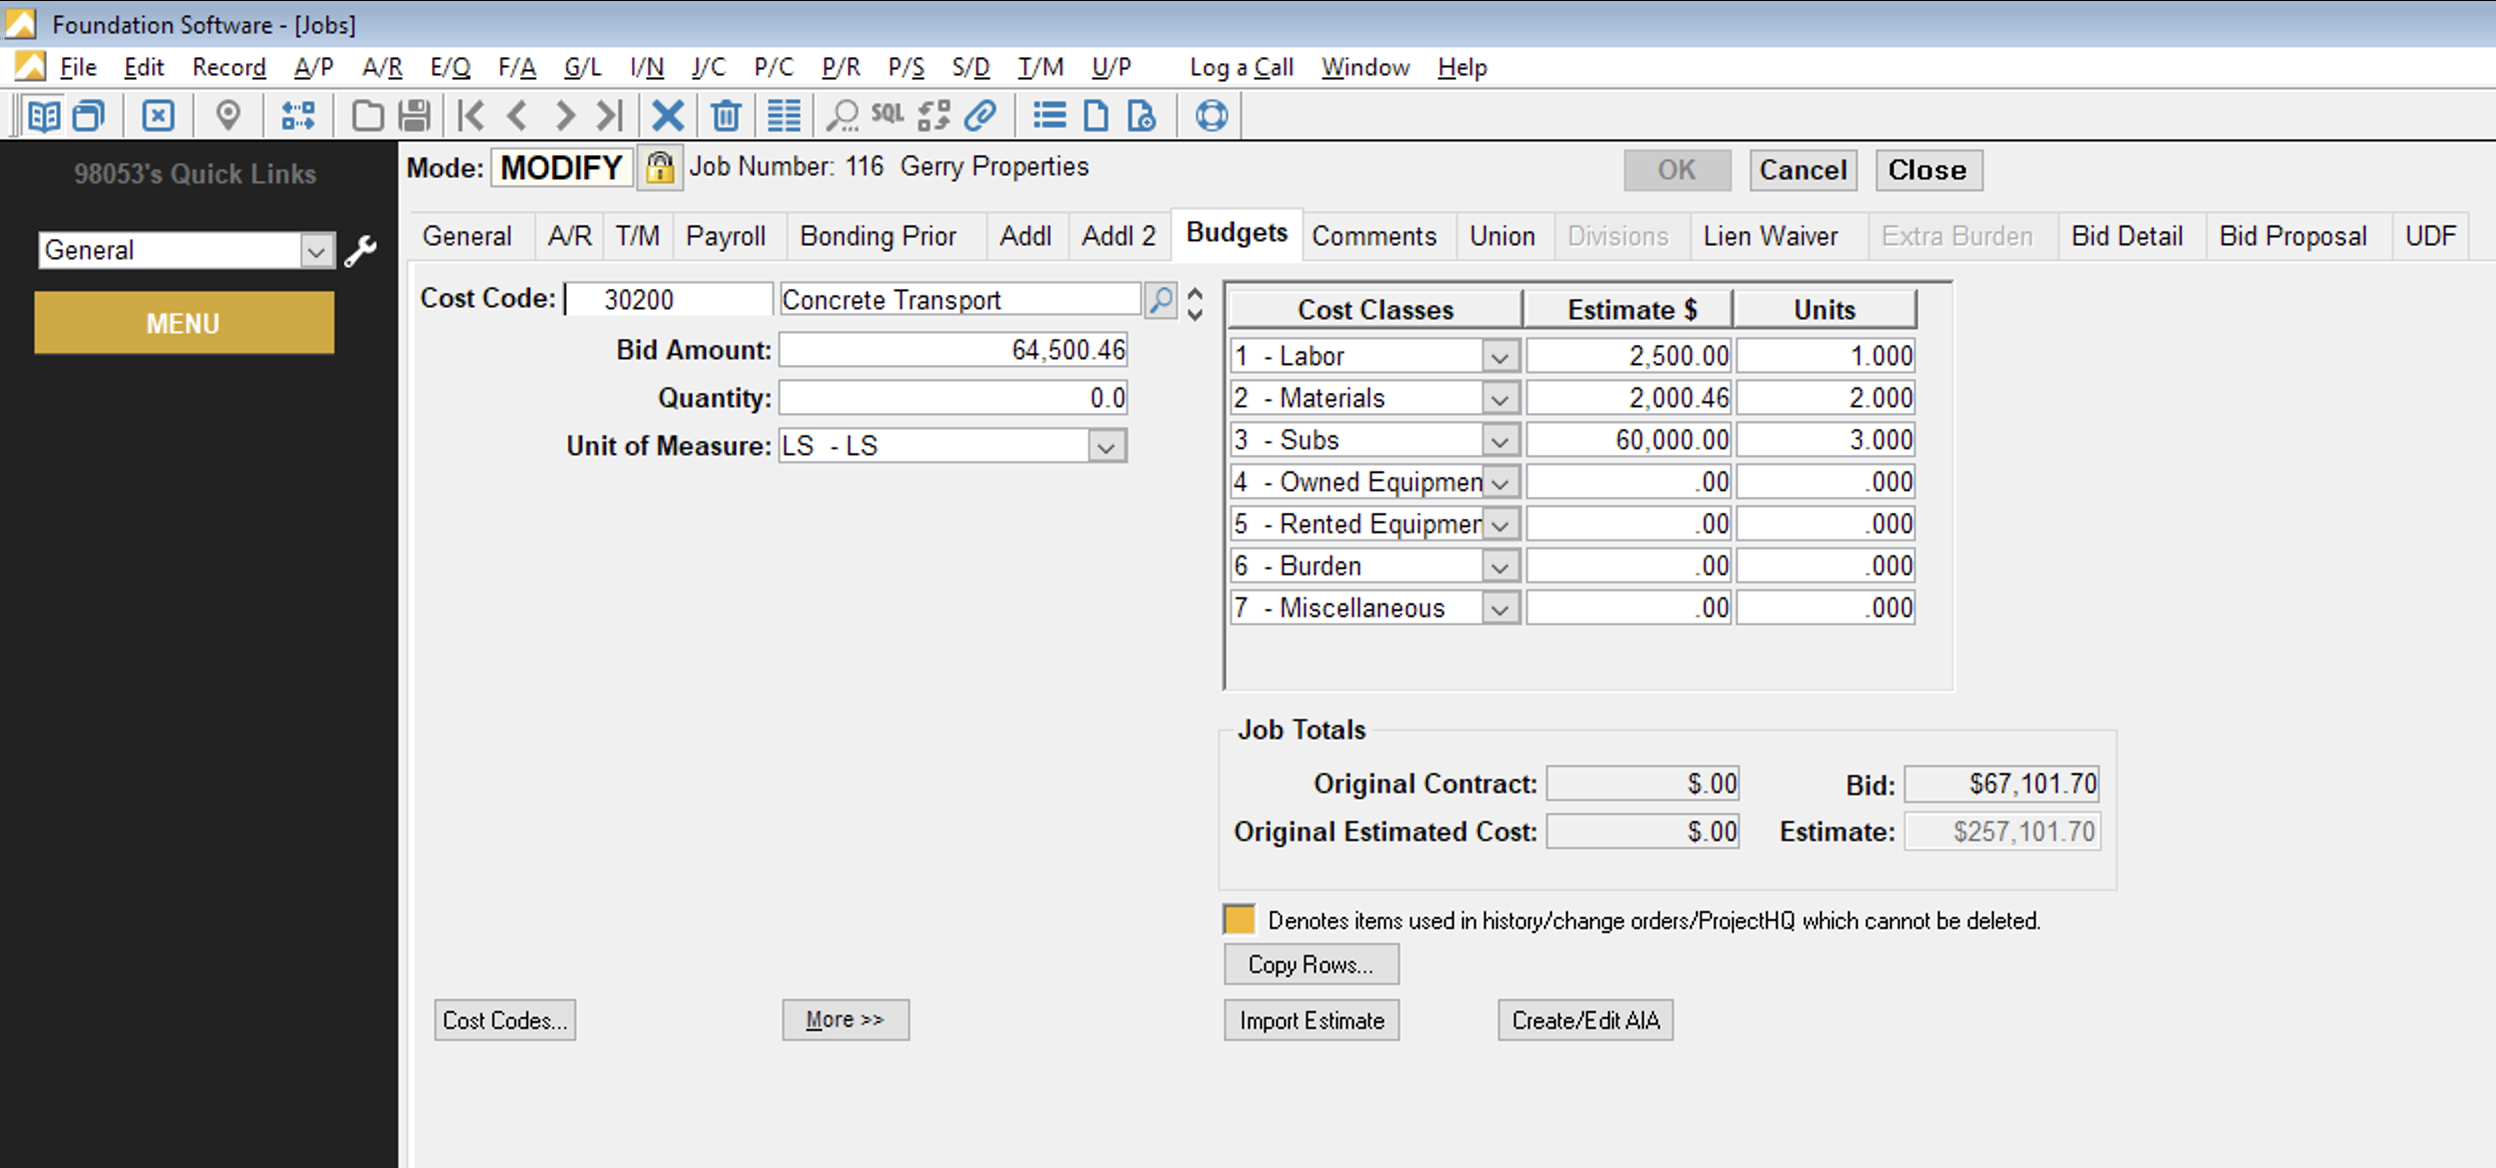
- To confirm the Budget imported successfully, go to the Budgets tab for the Job you imported the Budget (Estimate) to. It will include the estimate details you just imported:
- If I press "Refresh Data" in the Agave Sync UI, the three Budget Line Items will automatically link to the import Budgets:
I've imported my Budget to Foundation. Why is it not appearing in Foundation?
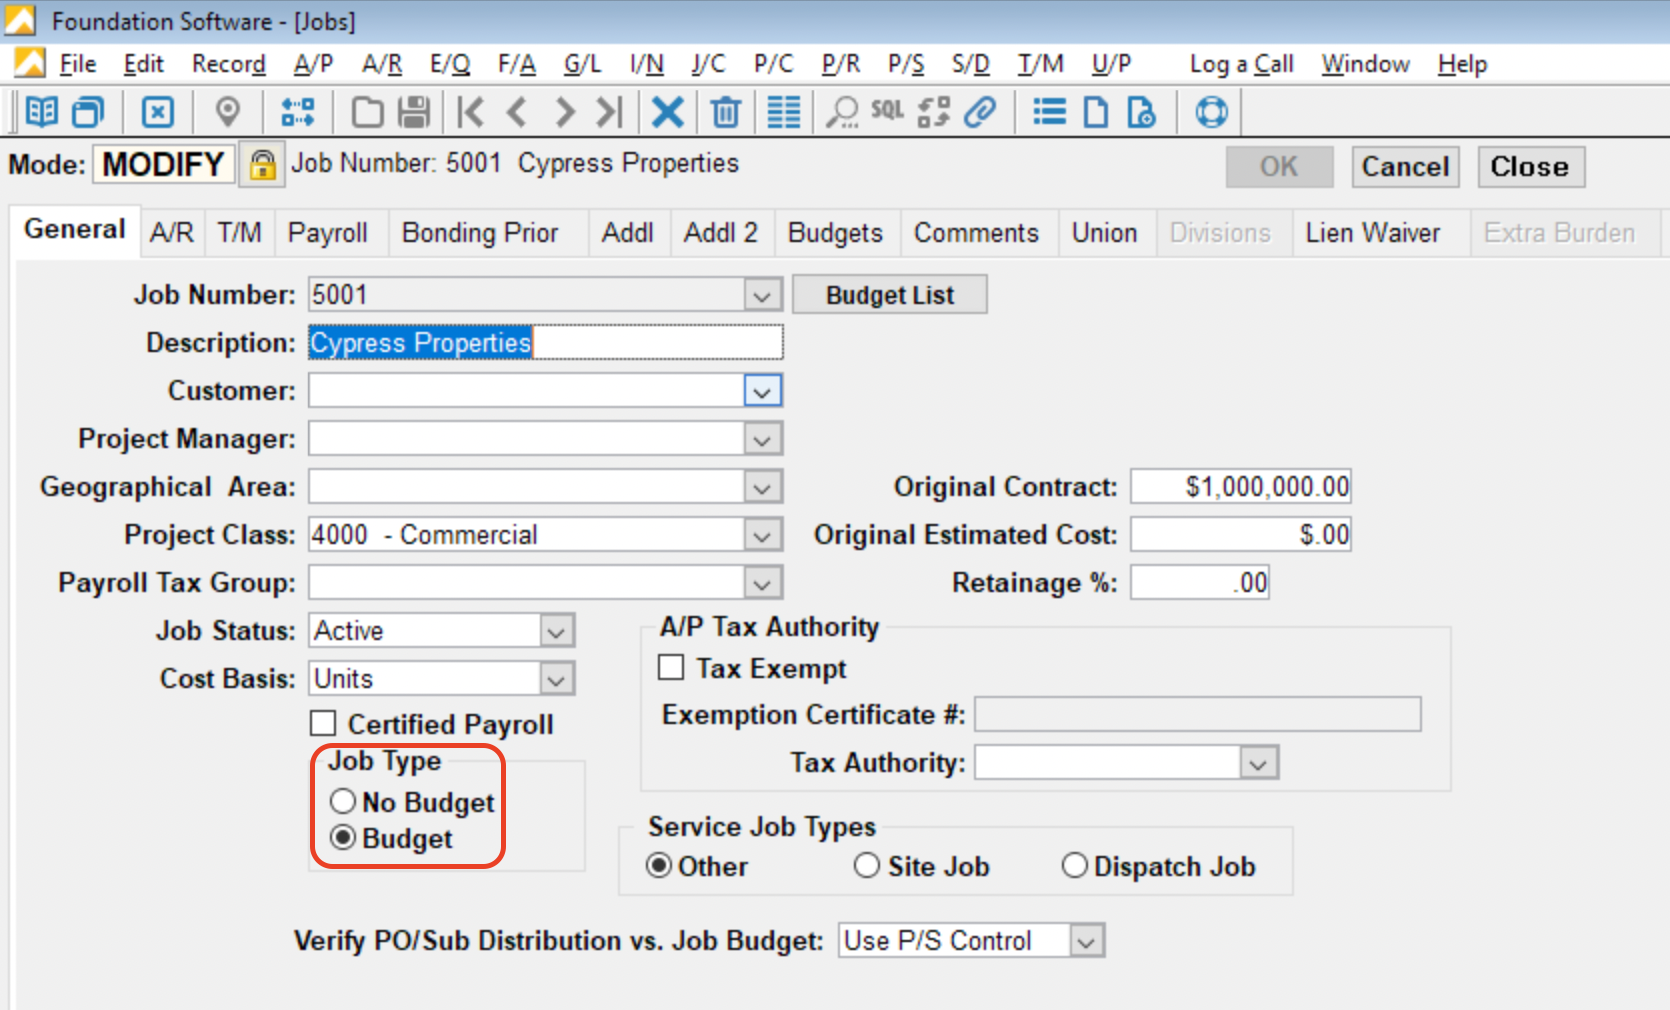
If your Budget Line Item is not appearing in Foundation, it's possible you have not set the Job Type to Budget.
To set the Job Type to Budget in Foundation:
-
Go to Job Cost --> Maintenance --> Jobs:
-
Select a Job, and change the Job Type to Budget:
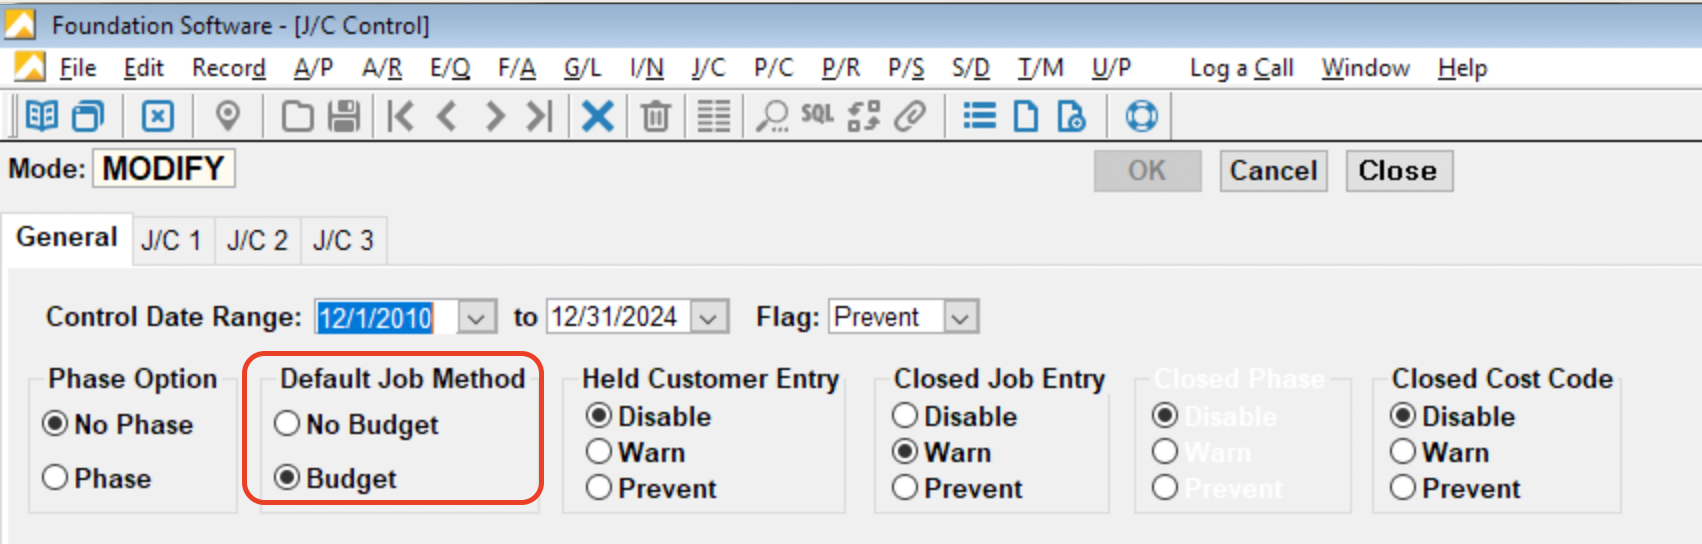
Note, you can make it the default to include a Budget for all new Jobs. To enable this as a default:
- Go to Systems--> Controls --> J/C:
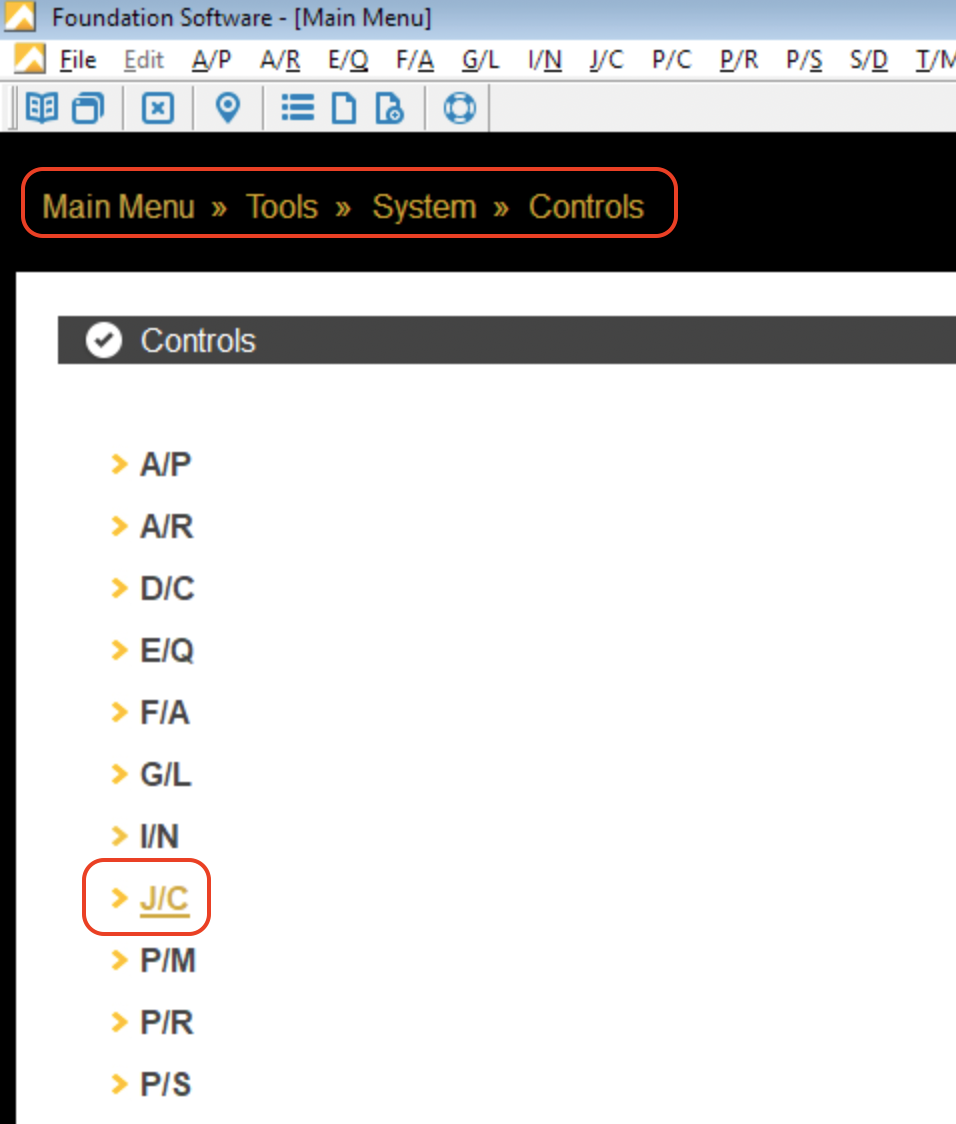
- Change Default Job Method to Budget:
Change Orders
Error: Cannot create a Change Order for a Contract that is in "Staged" status.
You are receiving this error because the Purchase Order or Subcontract the Change Order references has not been fully imported into Foundation.
To fully import these contracts into Foundation, see our guides for Purchase Orders or Subcontracts.
Negative Unit Cost for Change Orders
After importing Subcontract or Purchase Order Change Orders to Foundation, you may encounter the following error in Foundation: Unit Cost for inventory items must not be negative:
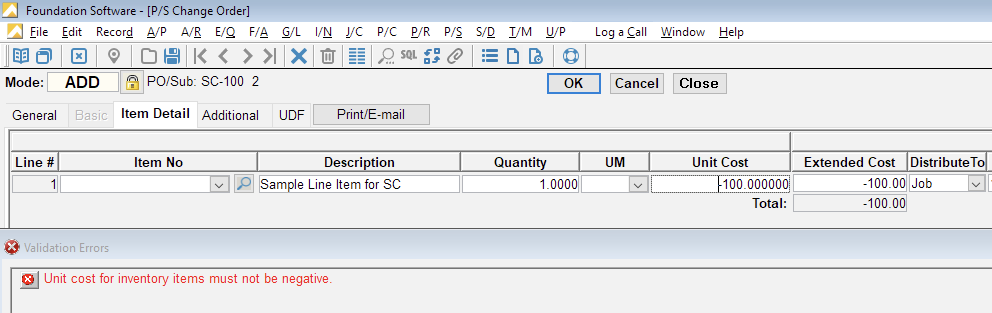
Foundation prohibits negative Unit Cost values for Subcontract or Purchase Order Change Orders. To resolve this error, you will need to either:
- Change the Quantity to be negative, and make the Unit Cost positive (so you have the same Extended Cost) in Foundation directly, or
- Make the foregoing change in your Project Management system and re-sync the Subcontract or Purchase Order Change Order to Foundation.
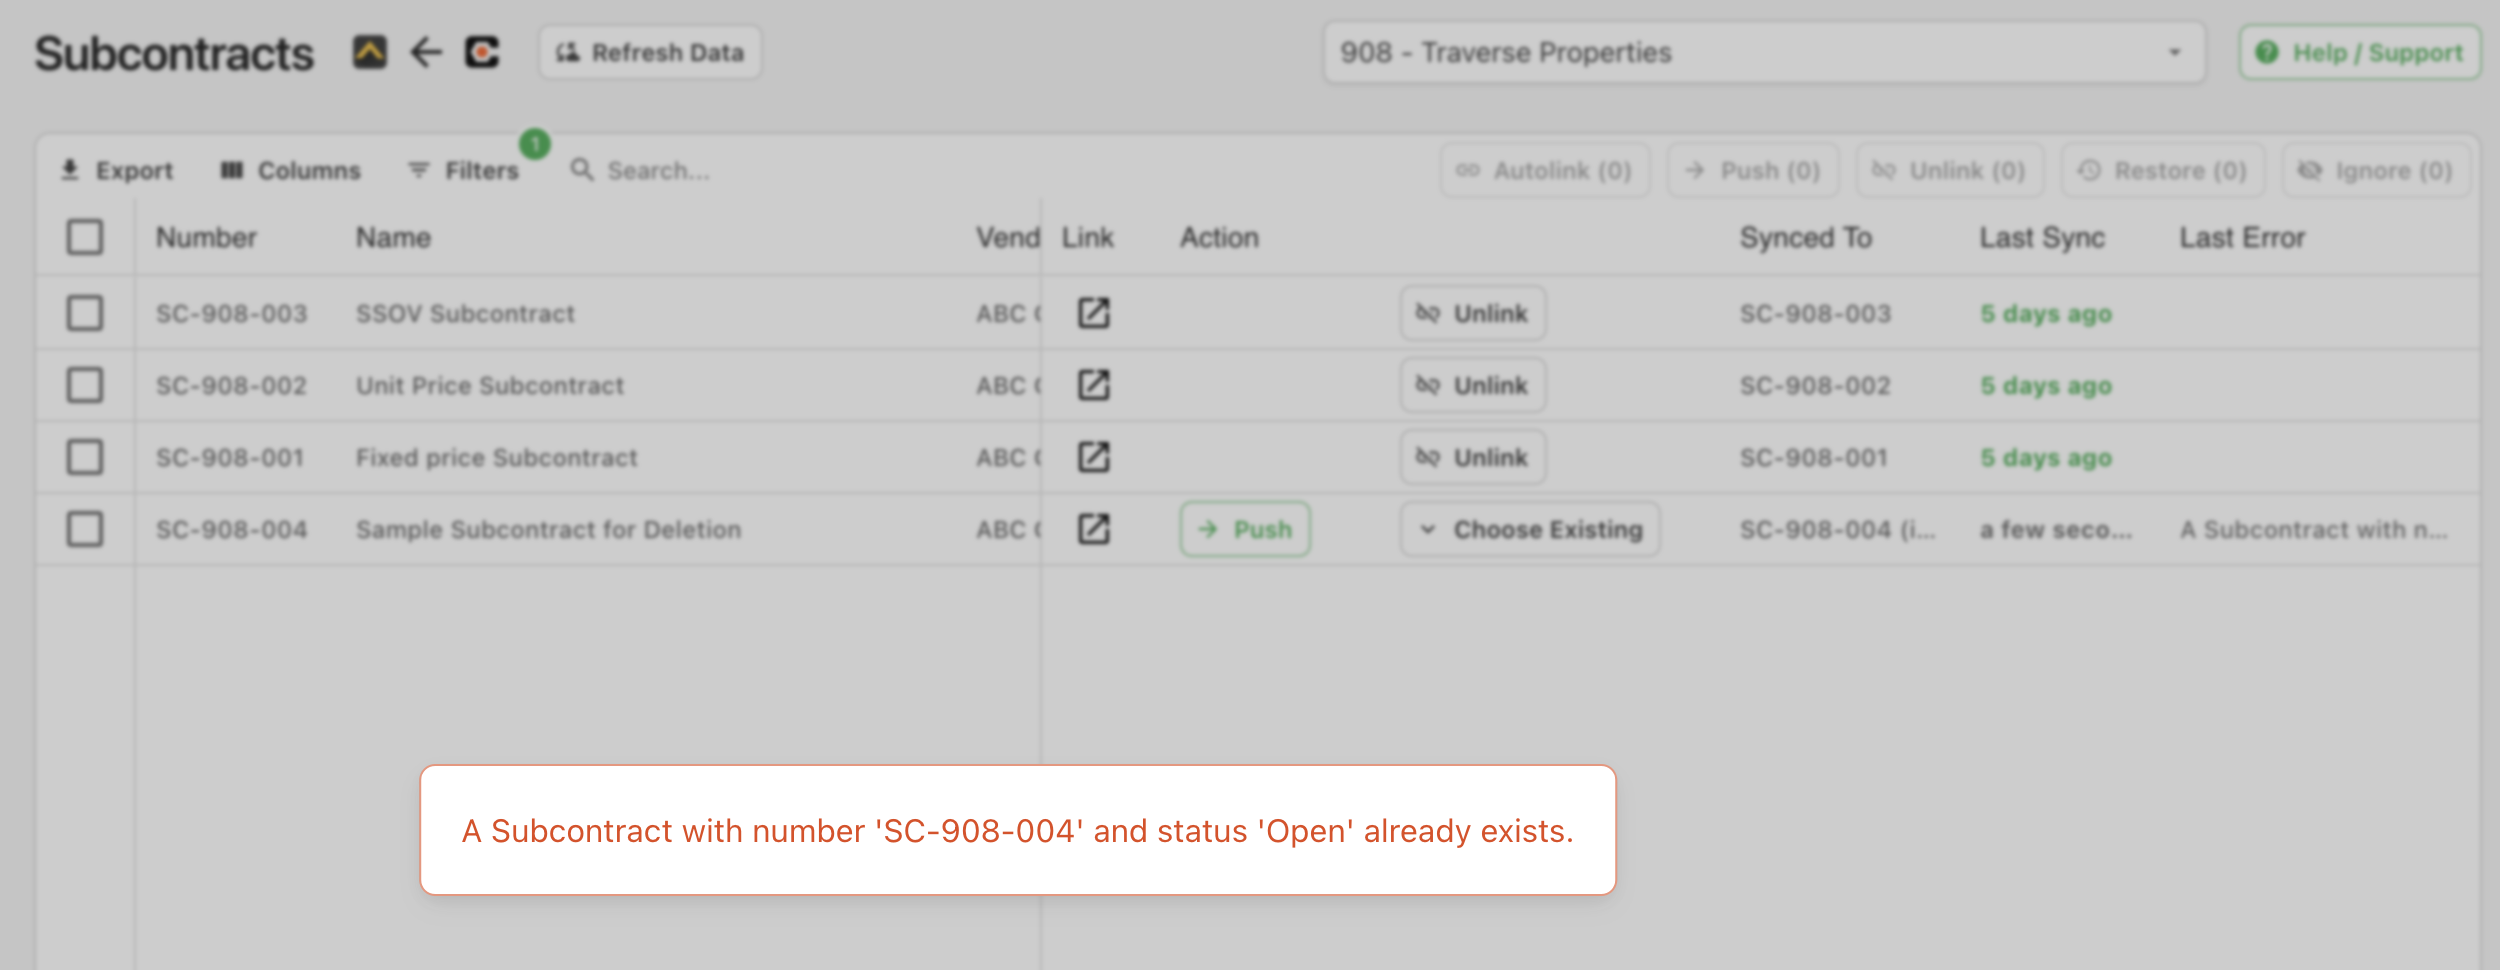
Why am I getting an error saying a record already exists even though I deleted it?
You may have deleted a record but still receive an error saying the record exists after re-syncing it (example below). Alternatively, You may need to modify and re-sync a Purchase Order, Subcontract, or Purchase Order/Subcontract Change Order record in the Project Management system after it has been exported to Foundation.
Depending on the status of the export, you have a two options:
If the record has not been imported in Foundation (i.e. it has a status of "Imported" or is in the PO/Sub and Change Order Sync view):
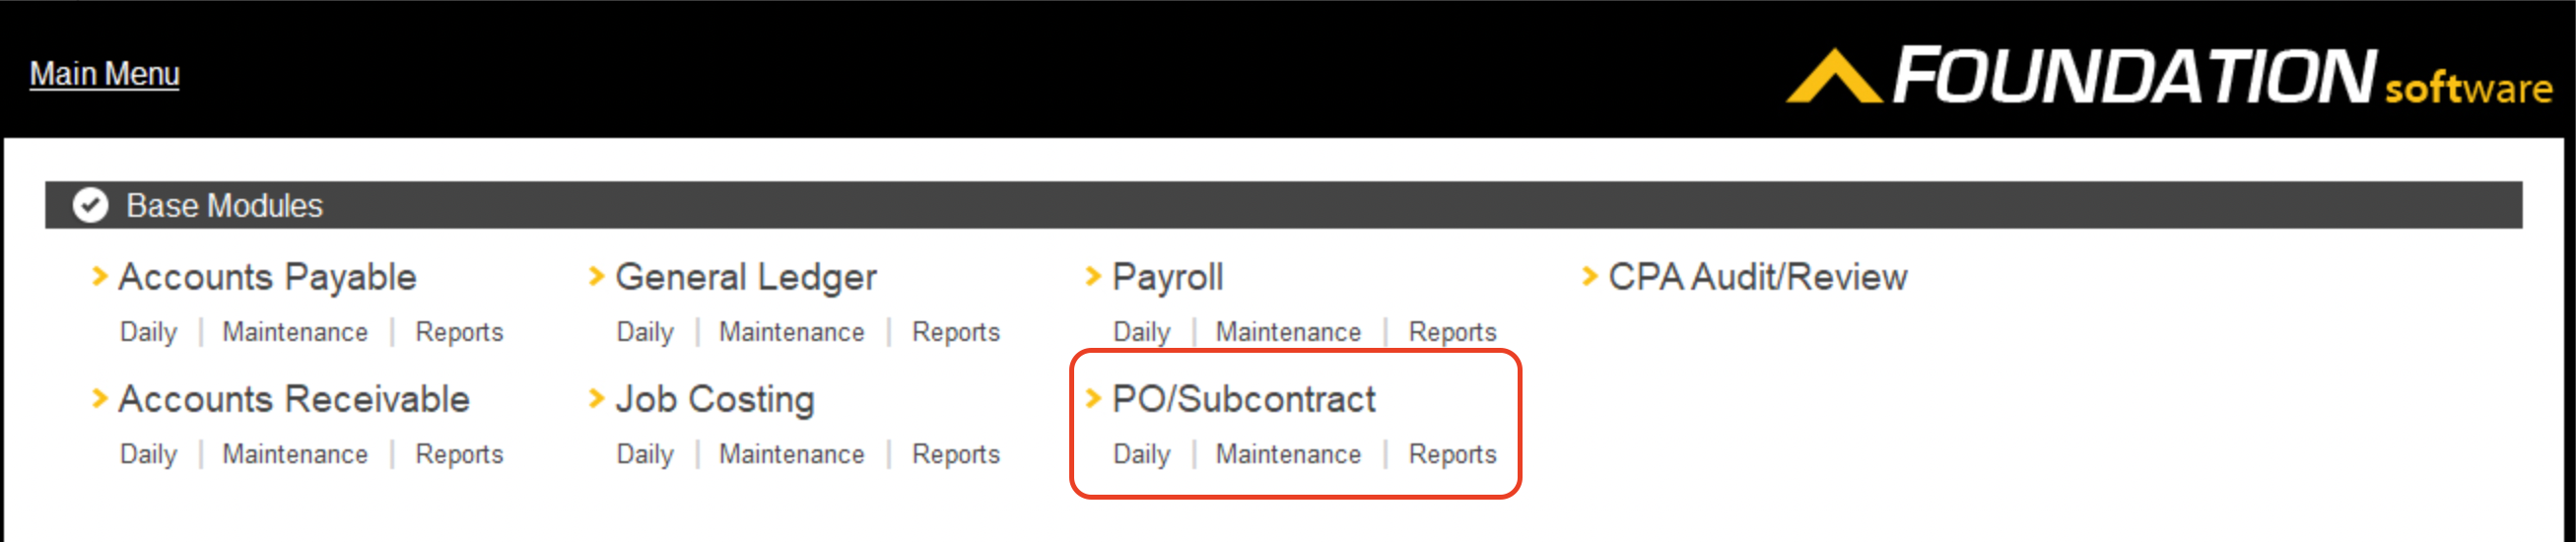
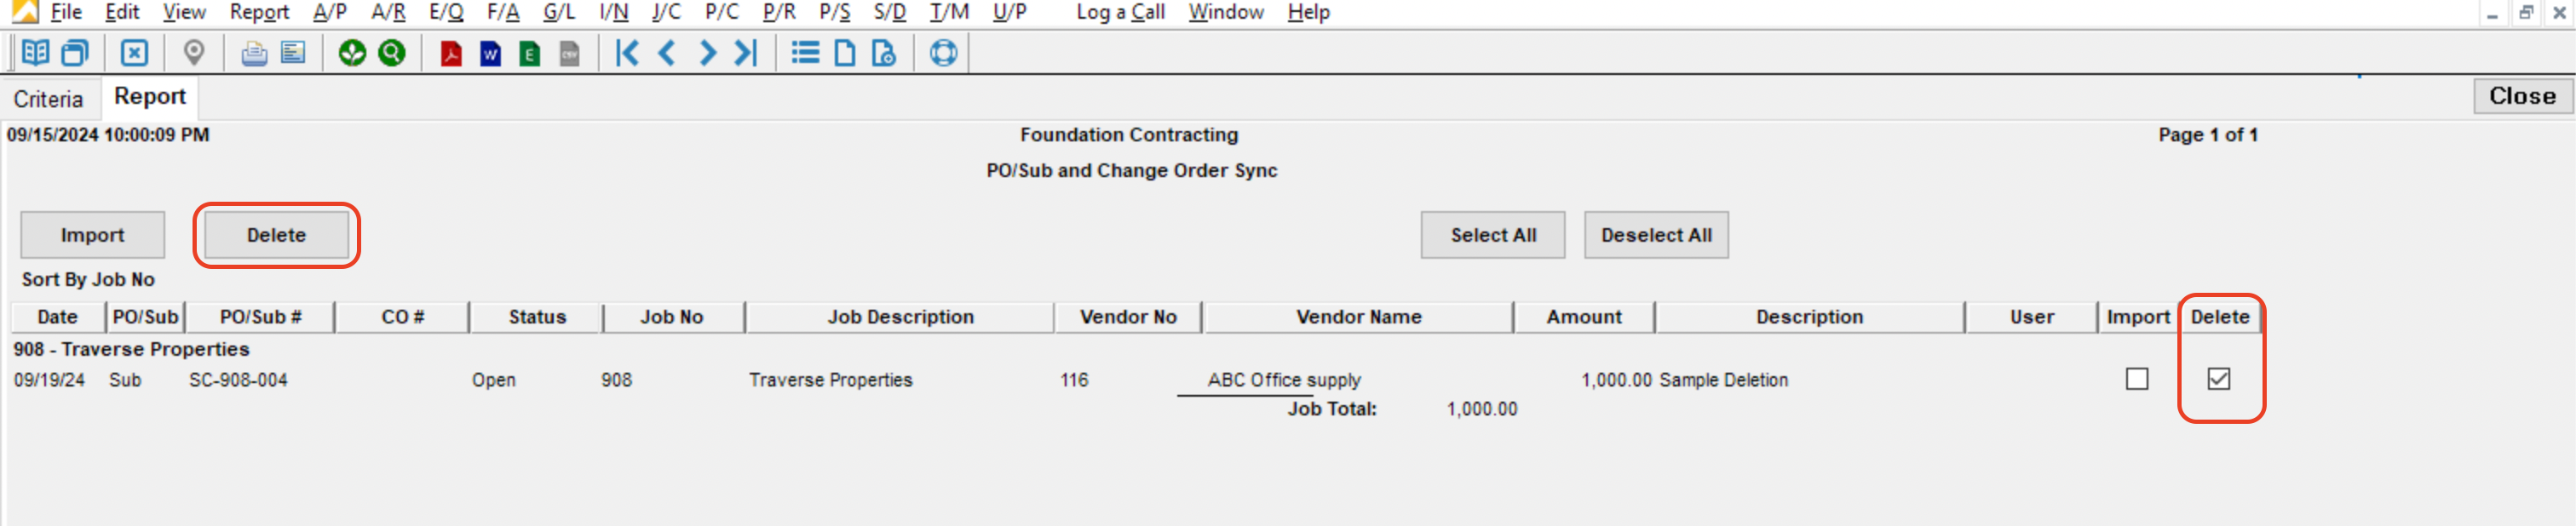
- From the main menu, select PO/Subcontract
- Select the PO/Sub and Change Order Sync view
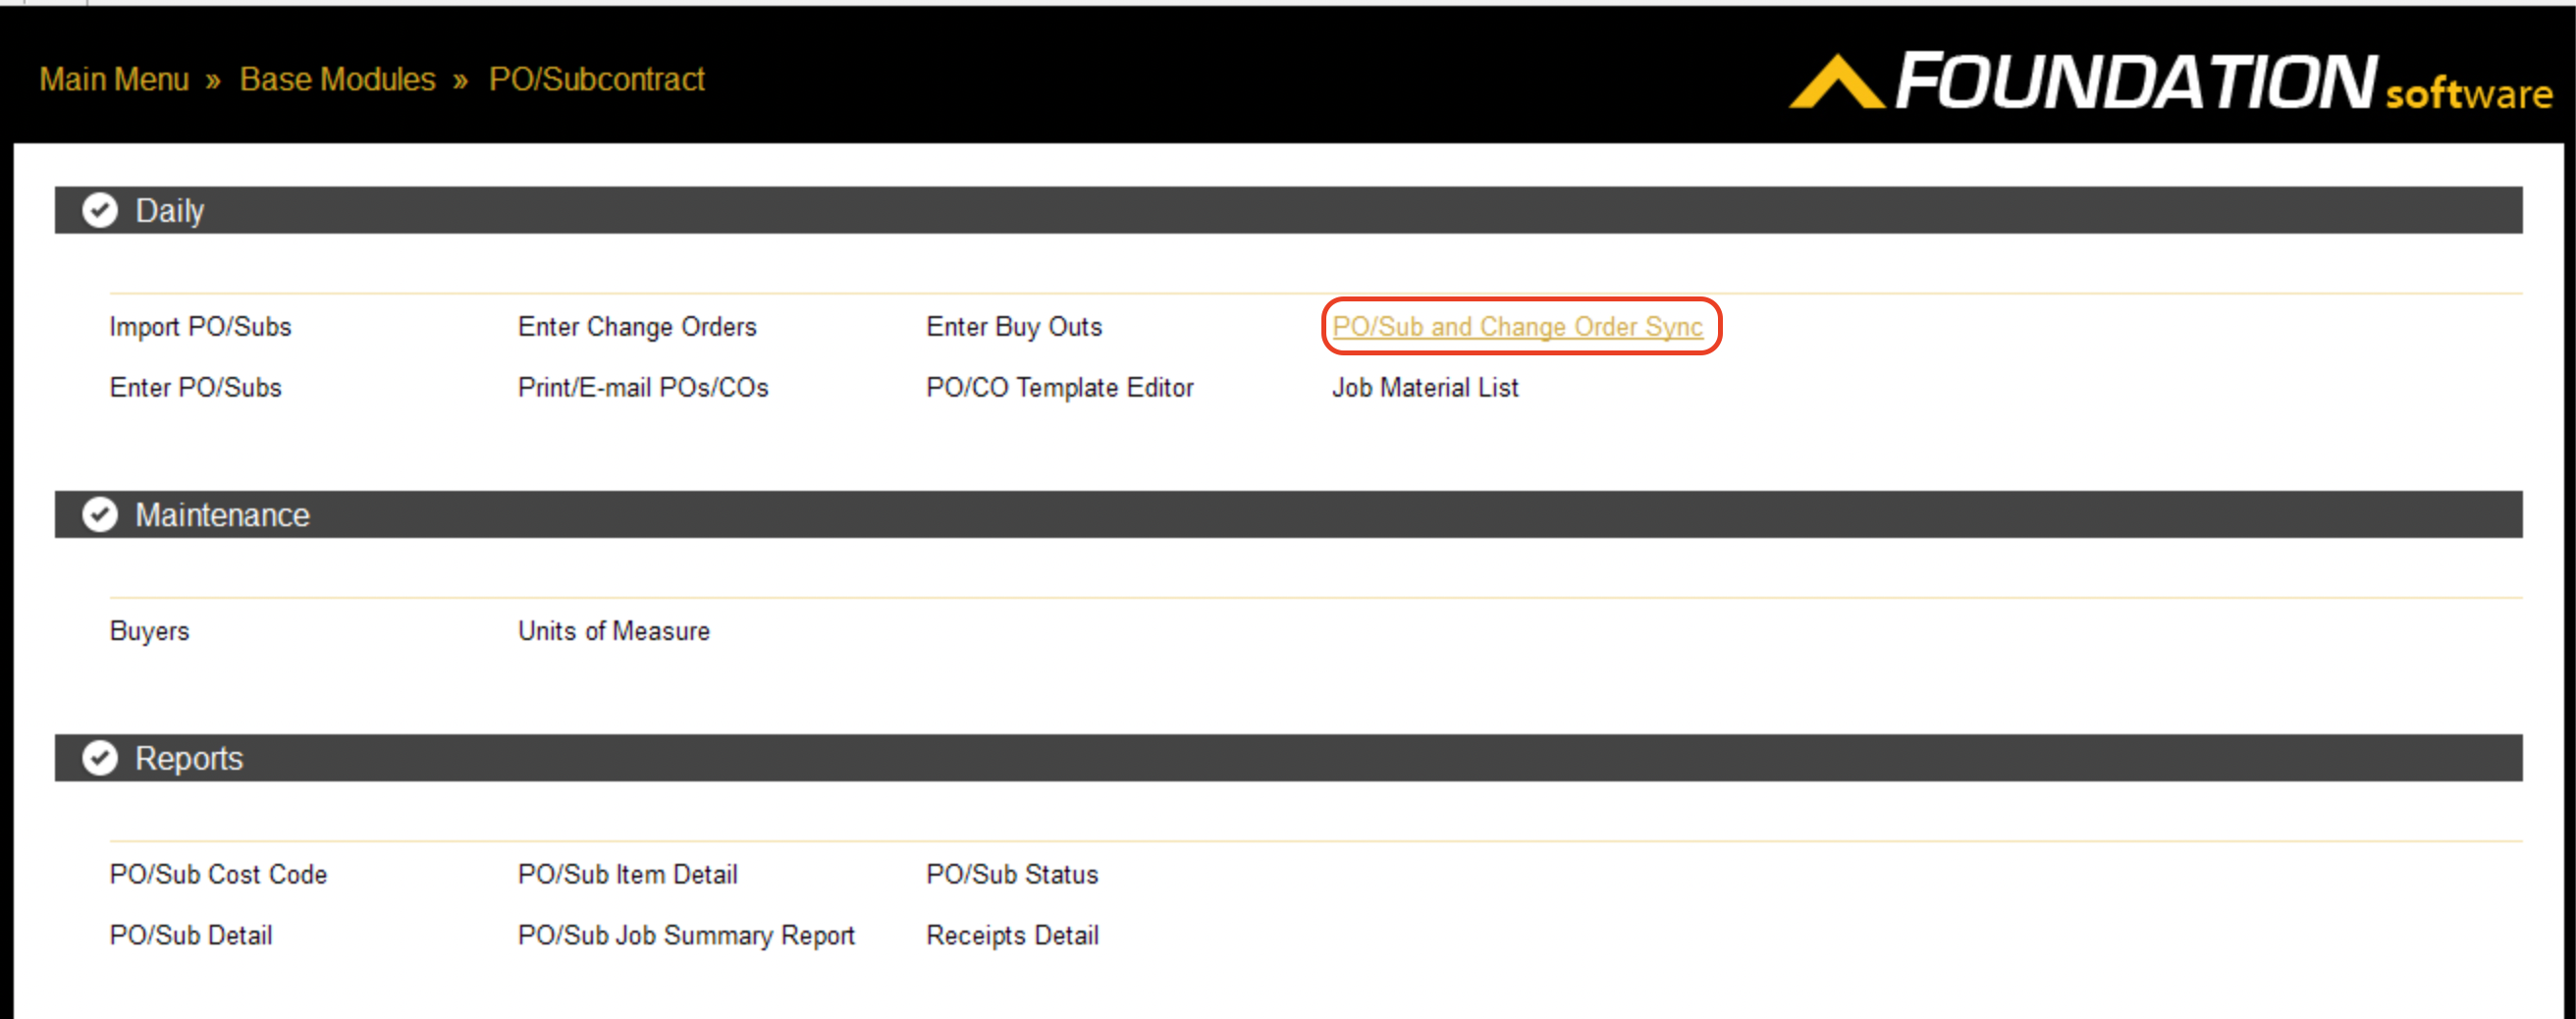
- Press Report, then select the Delete checkbox. Then press Delete
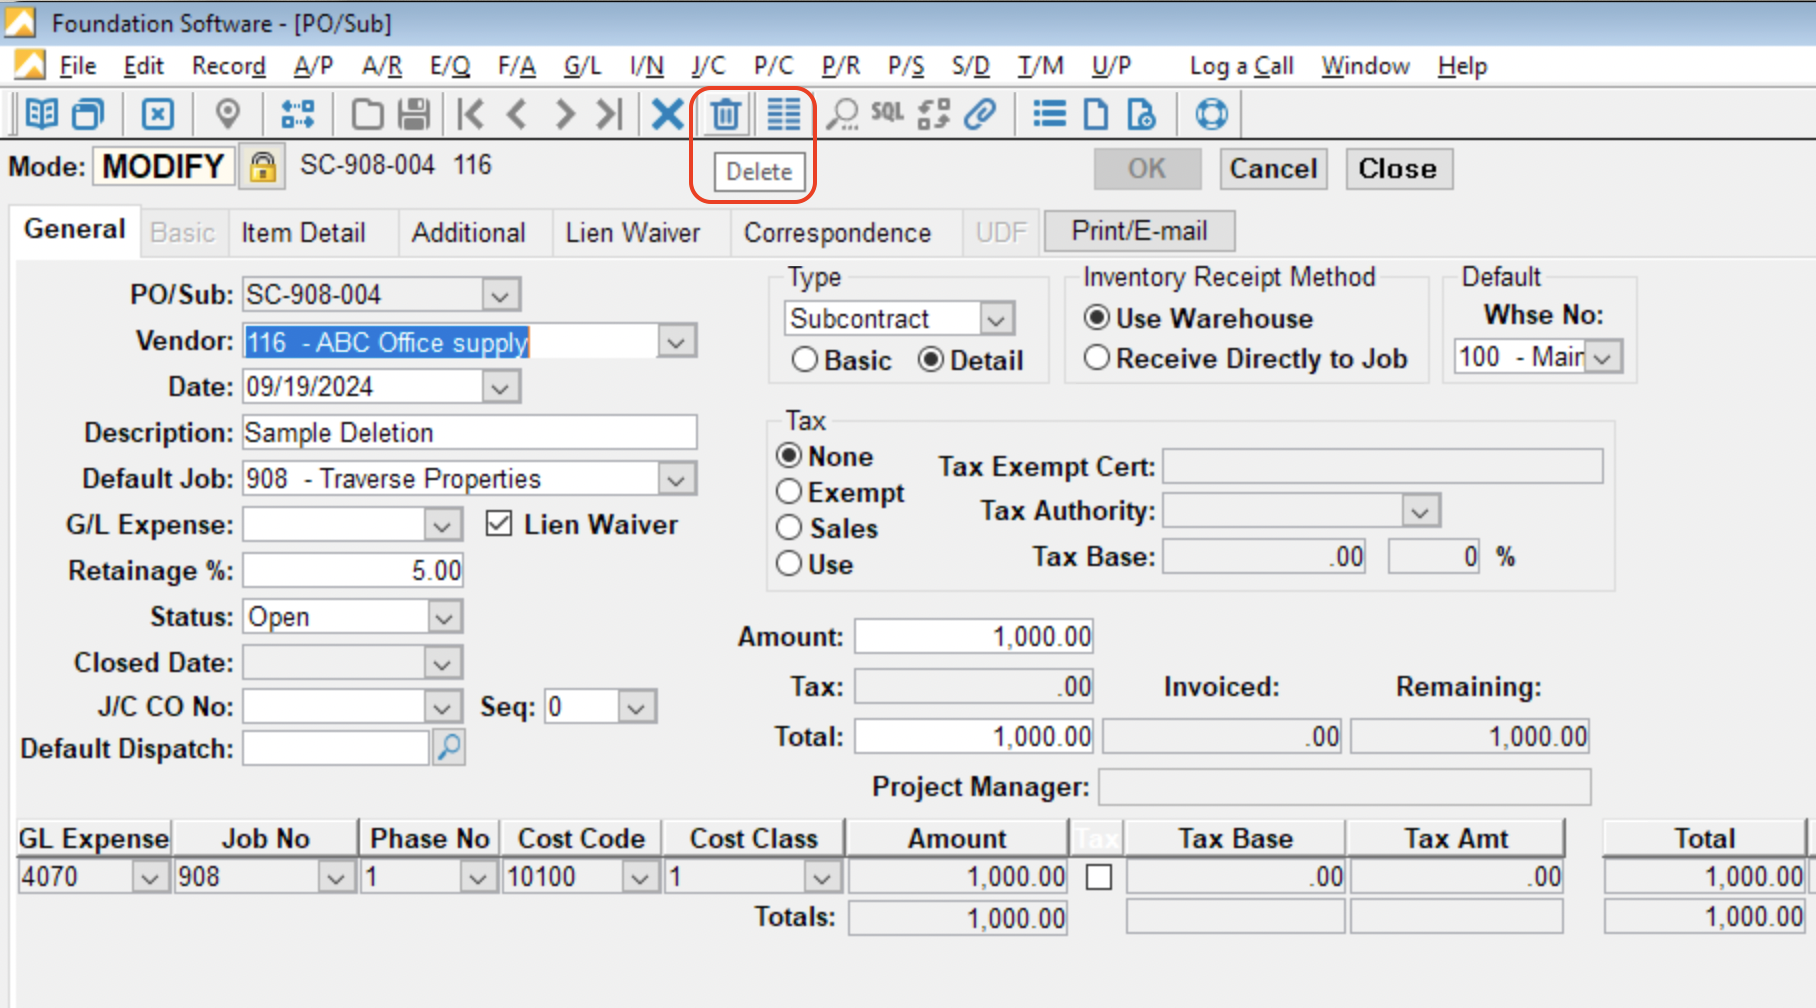
If the record has been imported in Foundation (i.e. it does NOT have a status of "Imported" or is visible in either the Enter PO/Subs or Enter Change Orders views), you can either modify the record manually with details from your Project Management system, or:
- Delete the record from either the Enter PO/Subs or Enter Change Orders views. You can do this by pressing the trashcan icon in the toolbar.
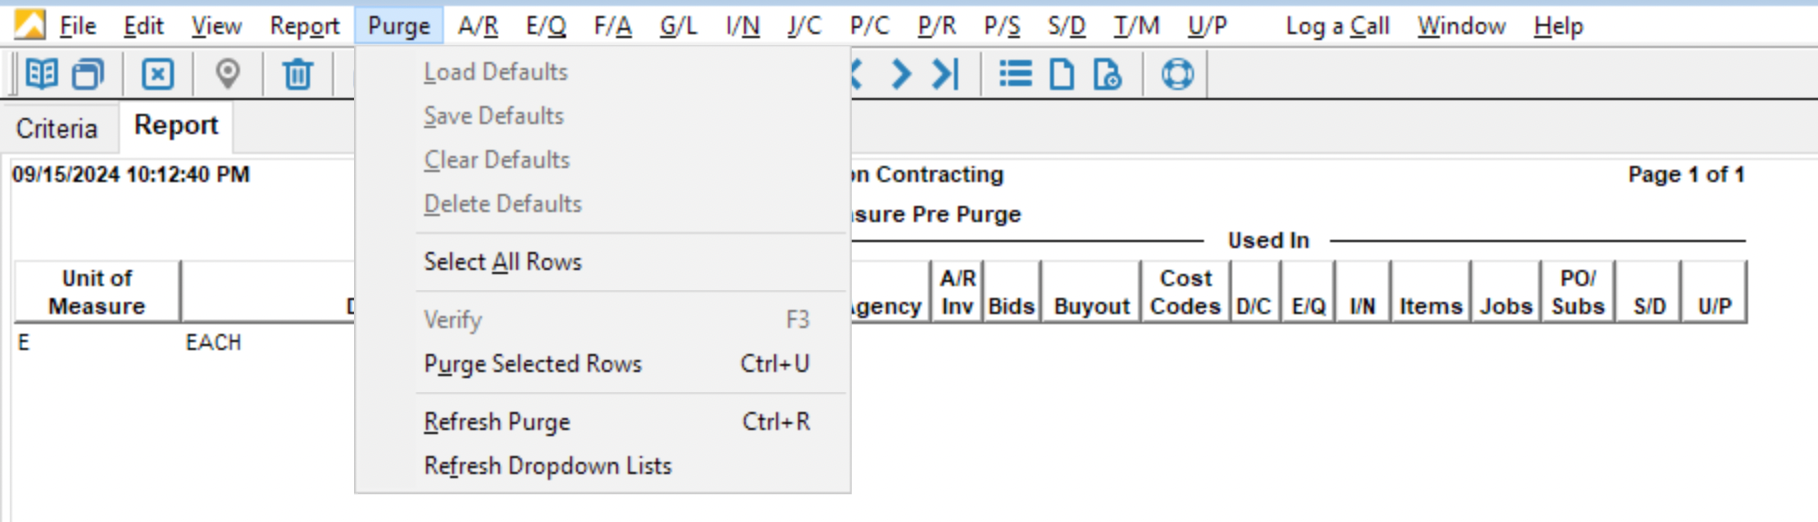
- From the main menu, select Controls --> Purge Data.

- Scroll down to the P/S Purges section and select PO/Subs.
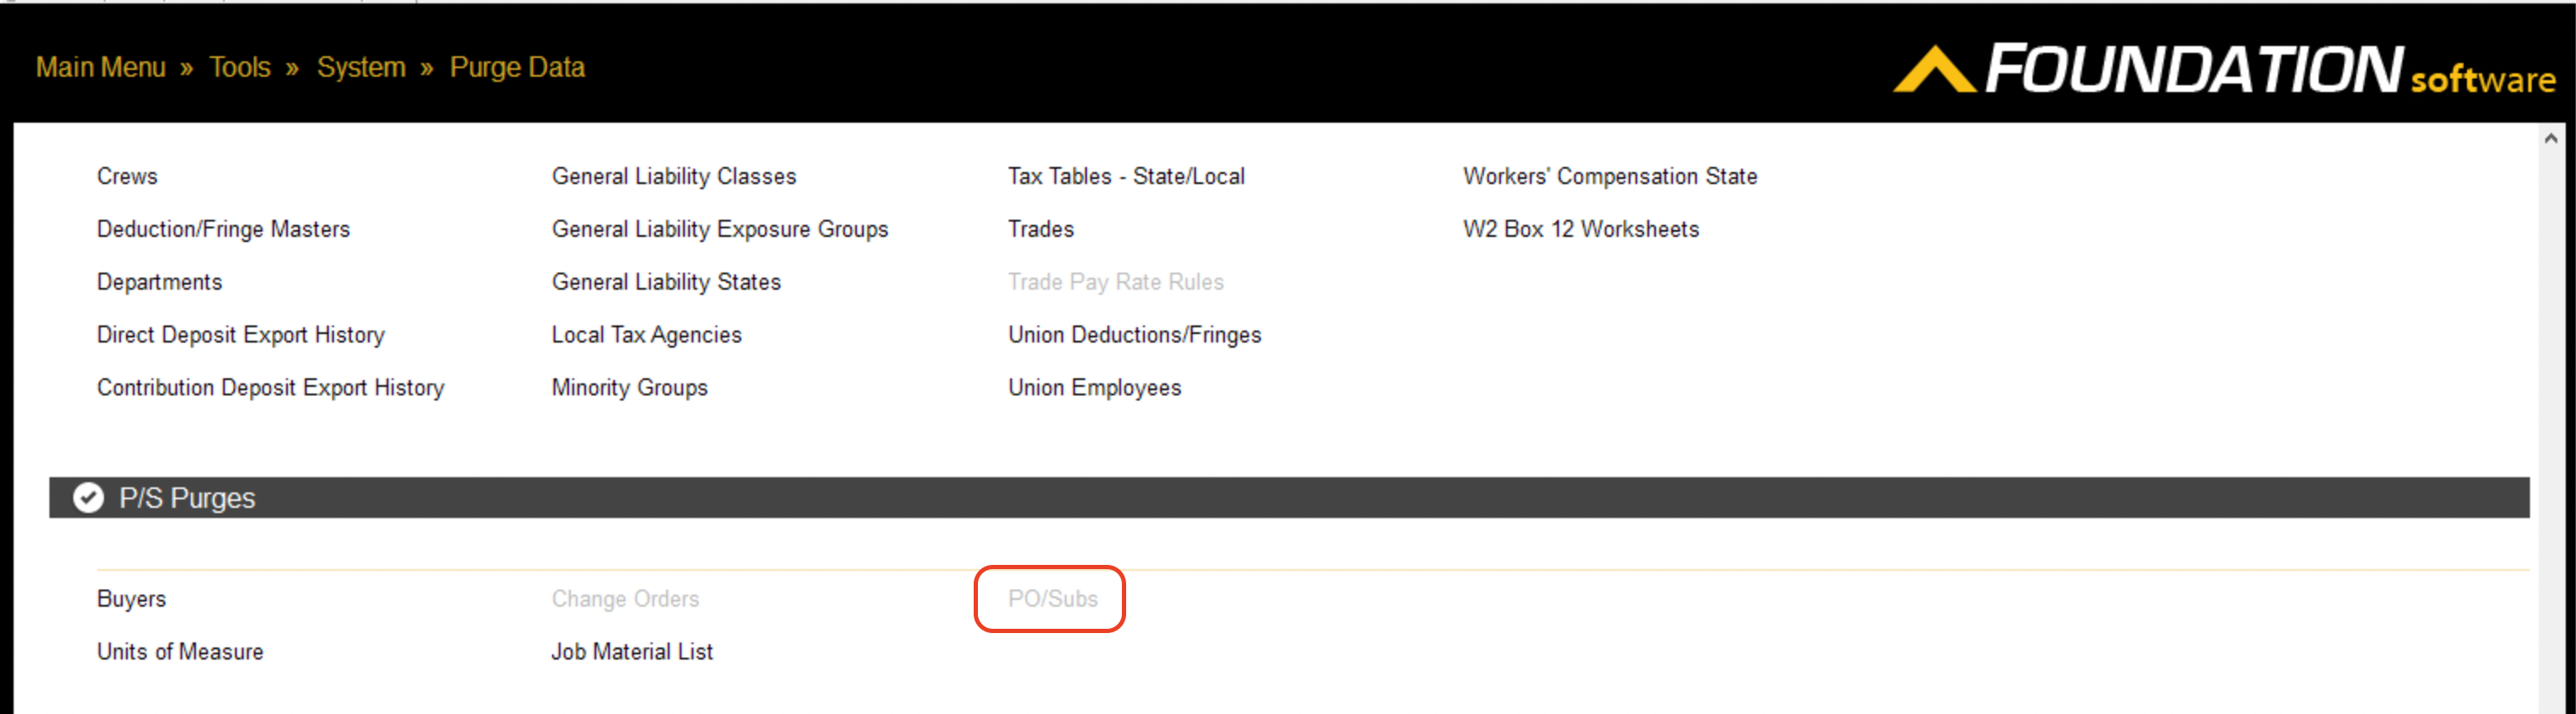
- In the Criteria tab, input the criteria for your report, then press the Report tab. Assuming the records match what you want to delete, either press "Ctrl + U" or Purge --> Purge Selected Records in the toolbar.
Cost Codes
Can we sync Cost Codes from Procore to Foundation?
No, we cannot write cost codes directly from Procore to Foundation. However, cost codes can be created in Foundation as a byproduct of syncing Budget Line Items (BLIs) via genies. Therefore, Cost Code syncing is always either Foundation → Procore or Link-only. There is no direct Procore → Foundation sync for cost codes.
How are Cost Codes exported to a Foundation Project?
When a Budget is exported from your Project Management system to Foundation, Agave adds the Cost Codes from that Budget to the Project in Foundation. Agave Sync then auto-links the Cost Codes for that Project.
If a Cost Code does not exist in Foundation at the Company-level, Agave Sync will add it for you.
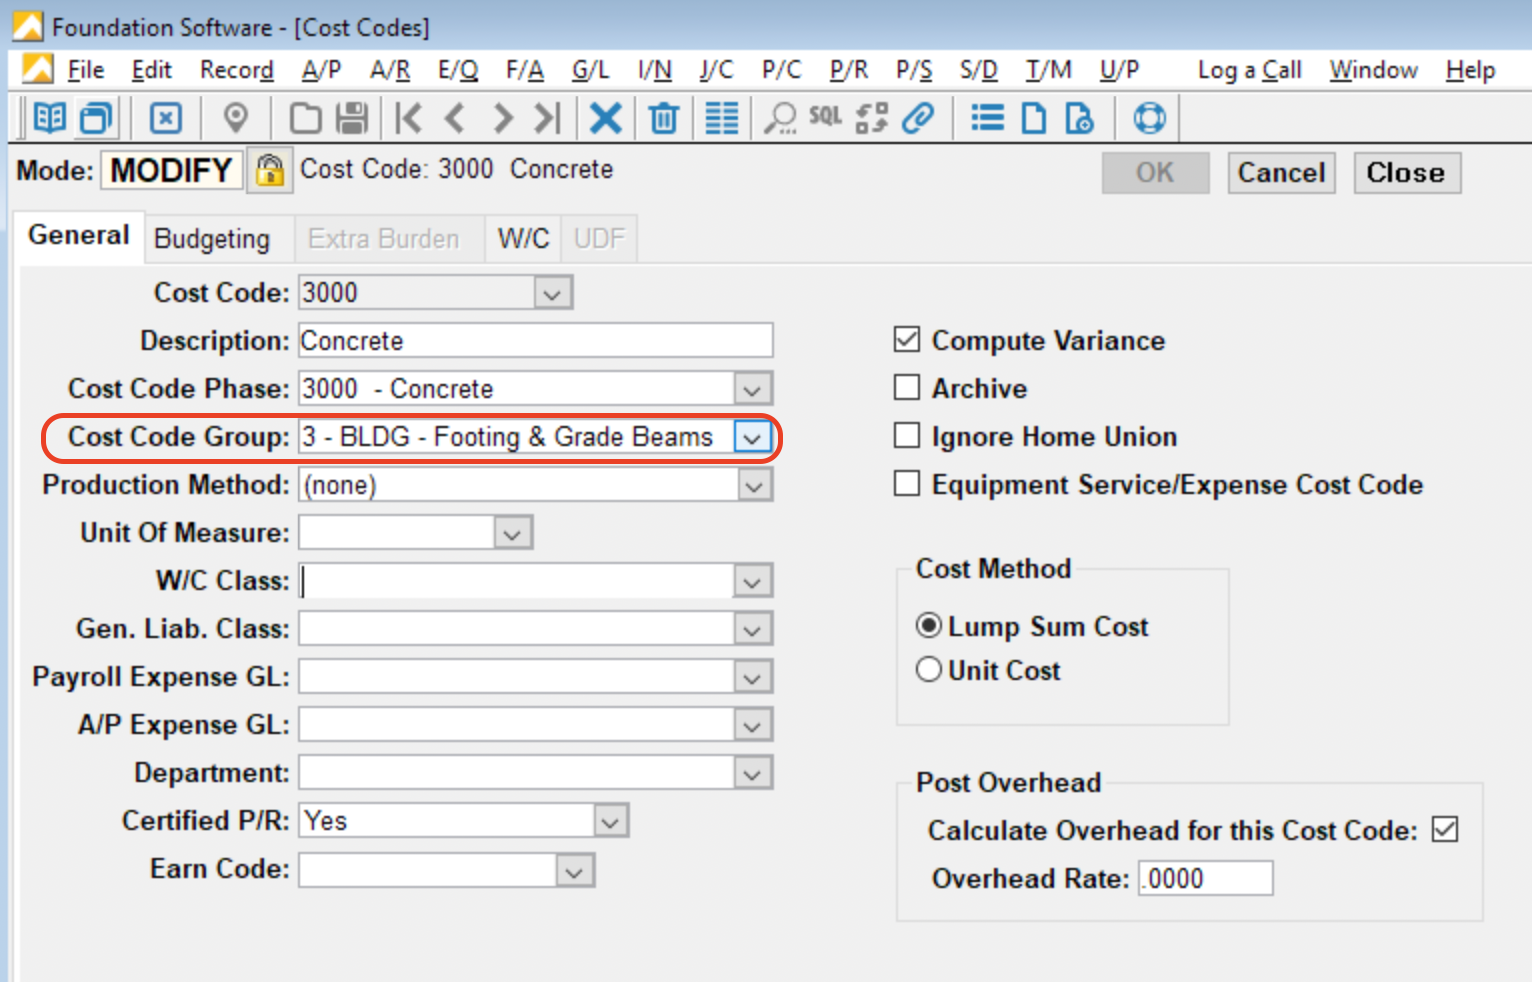
Can I sync Cost Code Groups from Foundation to my Project Management system?
Yes, Agave Sync allows for you to sync Cost Code Groups to your Project Management system. These Cost Code Groups can serve as a first-tier in your Cost Code structure.
If you would like to sync Cost Code Groups from Foundation to your Project Management system, let your Agave Account Manager know and they can enable a setting.
Customers
Error: Customer with Code "#" Already Exists
Agave uses Foundation's built-in "Next Number" feature when creating Customers in Foundation. If you receive the error Foundation: A Customer with code "X" already exists, it is from the "Next Number" already being in use in Foundation.
To reset the "Next Number" in Foundation:
- Navigate to Main Menu > Tools > System > Other and select Next Number:
- Select the relevant data type (Customer in this example) and reset its number (i.e. to a later number):
Projects (Jobs)
Can I exclude certain Projects (Jobs) from syncing to my PM System?
Yes. If you prefer not to sync specific Jobs to your PM System, Agave Sync allows you to apply filters to exclude them.
Common examples of Projects that you might want to exclude include:
- Inactive Jobs
- Specific Job Categories (e.g. Service Jobs)
- Older Jobs
- Certain Job Numbers (e.g. Jobs that start with "XX")
Let your Agave Account Manager about the filters you’d like to apply, and they will update your sync configuration accordingly.
Error: Project with Code "#" Already Exists
Agave uses Foundation's built-in "Next Number" feature when creating projects in Foundation. If you receive the error Foundation: A Job with code "X" already exists, it is from the "Next Number" already being in use in Foundation.
To reset the "Next Number" in Foundation:
- Navigate to Main Menu > Tools > System > Other and select Next Number:
- Select the relevant data type (Customer in this example) and reset its number:
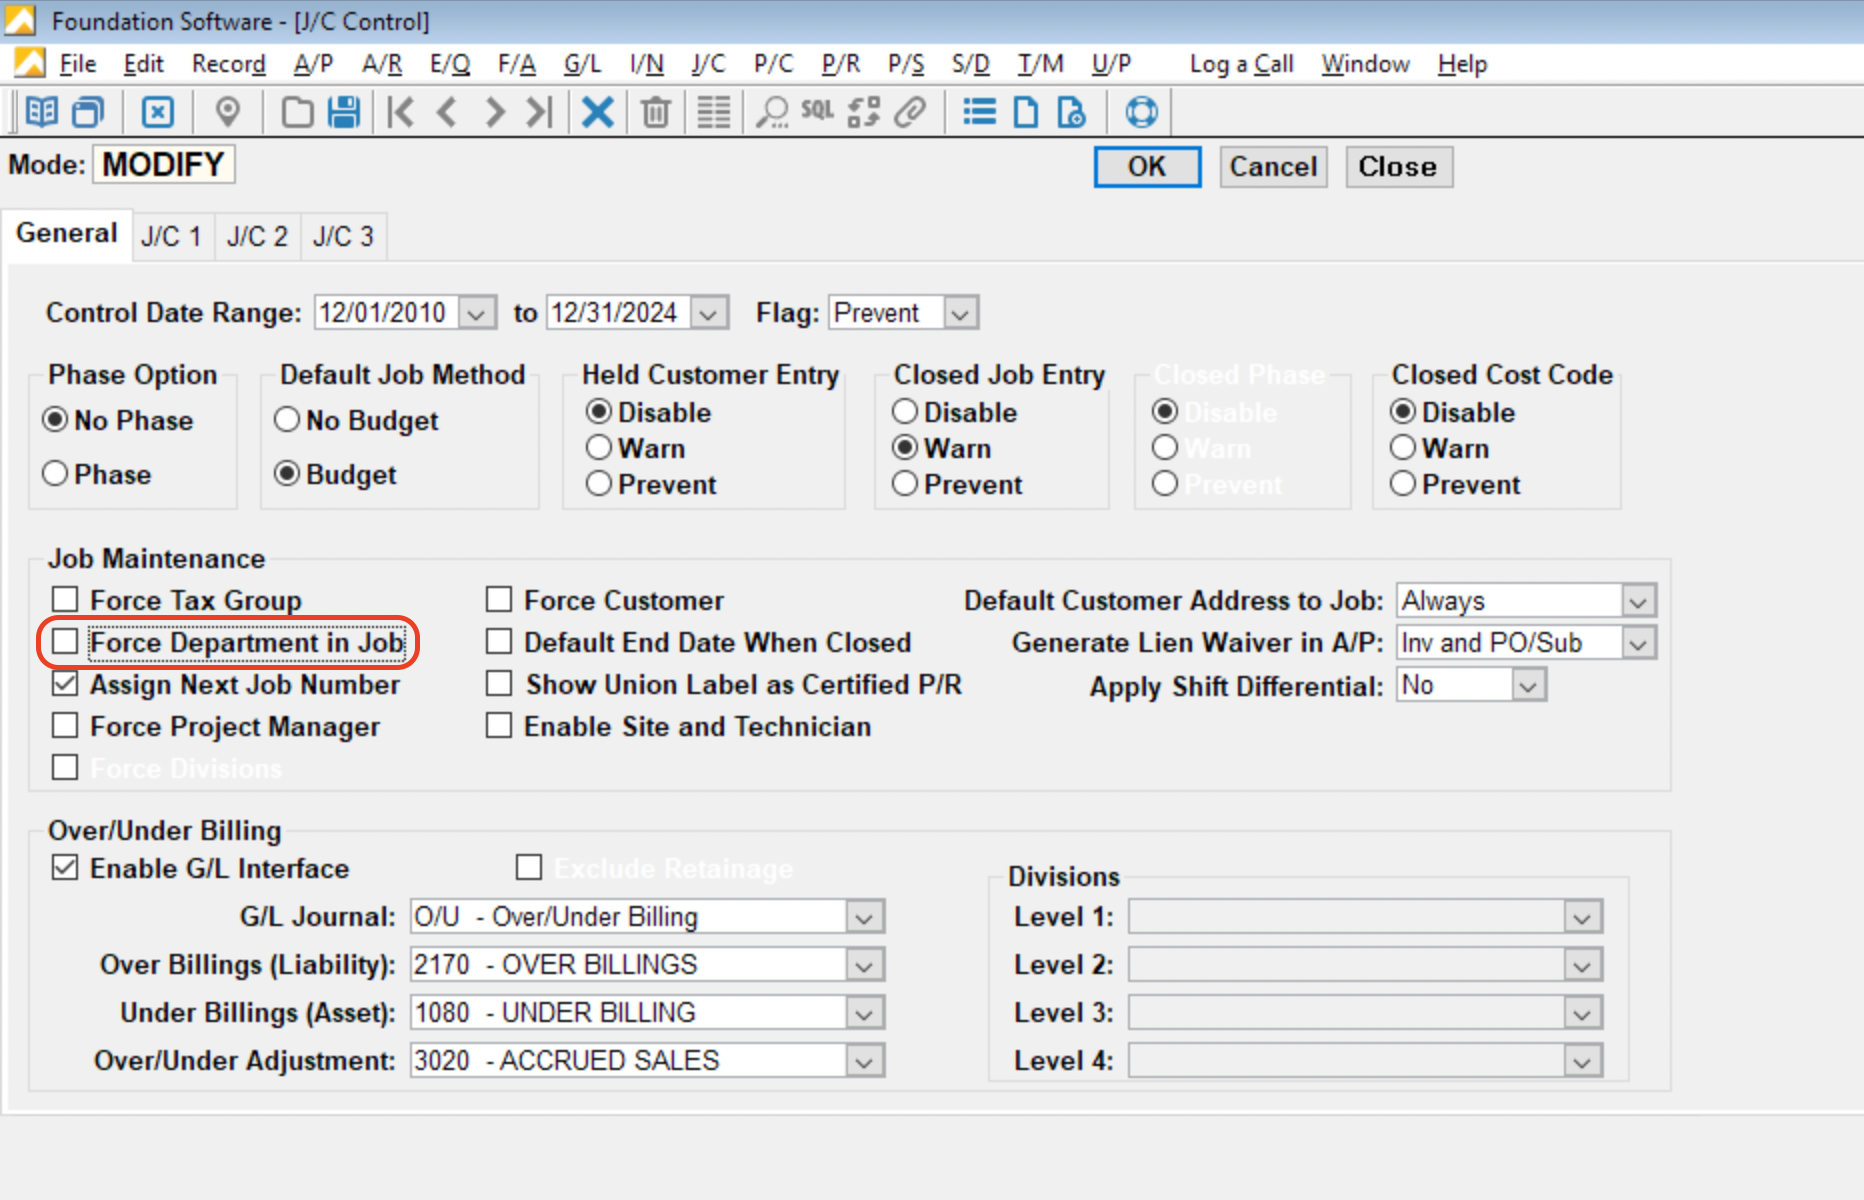
Error: Unable to create the Project because the setting “Force Department in Job” is enabled in Control → J/C.
This error is from the setting “Force Department in Job” is enabled in the J/C Control file. Force Department in Job
For context, when defining jobs, you can choose to indicate a department that should be used in Payroll. If you want the Payroll Department field on the Job "Payroll" tab to be required, you can enable this checkbox. If this checkbox is disabled, the Department will not be required on the job, but you may choose to enter one.
To fix this error:
- In Foundation, navigate to Controls --> J/C.
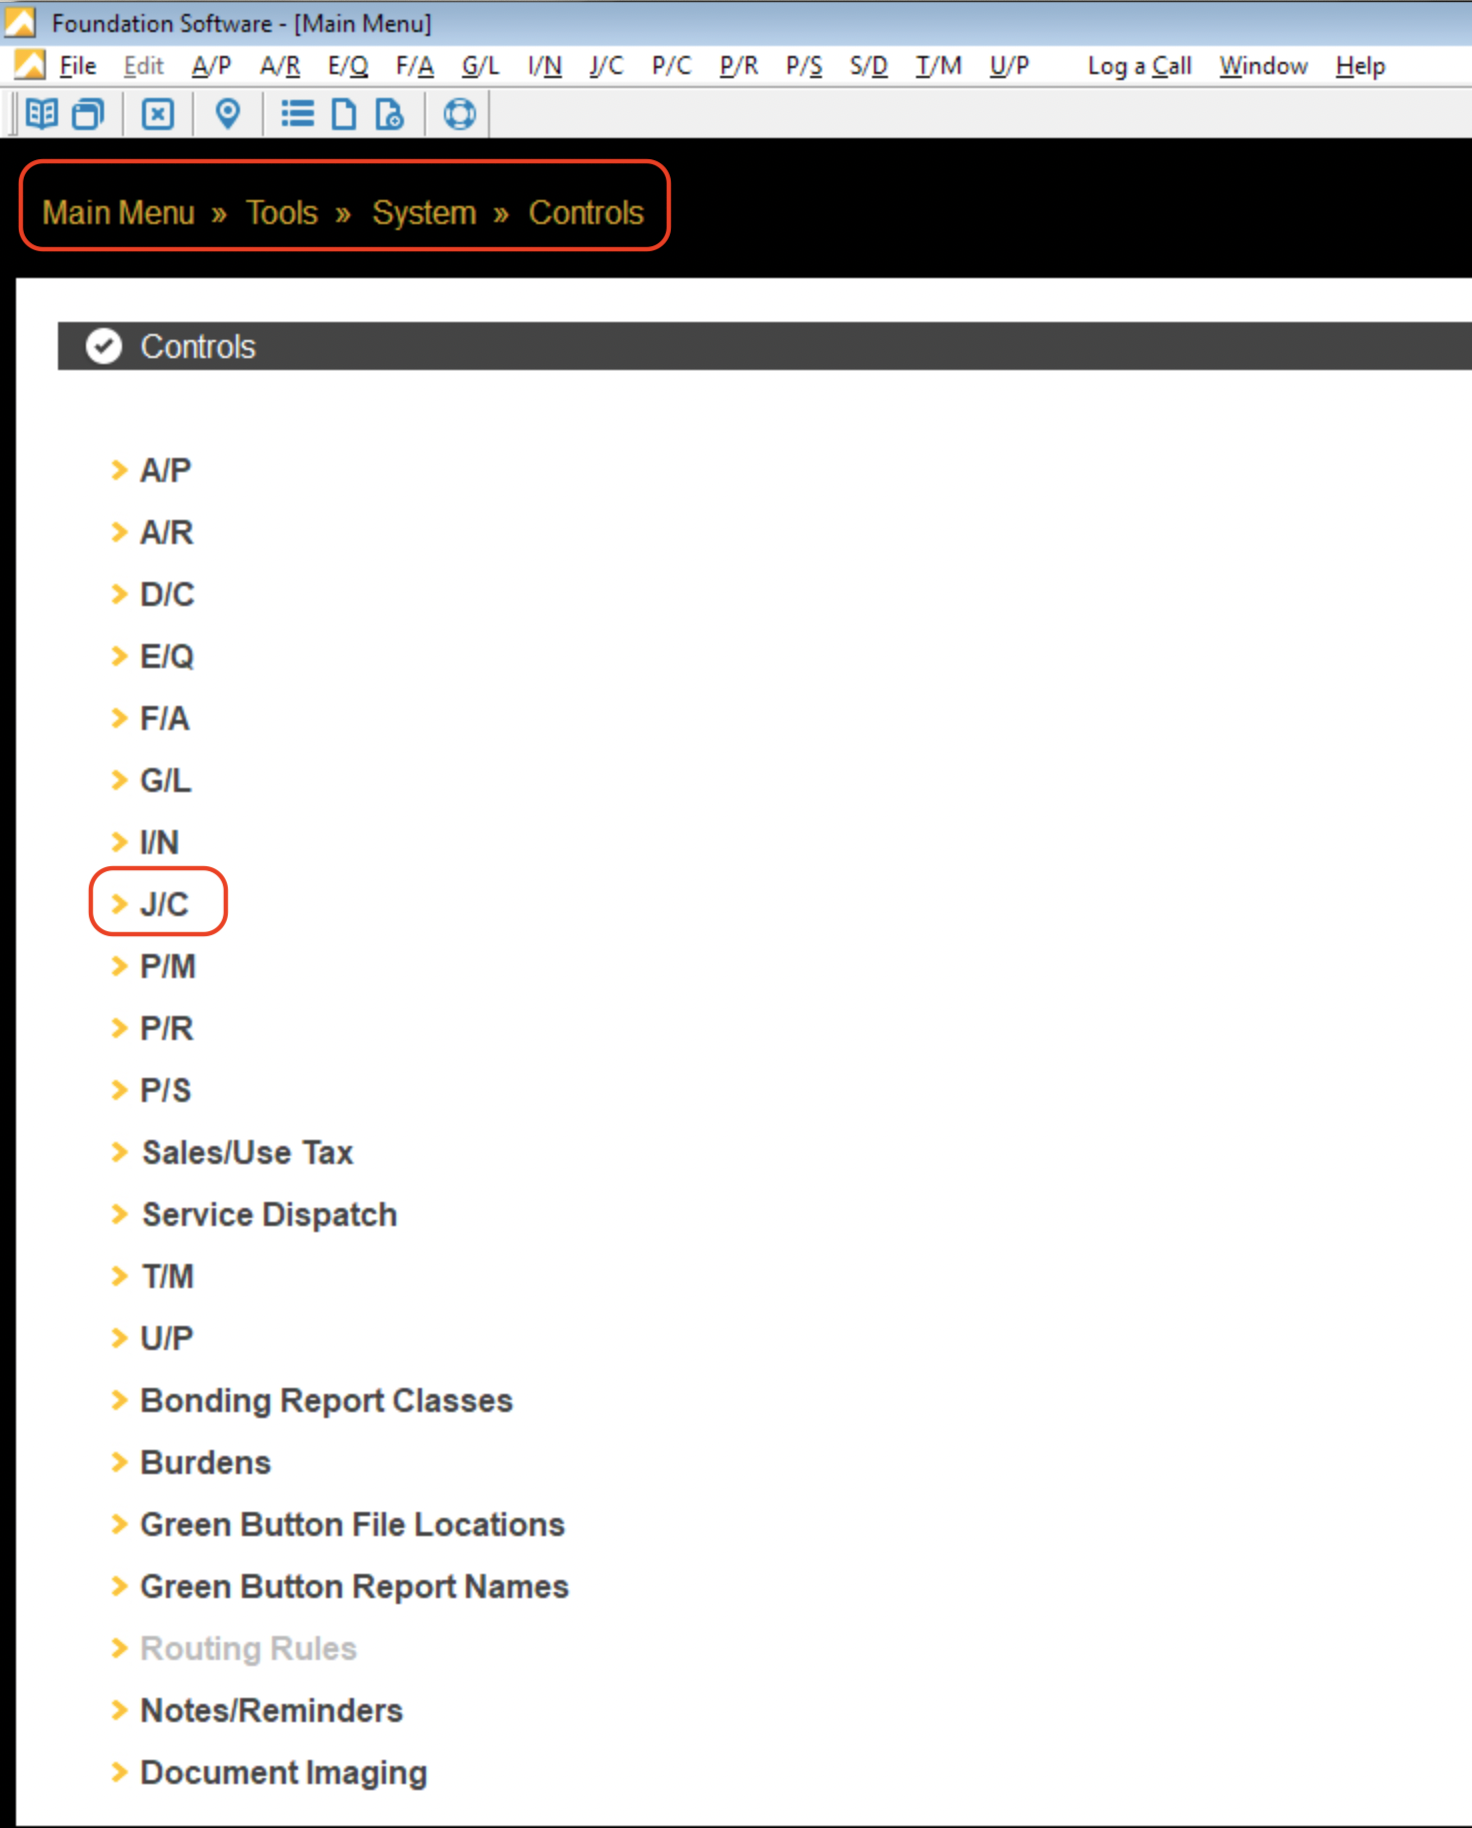
- Disable this setting Force Department in Job.
Purchase Orders
Why am I getting an error saying a record already exists even though I deleted it?
You may have deleted a record but still receive an error saying the record exists after re-syncing it (example below). Alternatively, You may need to modify and re-sync a Purchase Order, Subcontract, or Purchase Order/Subcontract Change Order record in the Project Management system after it has been exported to Foundation.
Depending on the status of the export, you have a two options:
If the record has not been imported in Foundation (i.e. it has a status of "Imported" or is in the PO/Sub and Change Order Sync view):
- From the main menu, select PO/Subcontract
- Select the PO/Sub and Change Order Sync view
- Press Report, then select the Delete checkbox. Then press Delete
If the record has been imported in Foundation (i.e. it does NOT have a status of "Imported" or is visible in either the Enter PO/Subs or Enter Change Orders views), you can either modify the record manually with details from your Project Management system, or:
- Delete the record from either the Enter PO/Subs or Enter Change Orders views. You can do this by pressing the trashcan icon in the toolbar.
- From the main menu, select Controls --> Purge Data.
- Scroll down to the P/S Purges section and select PO/Subs.
- In the Criteria tab, input the criteria for your report, then press the Report tab. Assuming the records match what you want to delete, either press "Ctrl + U" or Purge --> Purge Selected Records in the toolbar.
Why is my Purchase Order ID conflicting with an existing Subcontract in Foundation?
Foundation has a 10-character limit for Purchase Order and Subcontract IDs, and stores both POs and Subcontracts in the same table. If a Purchase Order or Subcontract is synced from Procore and the ID is longer than 10 characters, only the last 10 characters will be used in Foundation.
This can cause ID conflicts when syncing both POs and SCs on the same job. Procore's default naming convention is <record type>-<job number>-<sequence> (e.g. PO-12345-001 and SC-12345-001), but because Foundation truncates from the left, the record type prefix gets cut off — making both IDs appear identical (e.g. both become -12345-001).
Recommendation: Before syncing the first PO or SC on a job, manually change the Procore commitment's # field to a format like <job number><sequence><record type> (e.g. 1234501PO and 1234501SC). This keeps the record type identifier at the end where it won't be truncated, preventing conflicts. Once you manually change the format on a commitment, all future commitments of that type on the same job will automatically increment using the new format.
Error: The name field is required for Purchase Orders.
Foundation requires a date field when creating Purchase Orders.
To resolve this error:
-
Go to the Purchase Order in your PM System.
-
Add a value to the "Title" or "Name" field.
Subcontracts
Why am I getting an error saying a record already exists even though I deleted it?
You may have deleted a record but still receive an error saying the record exists after re-syncing it (example below). Alternatively, You may need to modify and re-sync a Purchase Order, Subcontract, or Purchase Order/Subcontract Change Order record in the Project Management system after it has been exported to Foundation.
Depending on the status of the export, you have a two options:
If the record has not been imported in Foundation (i.e. it has a status of "Imported" or is in the PO/Sub and Change Order Sync view):
- From the main menu, select PO/Subcontract
- Select the PO/Sub and Change Order Sync view
- Press Report, then select the Delete checkbox. Then press Delete
If the record has been imported in Foundation (i.e. it does NOT have a status of "Imported" or is visible in either the Enter PO/Subs or Enter Change Orders views), you can either modify the record manually with details from your Project Management system, or:
- Delete the record from either the Enter PO/Subs or Enter Change Orders views. You can do this by pressing the trashcan icon in the toolbar.
- From the main menu, select Controls --> Purge Data.
- Scroll down to the P/S Purges section and select PO/Subs.
- In the Criteria tab, input the criteria for your report, then press the Report tab. Assuming the records match what you want to delete, either press "Ctrl + U" or Purge --> Purge Selected Records in the toolbar.
Why is my Subcontract ID conflicting with an existing Purchase Order in Foundation?
Foundation has a 10-character limit for Purchase Order and Subcontract IDs, and stores both POs and Subcontracts in the same table. If a Purchase Order or Subcontract is synced from Procore and the ID is longer than 10 characters, only the last 10 characters will be used in Foundation.
This can cause ID conflicts when syncing both POs and SCs on the same job. Procore's default naming convention is <record type>-<job number>-<sequence> (e.g. PO-12345-001 and SC-12345-001), but because Foundation truncates from the left, the record type prefix gets cut off — making both IDs appear identical (e.g. both become -12345-001).
Recommendation: Before syncing the first PO or SC on a job, manually change the Procore commitment's # field to a format like <job number><sequence><record type> (e.g. 1234501PO and 1234501SC). This keeps the record type identifier at the end where it won't be truncated, preventing conflicts. Once you manually change the format on a commitment, all future commitments of that type on the same job will automatically increment using the new format.
Error: The name field is required for Subcontracts.
Foundation requires a date field when creating Subcontracts.
To resolve this error:
-
Go to the Subcontract in Autodesk Build or Procore.
-
Add a value to the "Title" or "Name" field.
Sub Jobs
How are Sub Jobs (Phases) exported to a Foundation Project?
When a Budget is exported from your Project Management system to Foundation, Agave adds the Sub Jobs (Phases) from that Budget to the Project in Foundation. Agave Sync then auto-links the Sub Jobs for that Project.
A Sub Job (Phase) must exist in Foundation at the Company-level for Agave Sync to export it to a Foundation Project. To add Sub Jobs (Phases), go to Job Costing-->Maintenance-->Phases.
Timecard Entries
Syncing Timecards to Overhead Projects
You may want to sync "Overhead" Timecards (e.g. for holiday pay, vacation) between your Project Management system and Foundation. These types of Timecards are synced to designated "Overhead" Projects, and intended to track indirect labor costs.
There are two approaches for syncing Timecard Entries to Overhead Projects in Foundation:
-
Option 1: Create a distinct Project for Overhead Timecards: you can create a dedicated Project in Foundation and your Project Management system, and only enter Overhead Timecards in that Project. This is the cleanest approach for syncing Overhead Timecards, but it requires your Employees to enter those Timecards in the Overhead Projects (versus the Projects they are on).
-
Option 2: Create Earning Codes specific to Overhead Timecards: you can create Earning Codes (e.g. "Holiday Pay") in your Project Management system and Foundation and designate them as "Overhead". In your Project Management system, these Earning Codes can be assigned to Timecards on any Project. When these Timecard Entries are synced to Foundation, these Timecard Entries are assigned to the Overhead Project instead.
For Option 2, you will need to notify your Agave Account Manager which Earn Codes in your Project Management system and Project in Foundation you would like to use.
Units of Measure
Adding Units of Measure to Foundation
If you receive an error like the following: "The Unit of Measure associated with this model has not been synced", it's possible the Unit of Measure may not exist in Foundation. To fix this error:
- From Foundation's homepage, go to Job Costing --> Maintenance:
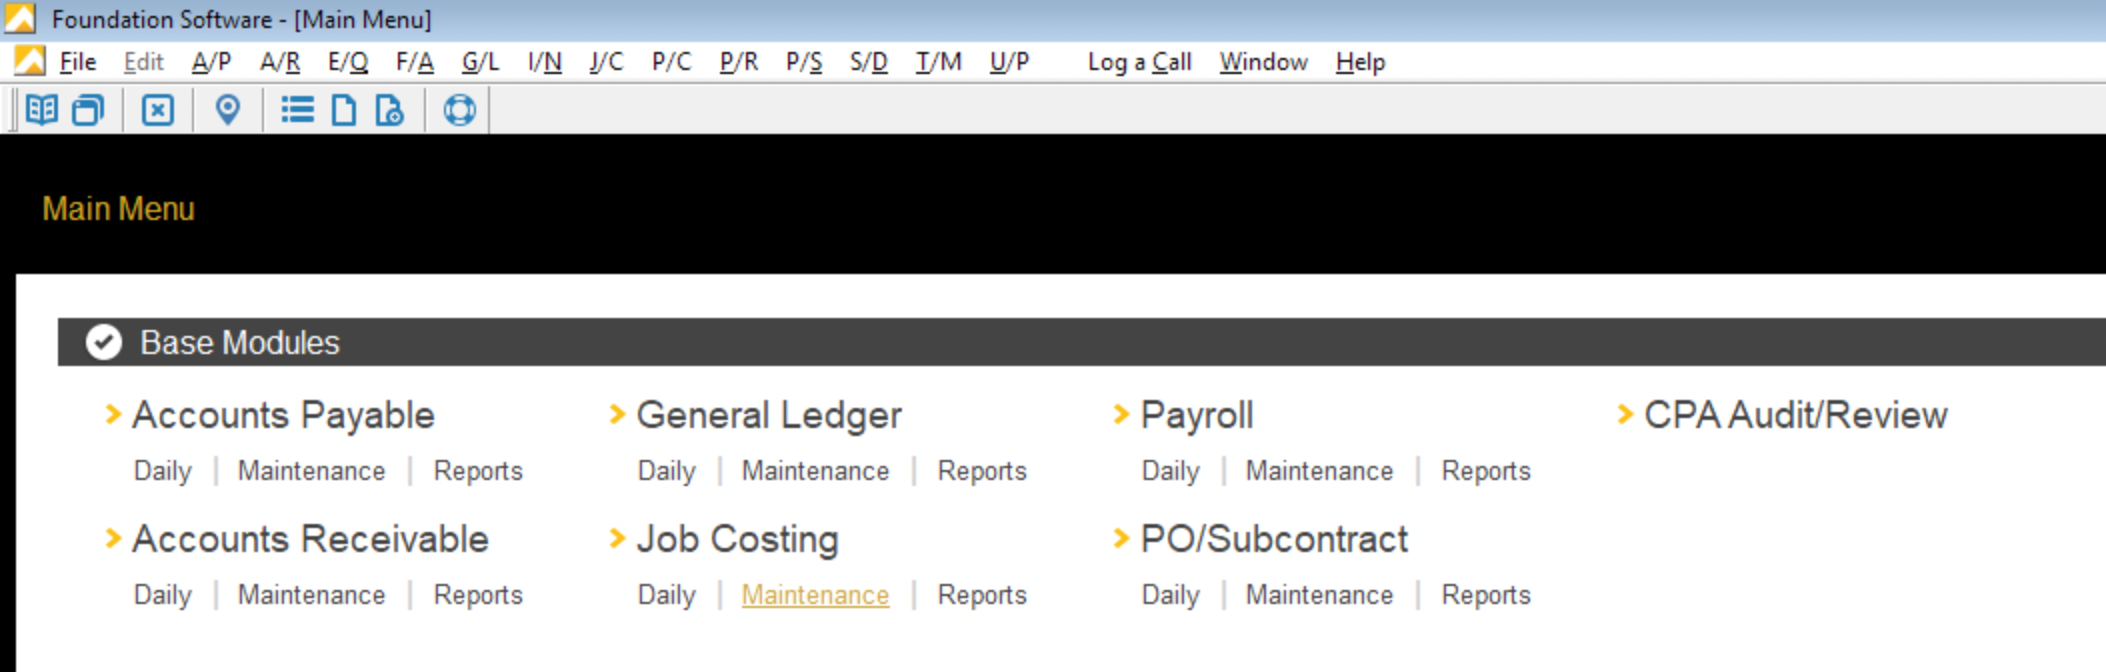
- Select Units of Measure:
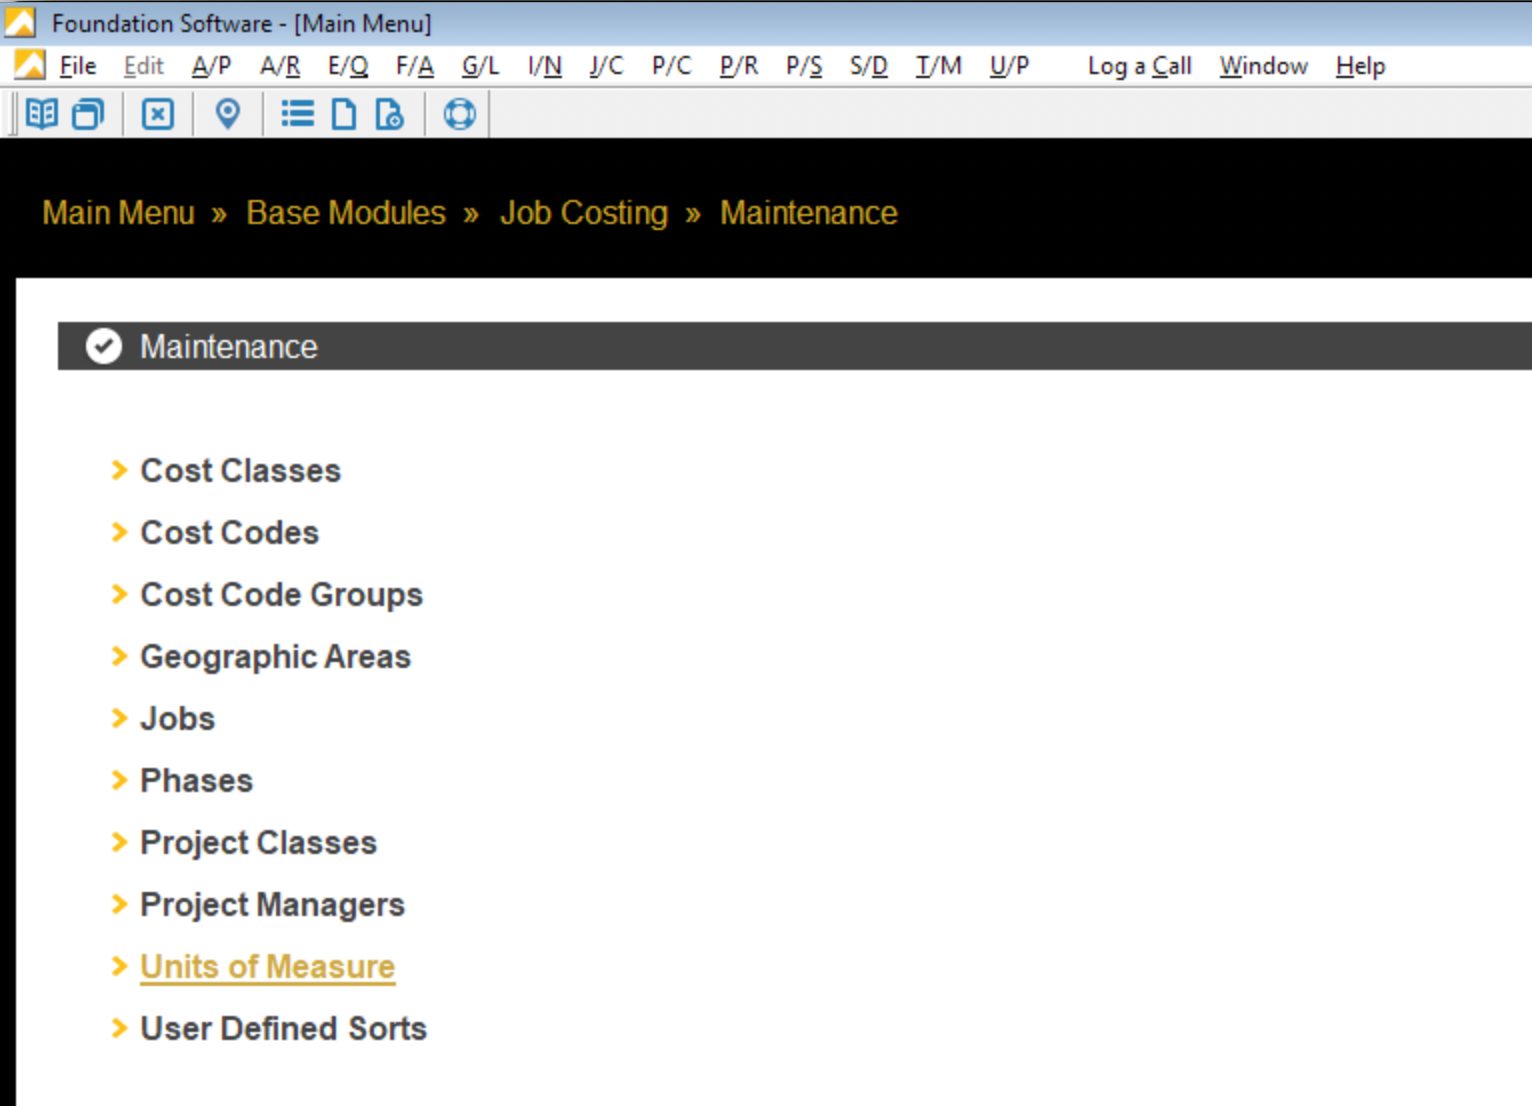
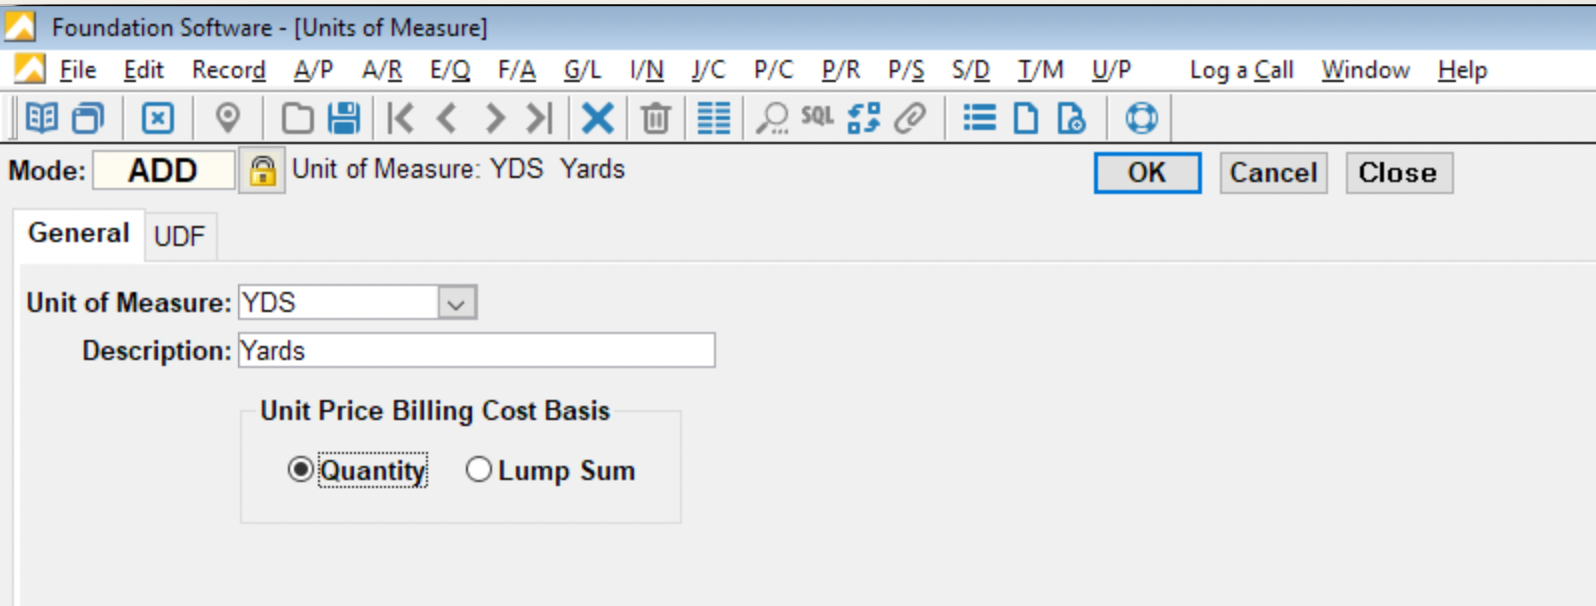
- Add the Unit of Measure, and press OK:
Vendors
Can I exclude certain Vendors from syncing to my PM System?
Yes. If you prefer not to sync specific Vendors to your PM System, Agave Sync allows you to apply filters to exclude them.
Common examples of Vendors that you might want to exclude include:
- Inactive Vendors
- Specific Vendor Categories (e.g., Employees, Telecom Companies)
- Vendors not used in the ERP for several years
Let your Agave Account Manager about the filters you’d like to apply, and they will update your sync configuration accordingly.
Enabling Vendors Sync to Foundation
Installation
Exporting Vendors to Foundation requires the a combination of Foundation's FSI Importer, ODBC access, and the Agave Connector.
Step 1: Download the FSI Importer
-
Log in to the Foundation Client Portal.
-
If you are a Foundation Cloud (Hosted) Customer, go to Resources-->Downloads. If you are a Foundation On-premise Customer, go to Resources-->Software Releases.
-
Select the download icon for the FSI Importer.
-
Once the file has downloaded, go to your Downloads folder and open the .exe file. This will start the installation process for the FSI Importer.
-
Finish the installation process.
Step 2: Set up ODBC access for the FSI Importer
To use the FSI Importer with Agave Sync, you will need to set up Microsoft Open Database Connectivity (ODBC) access to your Foundation instance.
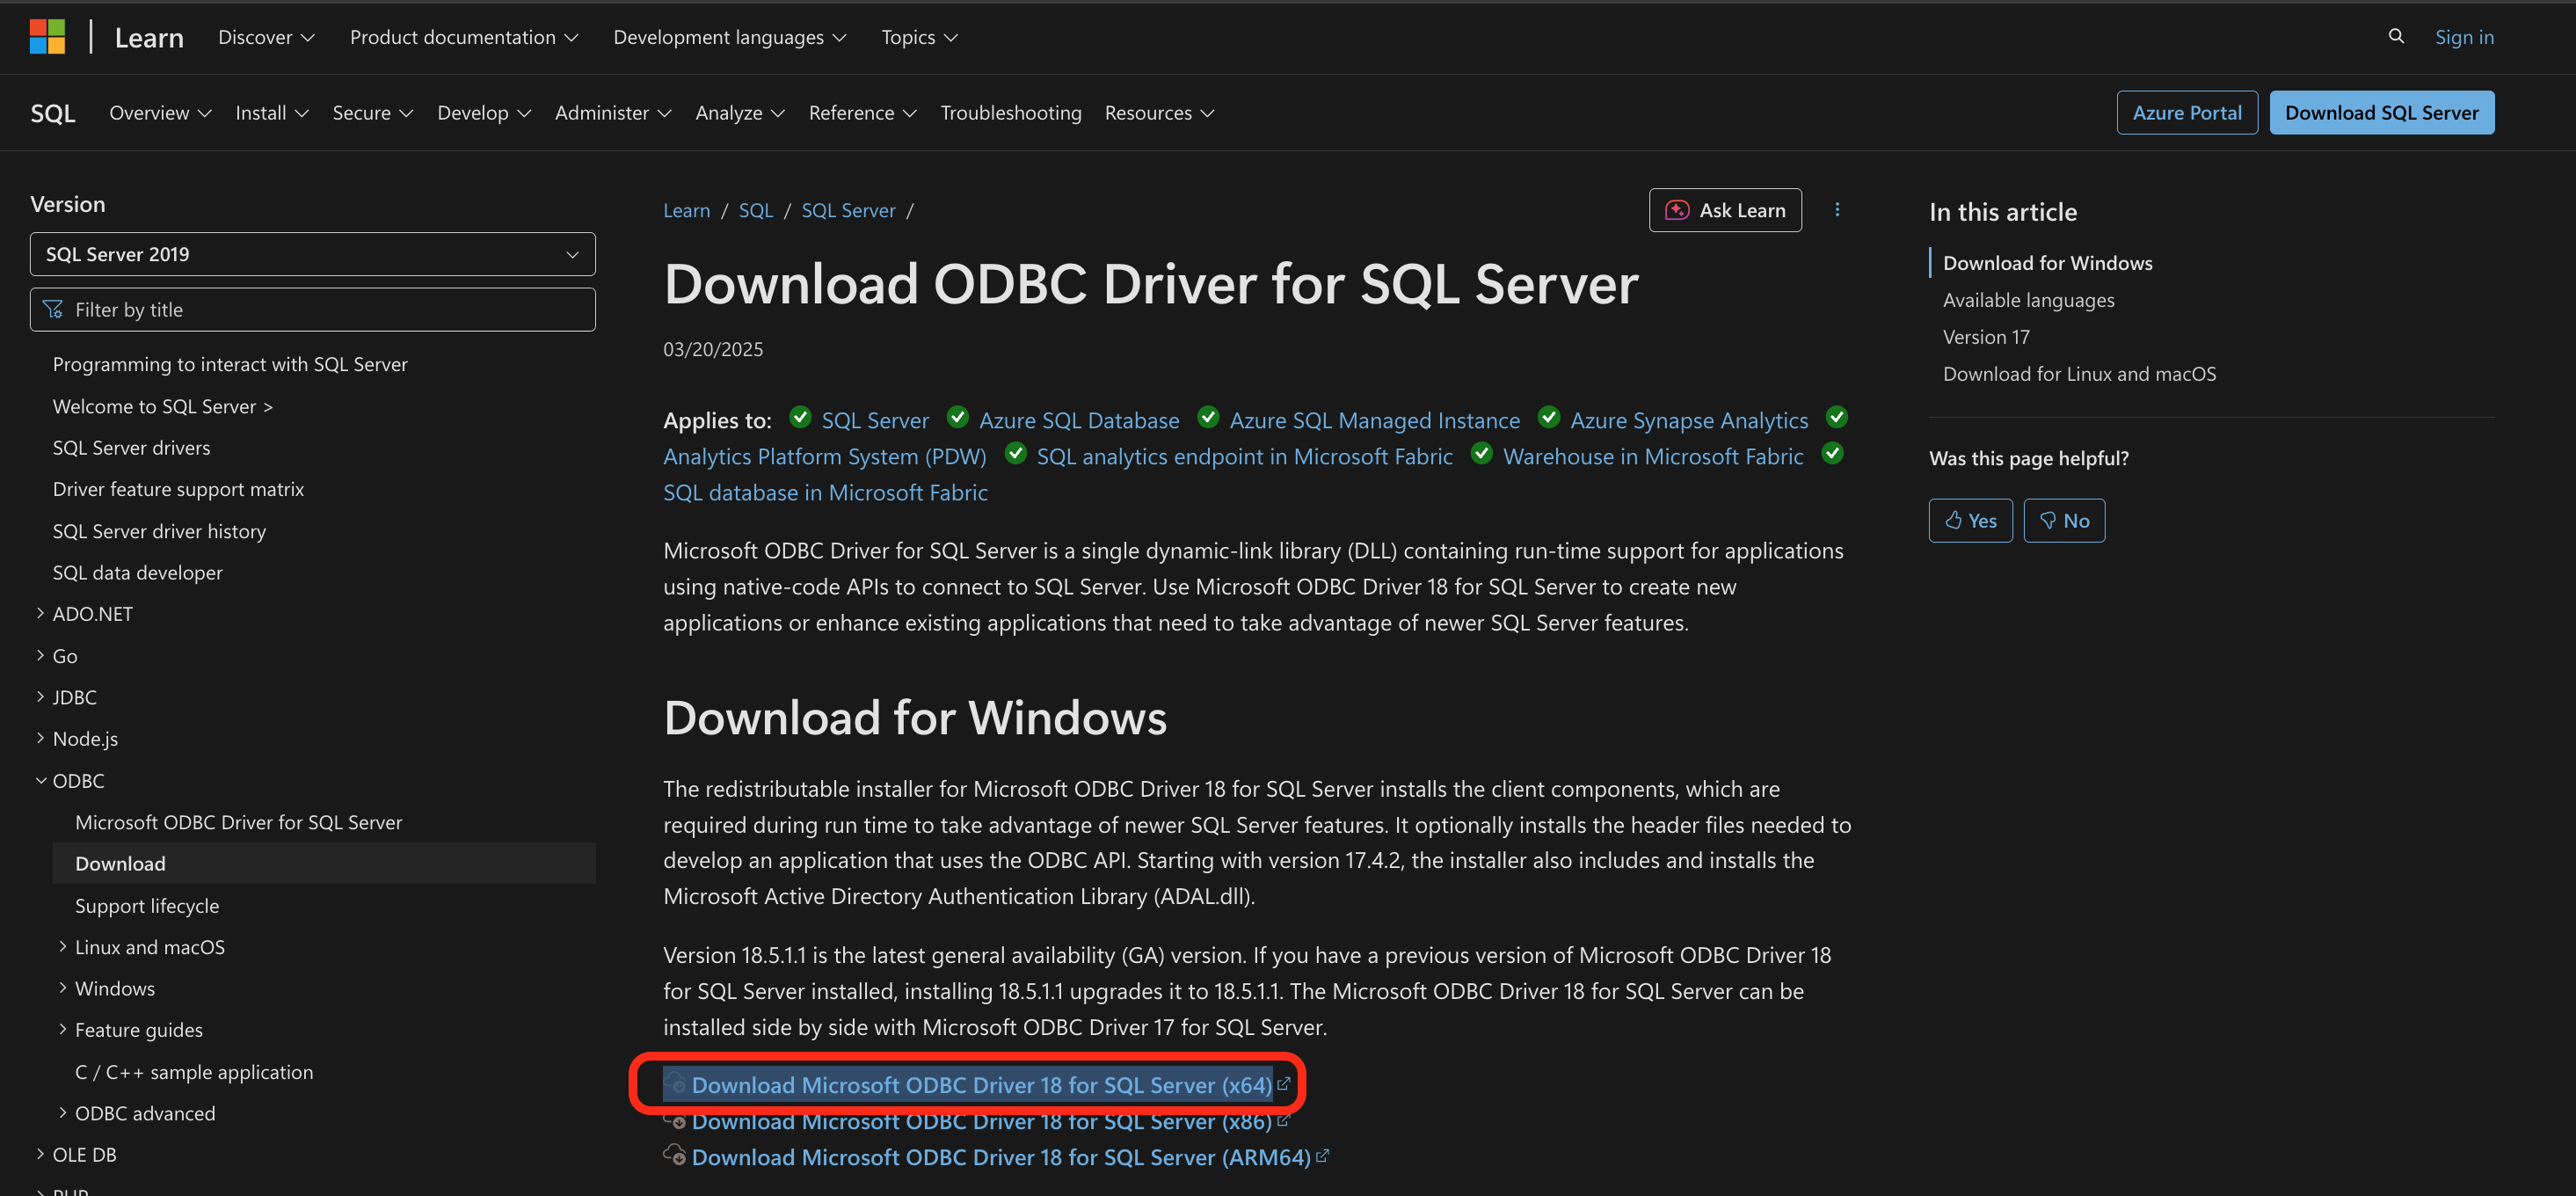
Download and Install the ODBC Driver
- Go to the Microsoft website and download the Microsoft ODBC Driver for SQL Server 18 (x64)
- Double click on the msodbcsql.msi file that you downloaded
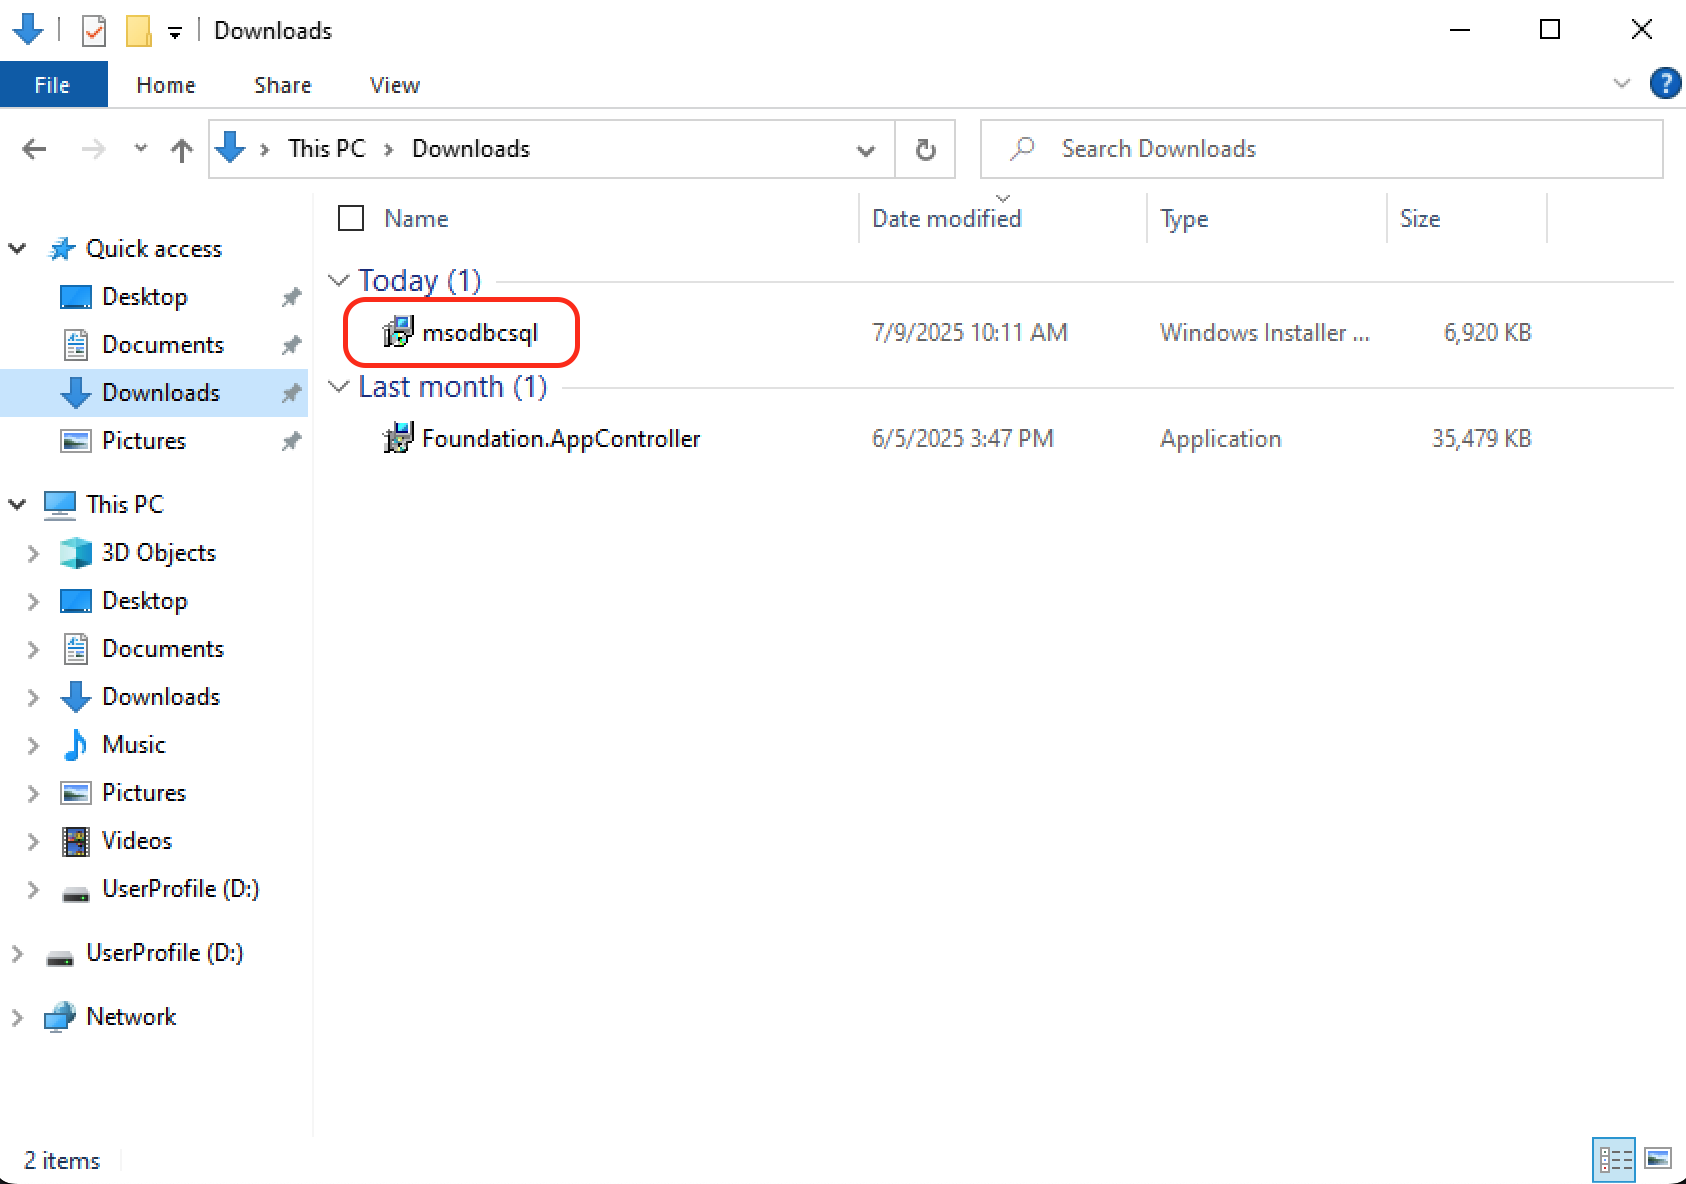
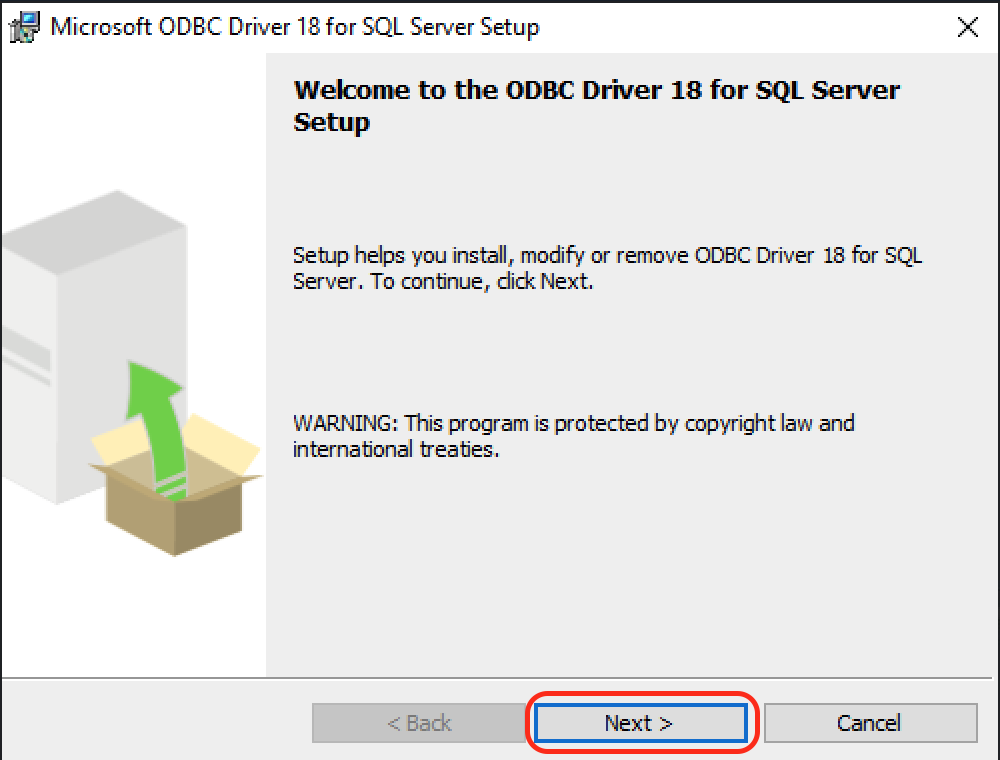
- This will open up an Installation Wizard, click Next
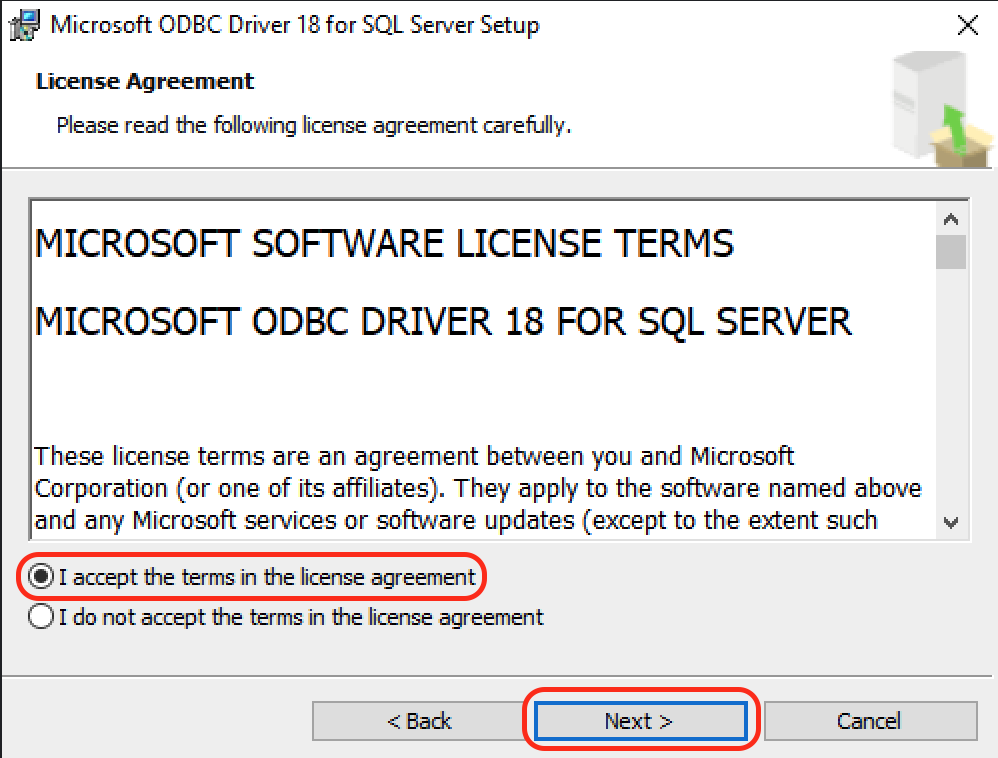
- Accept the agreement terms, click Next
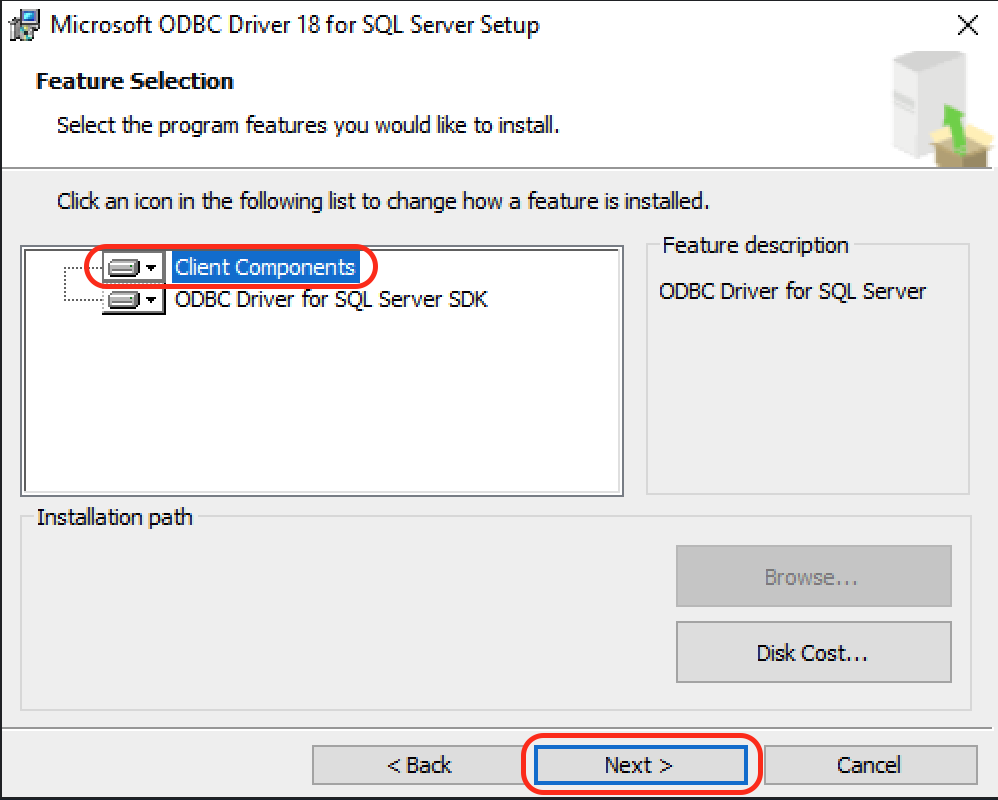
- Select Client Components, click Next
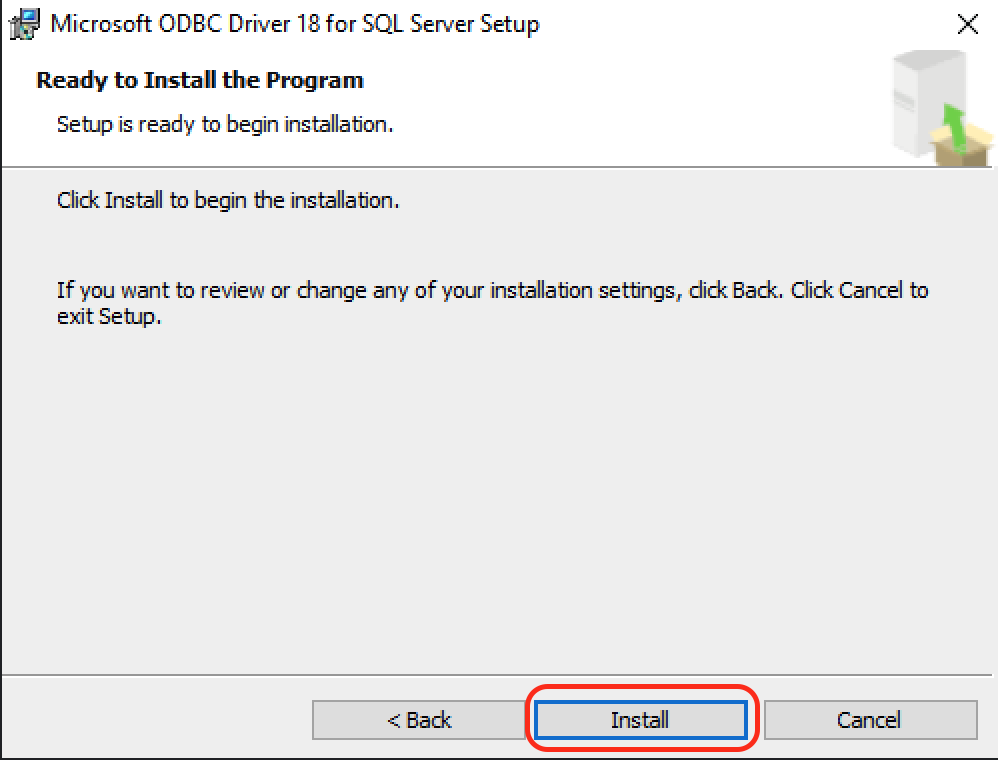
- On the next screen, click Install
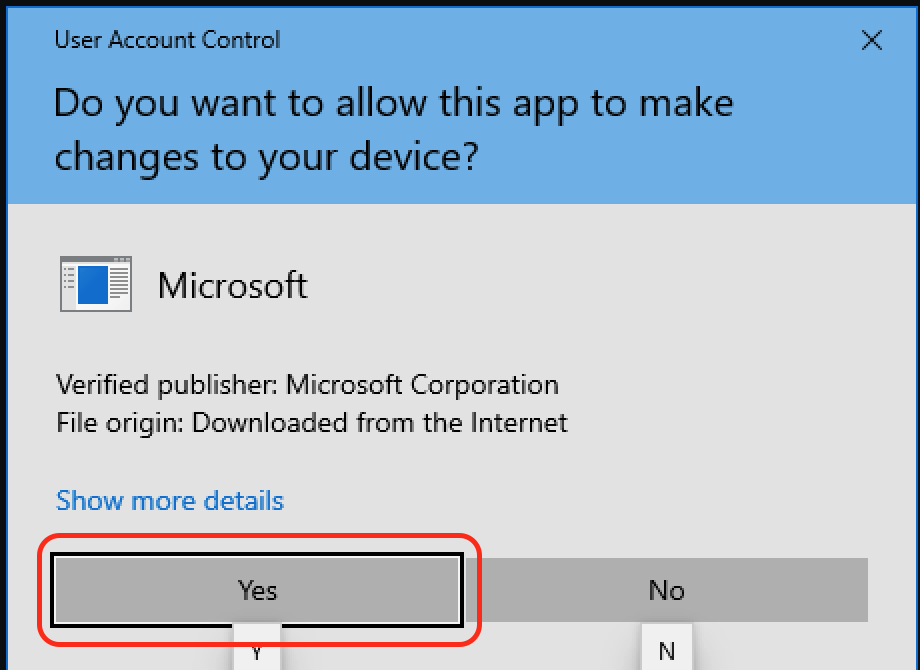
- You may encounter a User Account Control prompt, click Yes
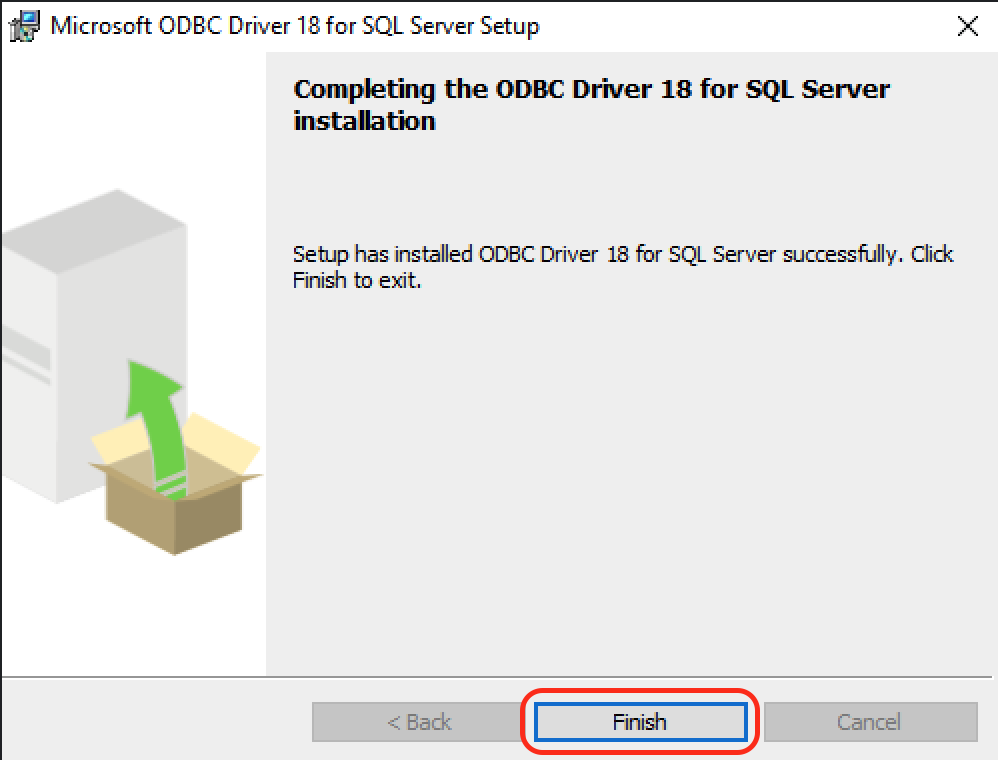
- Click Finish to complete the installation of the driver
Configure the ODBC Driver
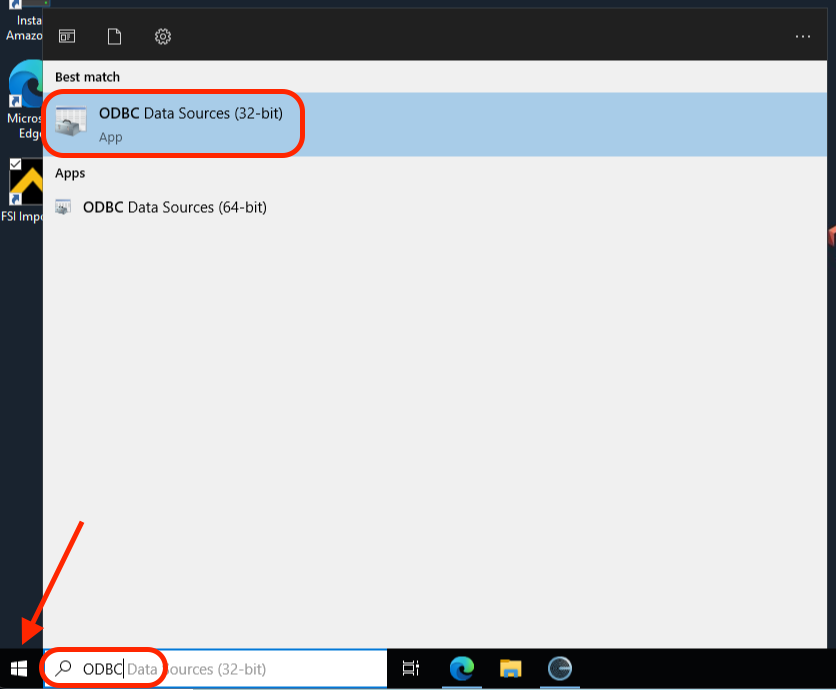
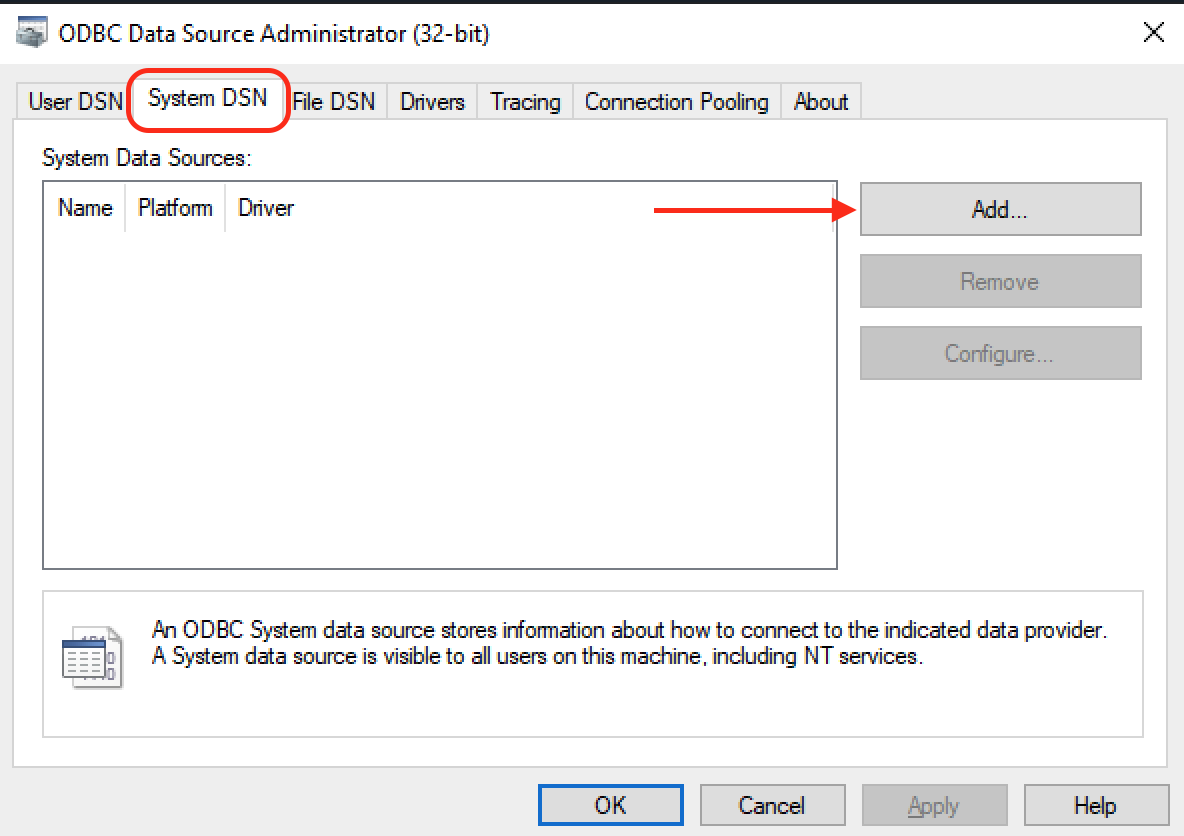
- Open the Start Menu and search “ODBC”, then open the ODBC Data Sources (32-bit) application
- Switch to the System DSN tab, click Add
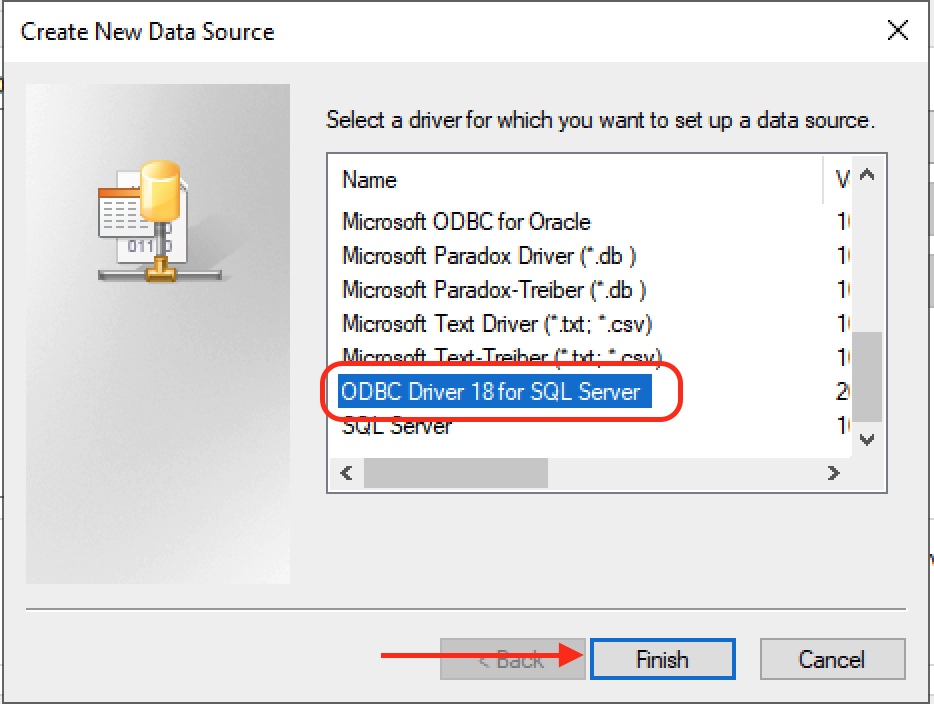
- Select ODBC Driver 18 for SQL Server, click Finish
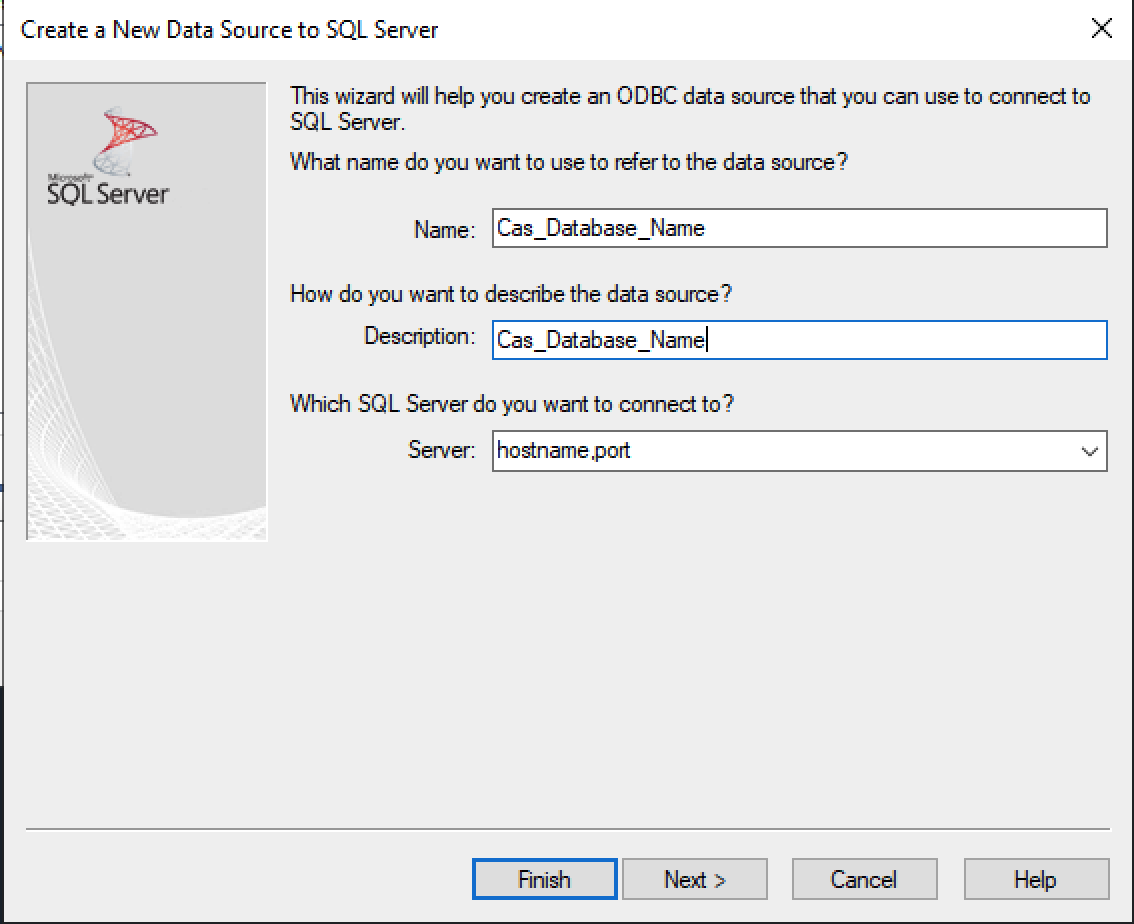
- In the Name and Description fields, enter the name of your Foundation database (usually looks like
Cas_xxx). You will also need to enter the hostname and port for your Foundation server in the Server field.
- For hosted Foundation instances:
sql.foundationsoft.com,9000 - For on-premise Foundation instances: enter the hostname (this will be a domain or IP address) and the port that we are using to connect to your server (e.g.,
xxx.xx.x.xx,4243)
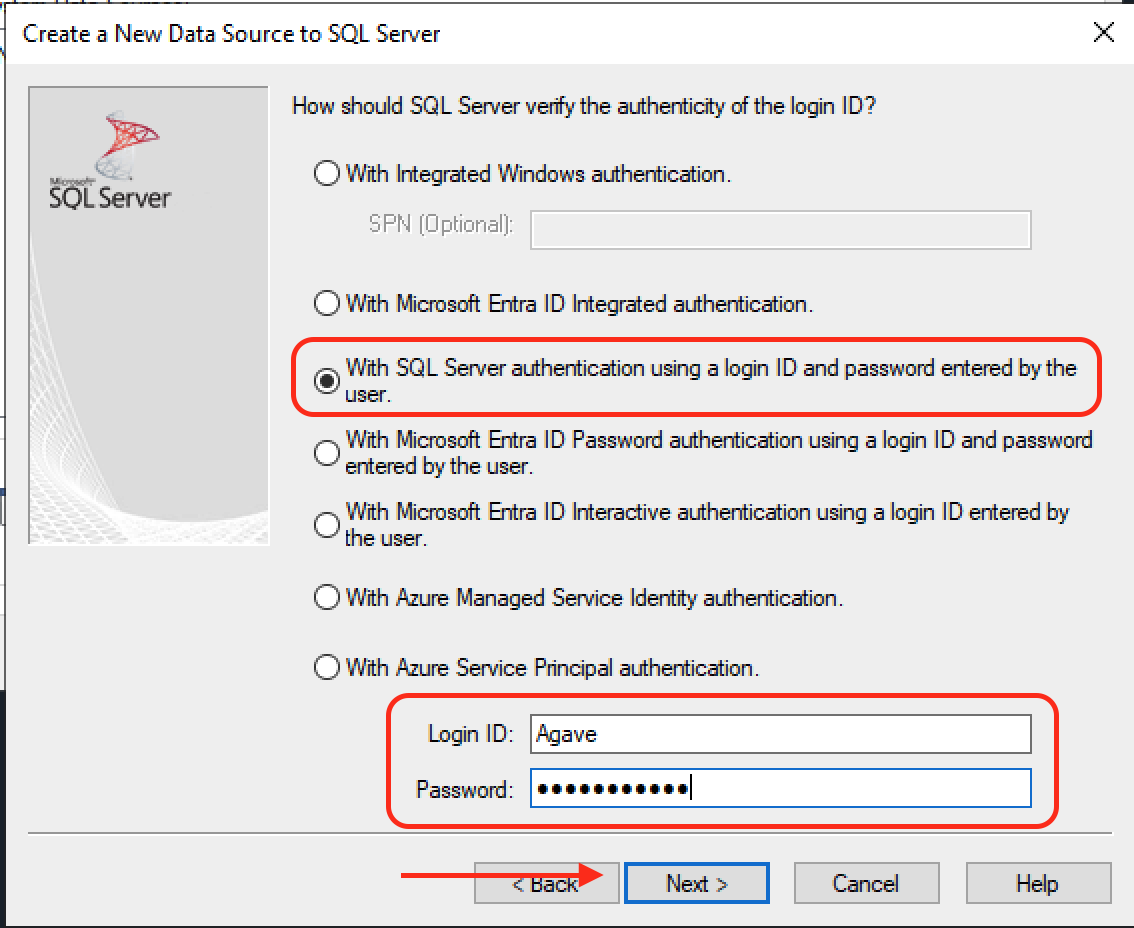
- Select With SQL Server authentication using a login ID and password entered by the user, then enter the credentials for the Agave user you created into the Login ID and Password fields, click Next
- Check the Change the default database to checkbox, then type in your Foundation database name. Also, uncheck the Use ANSI nulls, paddings and warnings checkbox, click Next

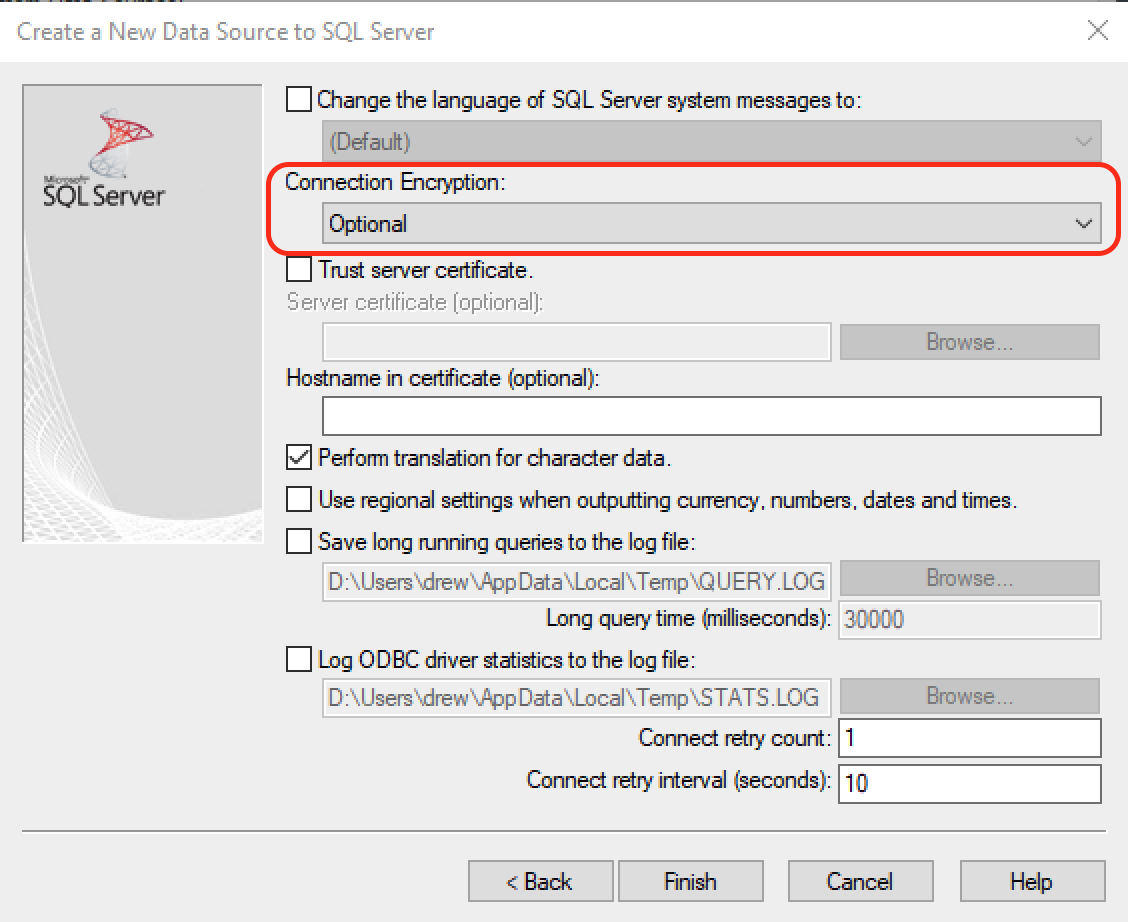
- In the Connection Encryption dropdown box select Optional, click Finish
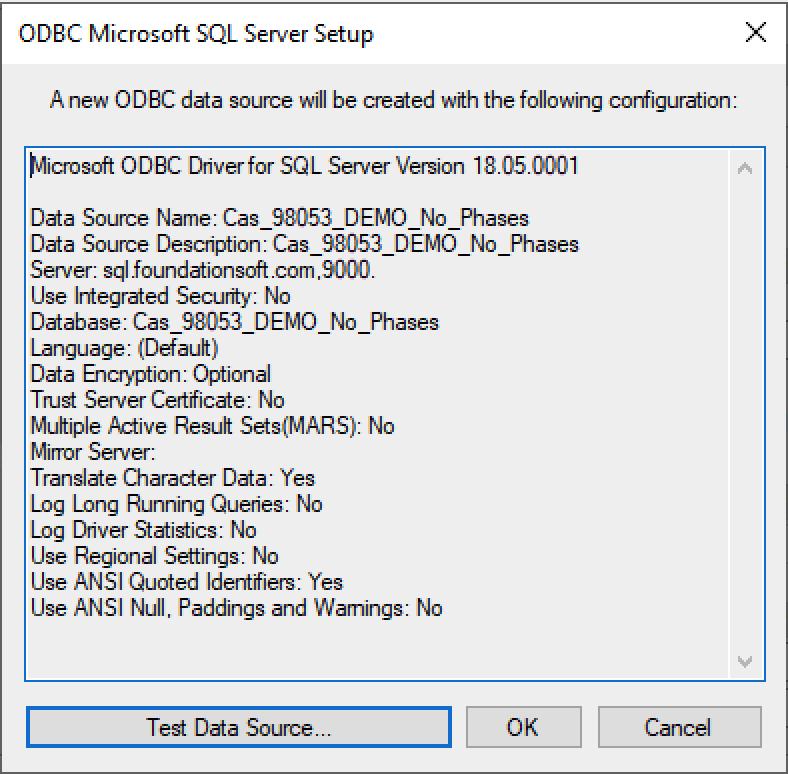
- Click Test Data Source... to test the connection
- If the test was successful, you will see this message, just click Ok to save the configuration
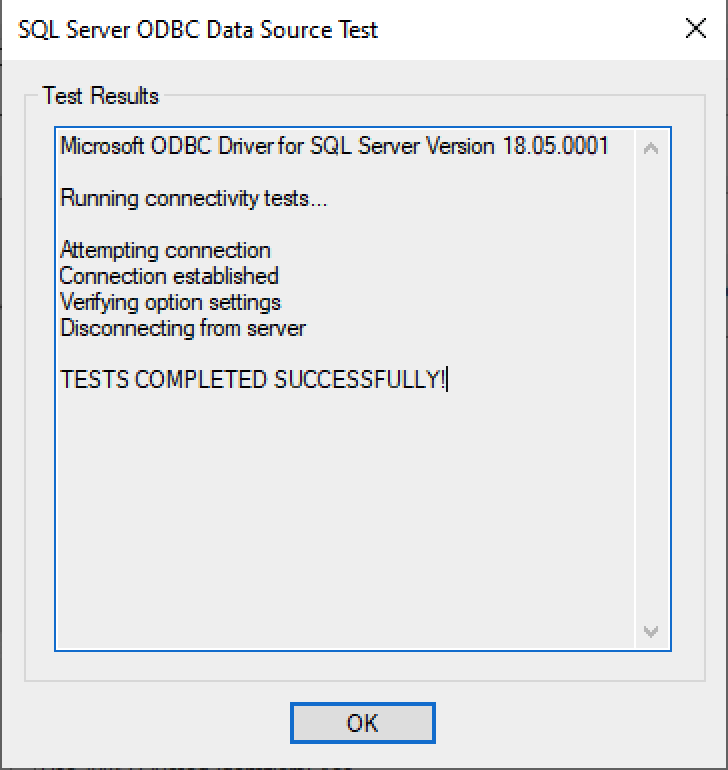
- If the test was unsuccessful then it is likely due to an incorrect password
- If you've confirmed that the password is correct, then complete steps 1-8 again and retry the connection test
Step 3: Set up the Agave Connector
-
Ask your Agave Account Manager for a link to the Agave Connector. Then download and install it.
-
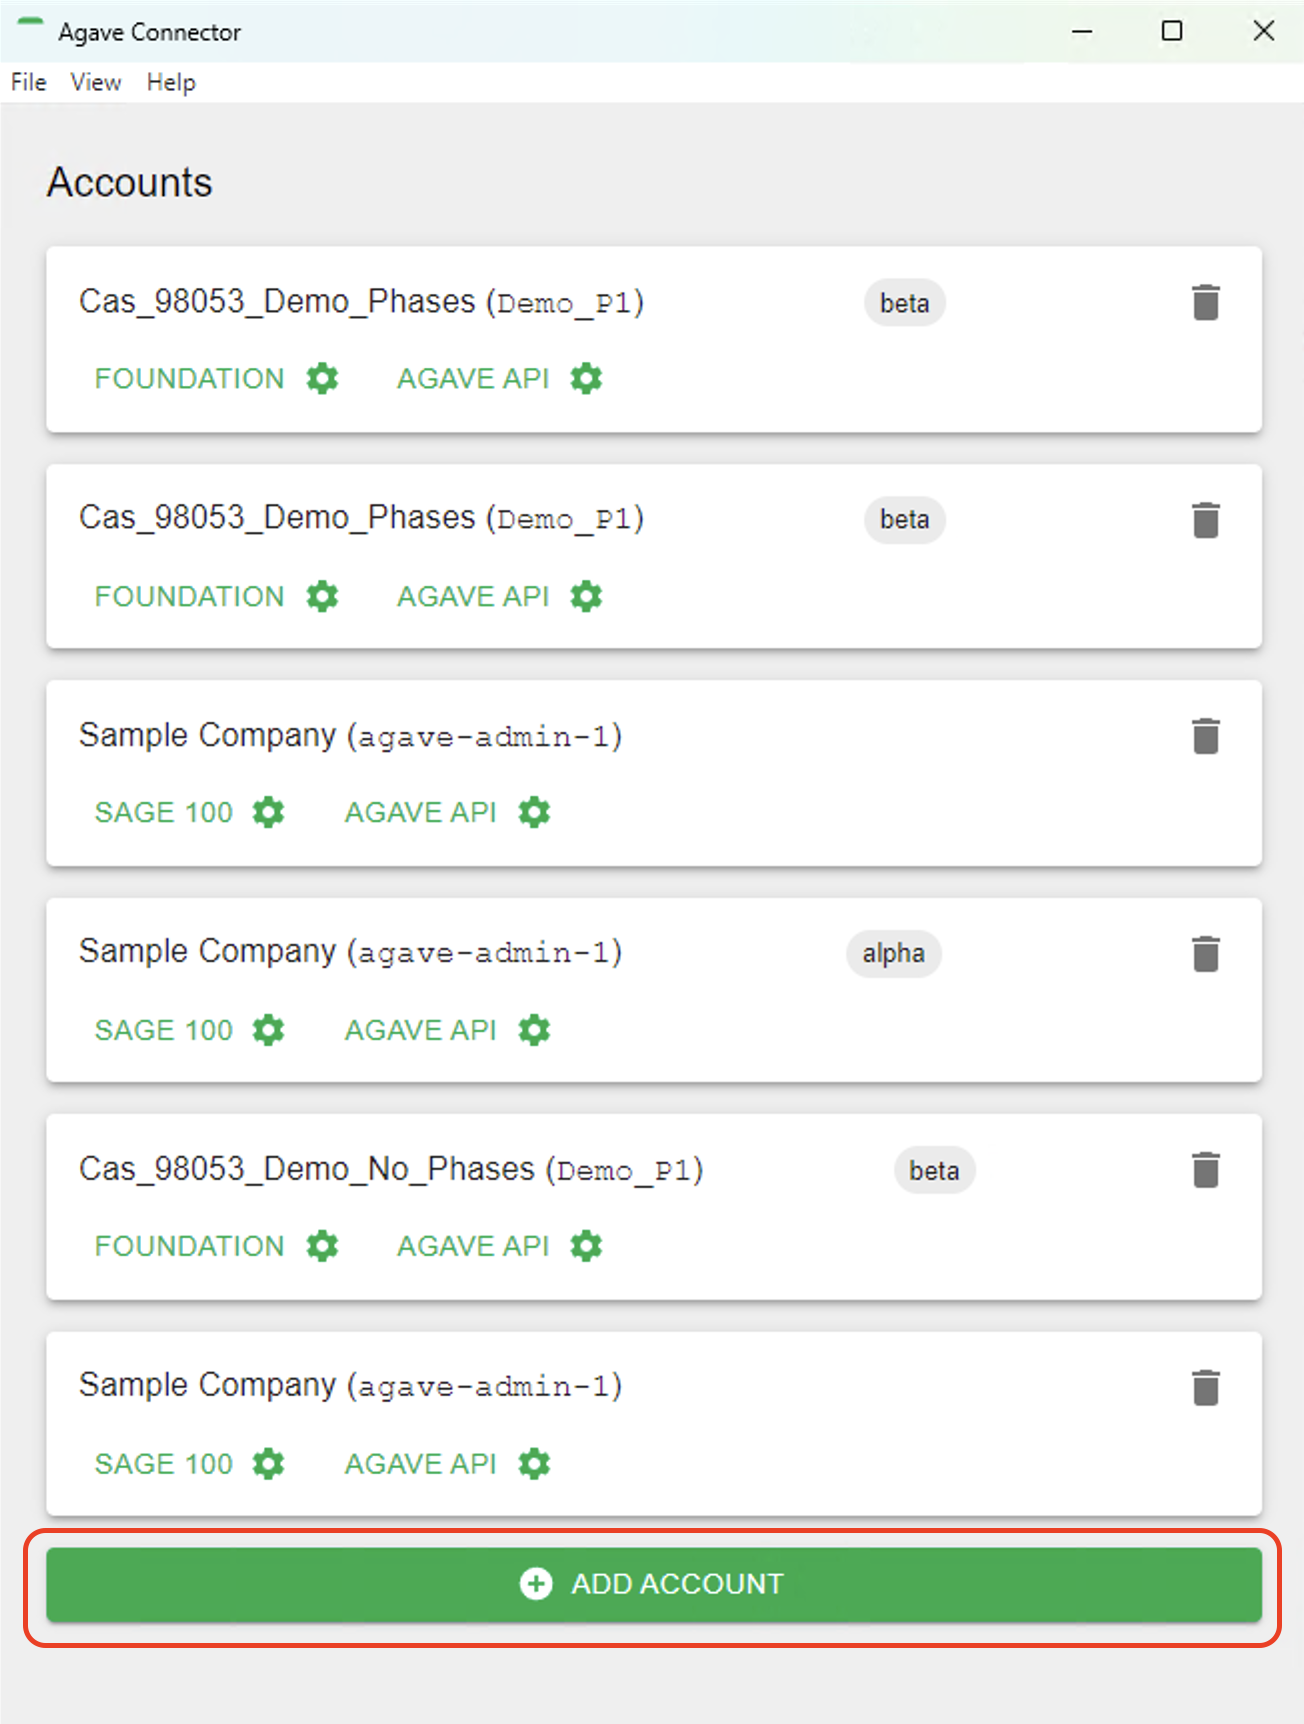
Open the Agave Connector and press Add Account.
- Select Foundation as your Source System.
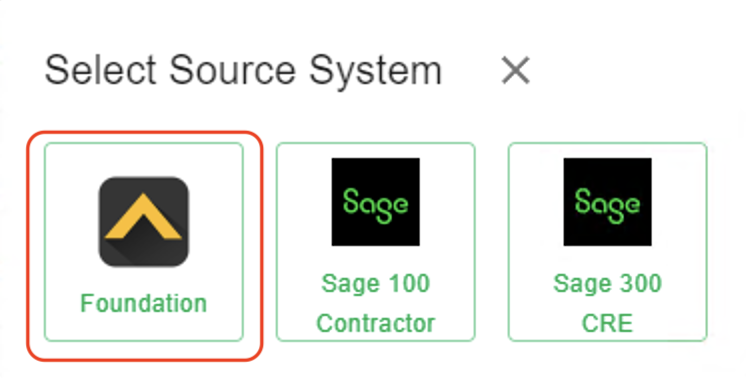
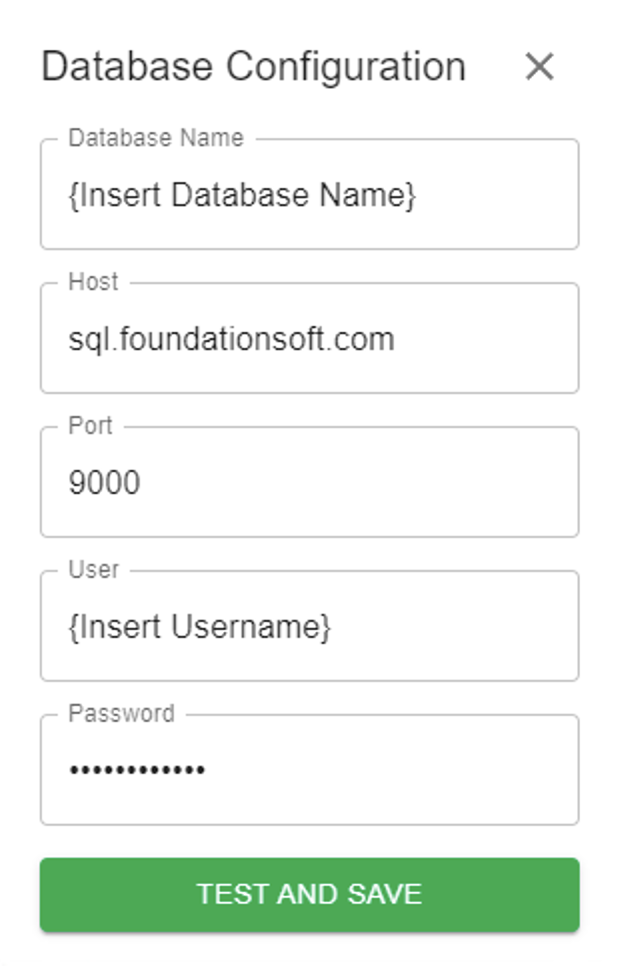
- Input details for your Foundation user you use in Agave Sync, and then press Test and Save. Note, these are the same credentials you used for connecting Foundation to Agave Sync.
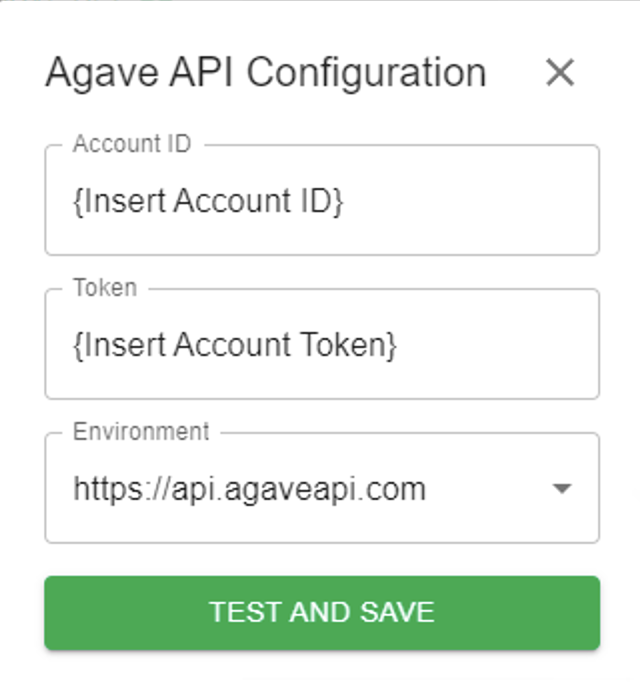
- Notify your Agave Account Manager that you have completed the foregoing step and ask for an Account ID and Token. Input these details in the next screen and then press Test and Save:
- Notify your Agave Account Manager that you have completed the foregoing step. They will then be able to confirm that you can export Vendors to Foundation.
Error: The current user does not have access to encrypt data
Depending on how your integration user is configured, you may encounter: [Foundation Error] [0] The database in use is encrypted, but the current user does not have access to encrypt data.
To resolve this, enable access to encrypted data for the Foundation user attached to the integration:
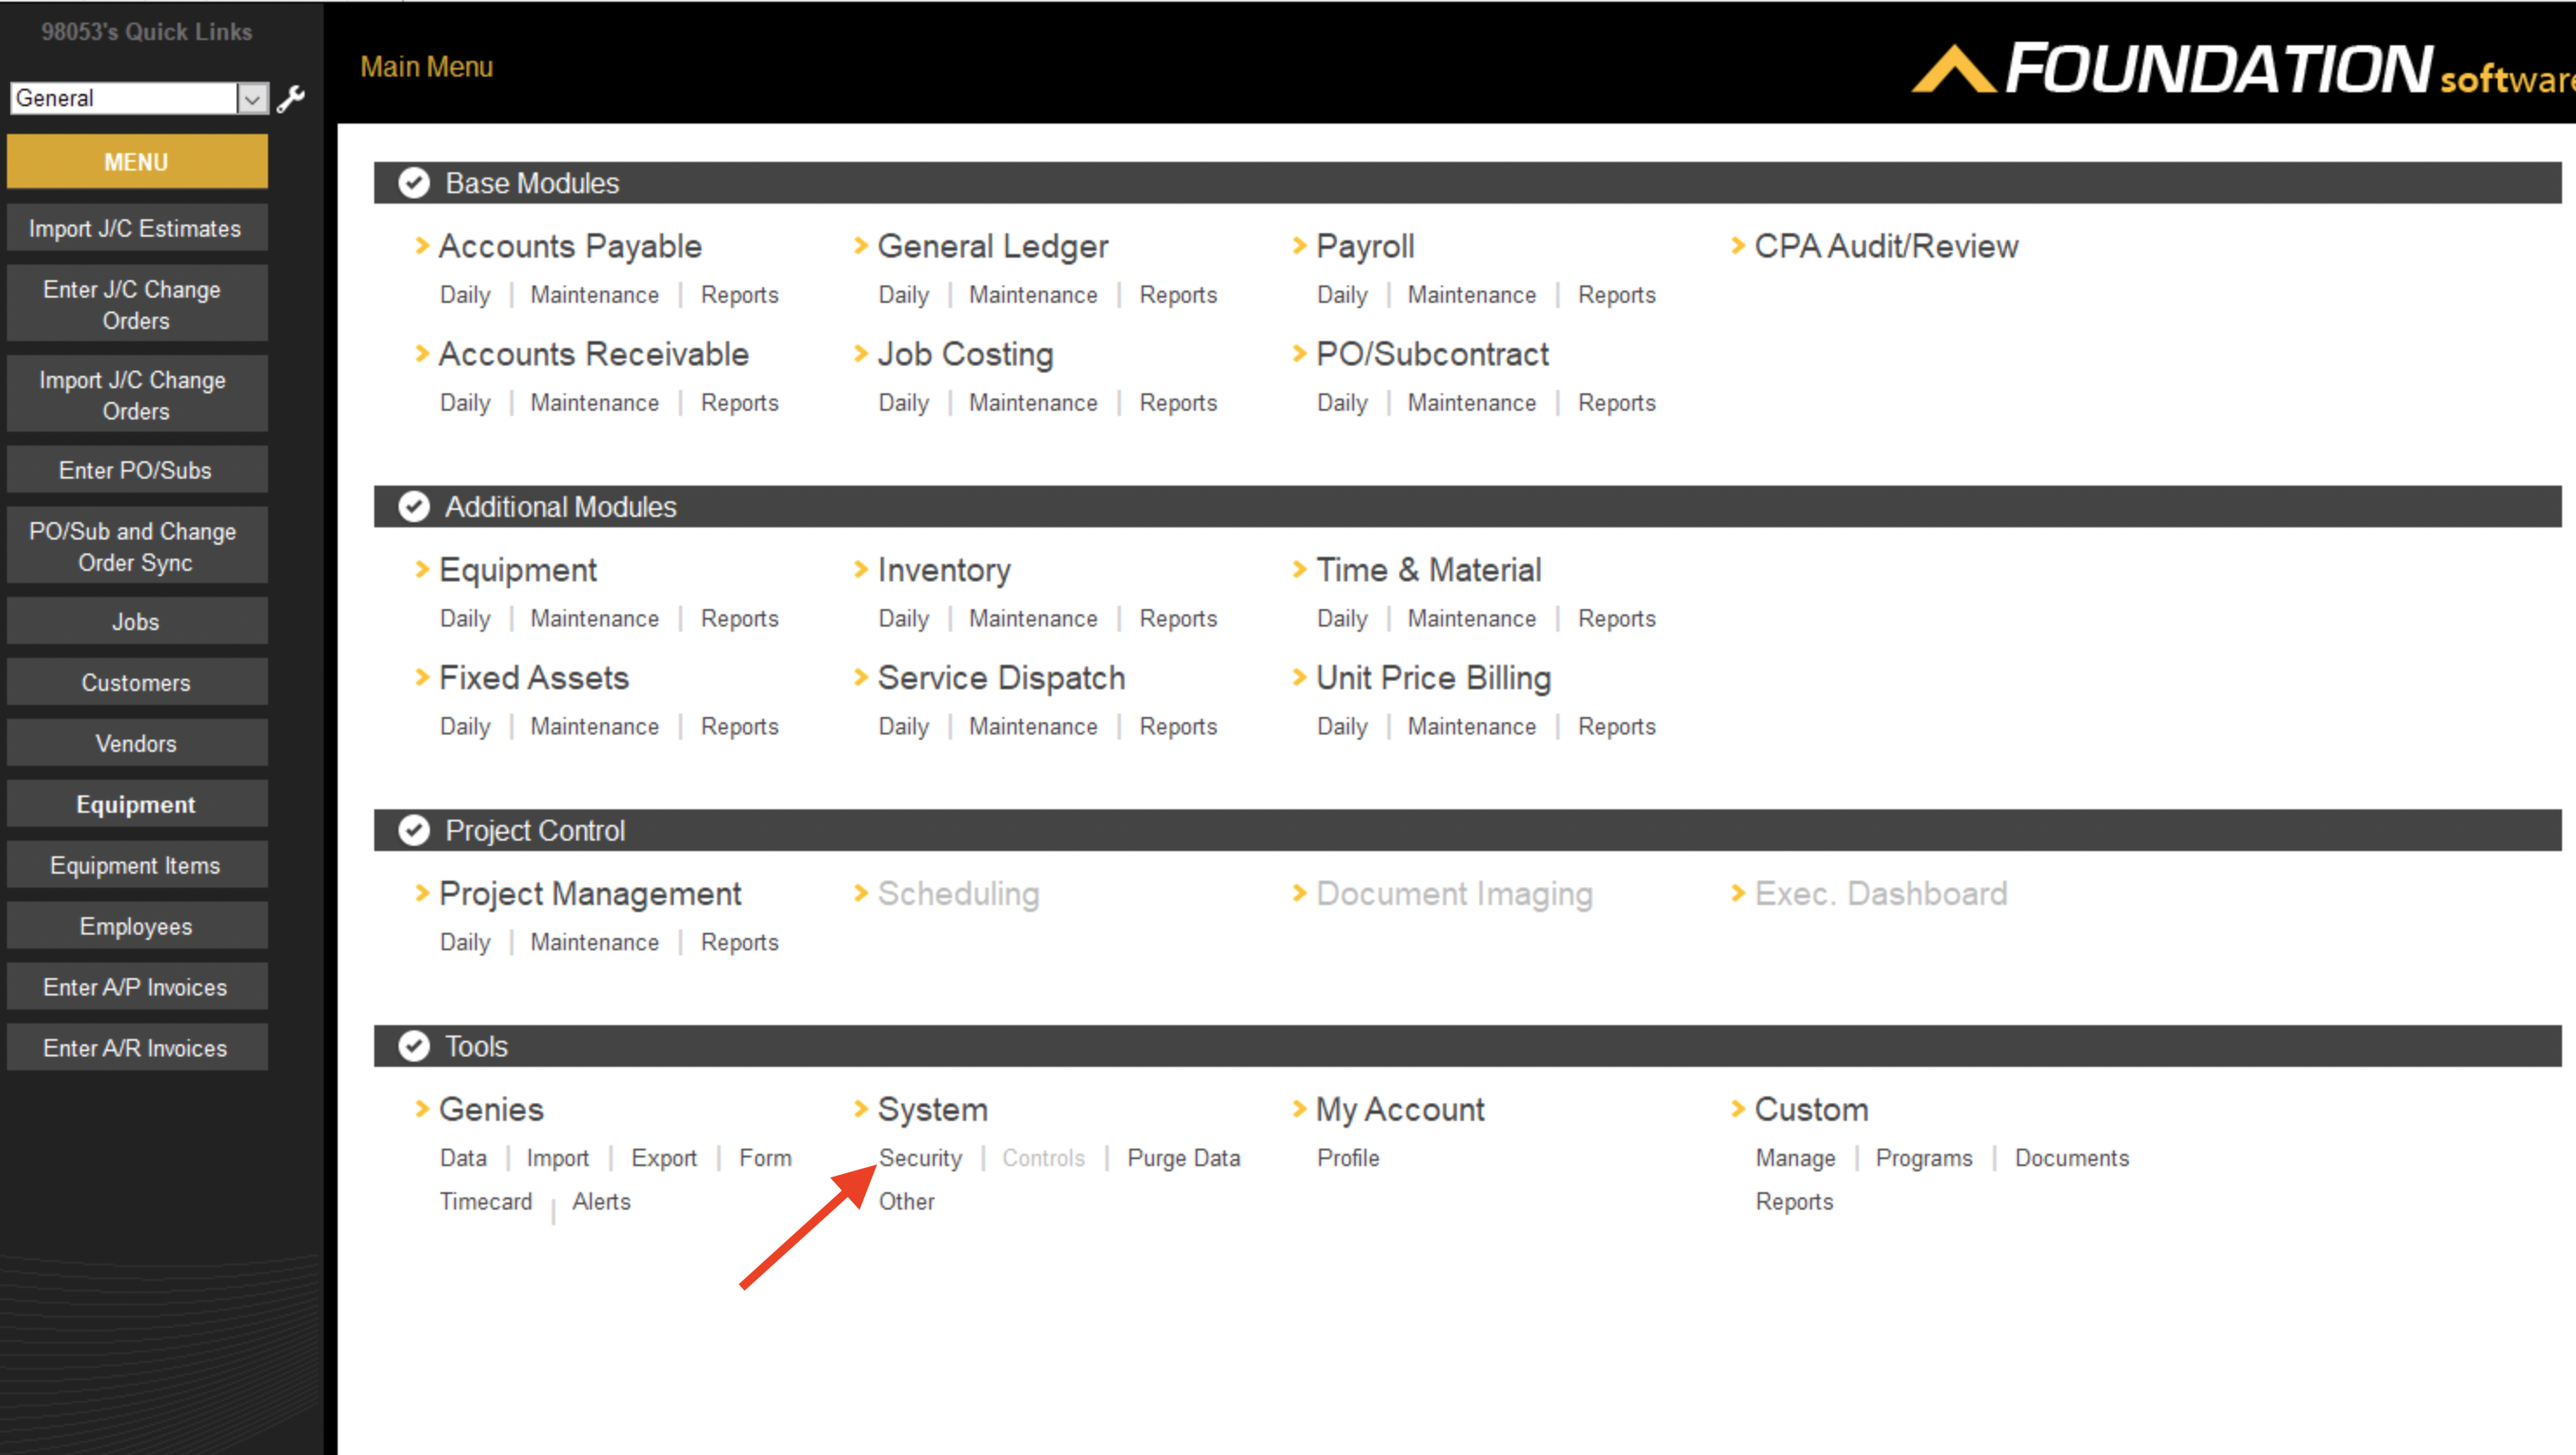
- Navigate to System > Security in Foundation:
- Select the relevant Company in the left sidebar, and ensure the checkbox for allowing access to encrypted data is checked:
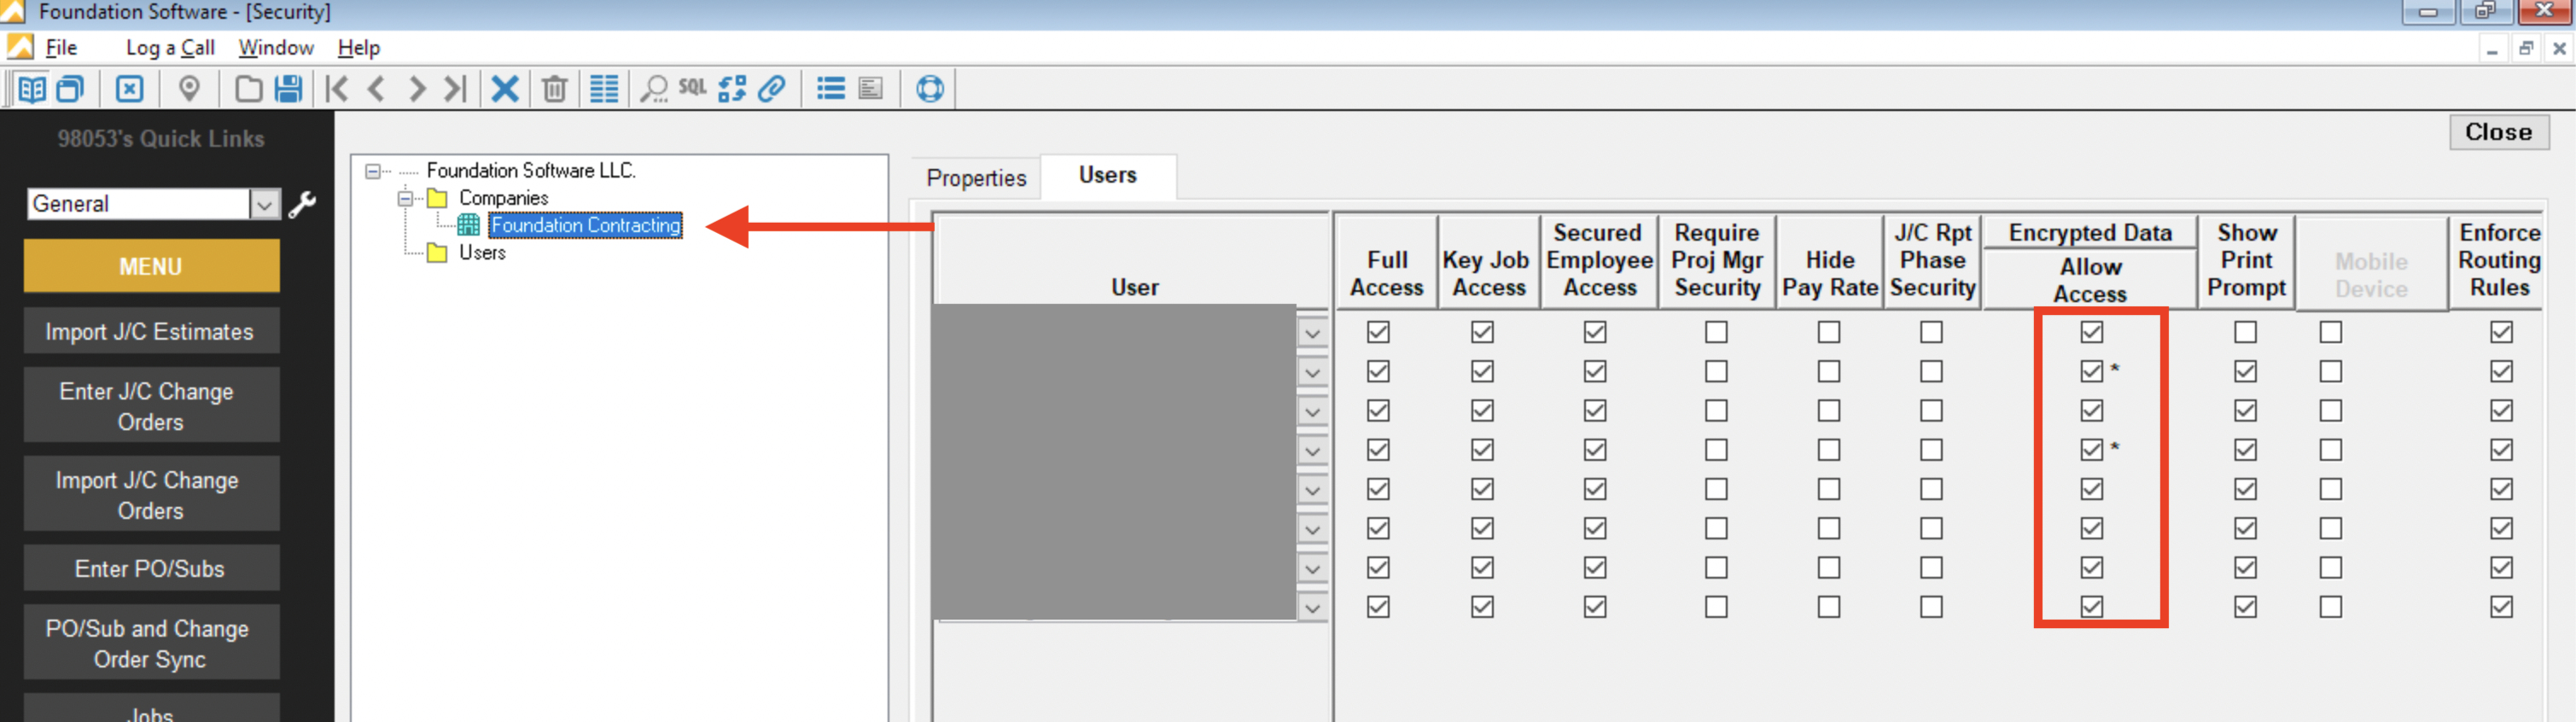
- Save these settings. If the "Save" button freezes, try clicking "Close" and then "Yes" to saving changes.
Do I need to have the FSI Importer installed for Vendor syncs to work?
Yes. We leverage the same technology that Foundation uses for the FSI Importer as part of this sync.
Do I need the Agave Connector to be opened/minimized for Vendor syncs to work?
Yes - we recommend keeping it open and minimized.