Projects (Jobs)
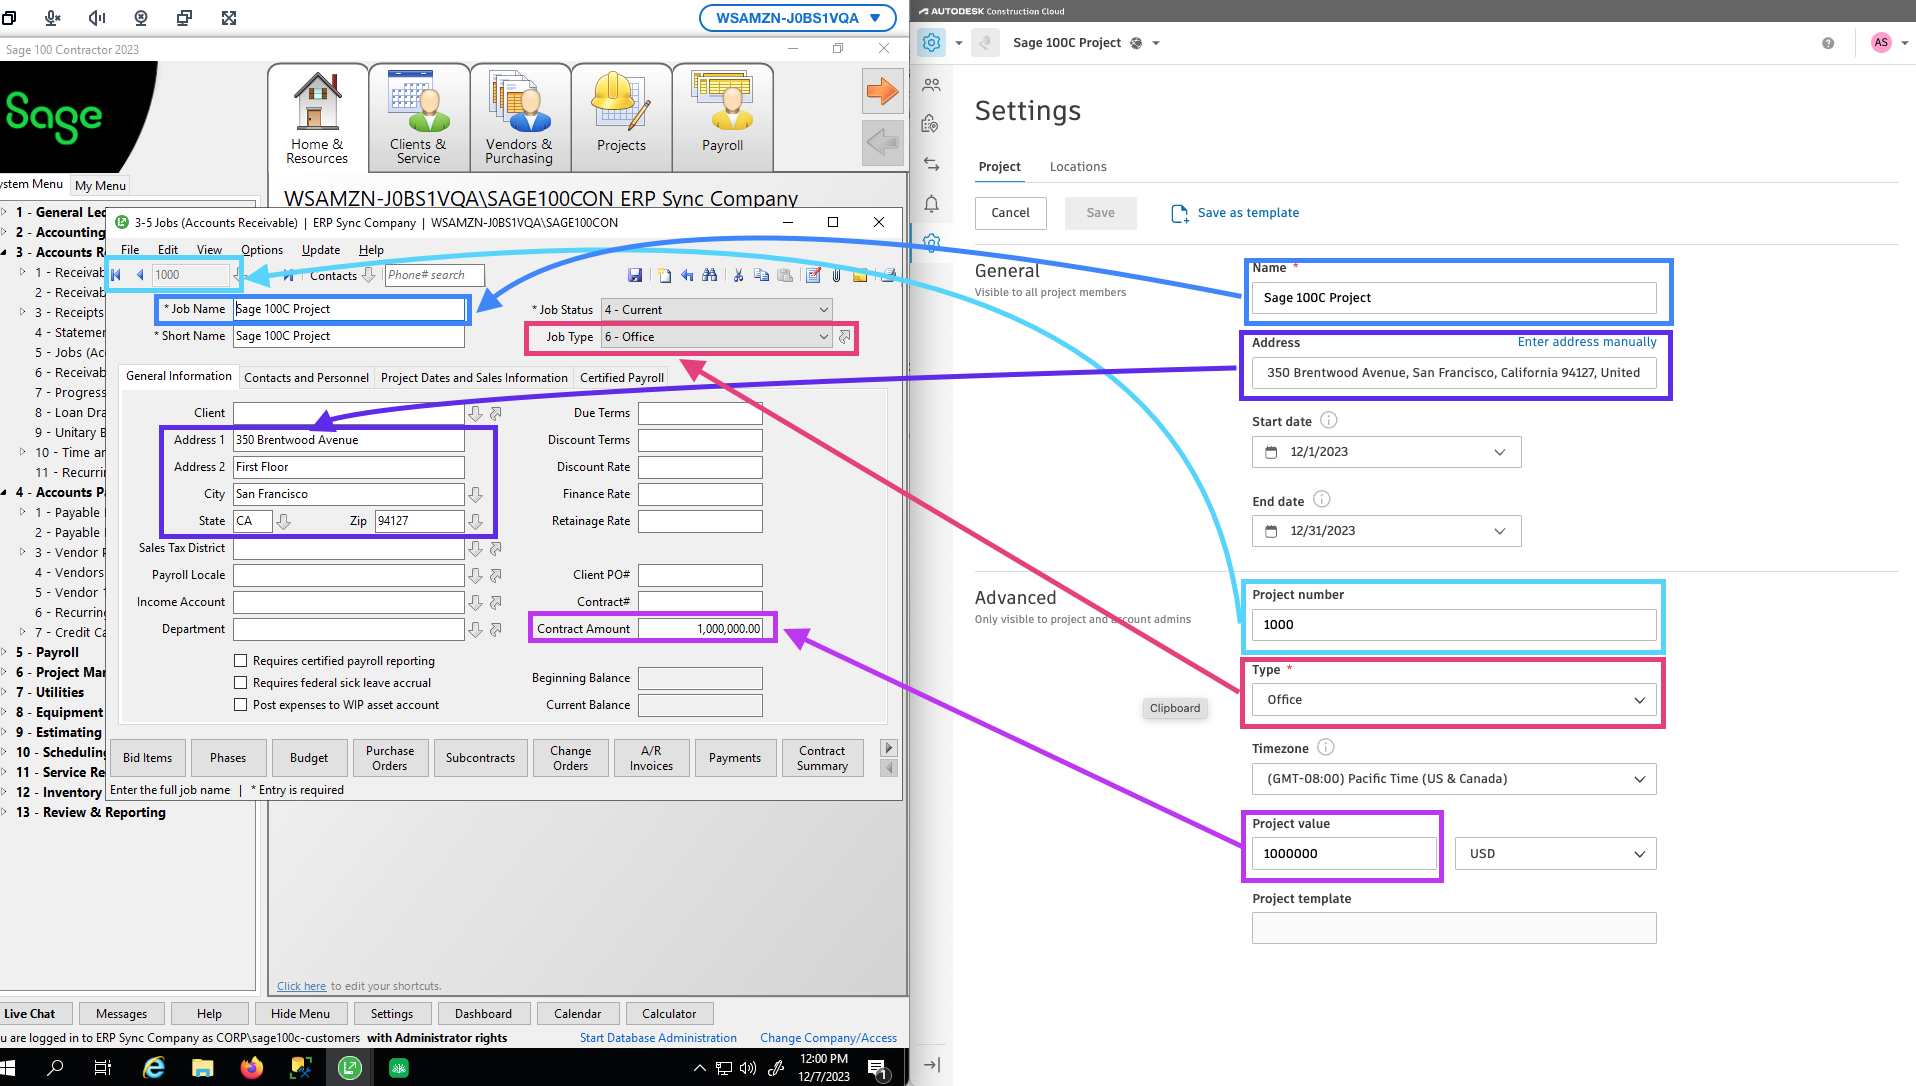
Agave Sync allows you to export Autodesk Build Projects to Sage 100C Jobs.
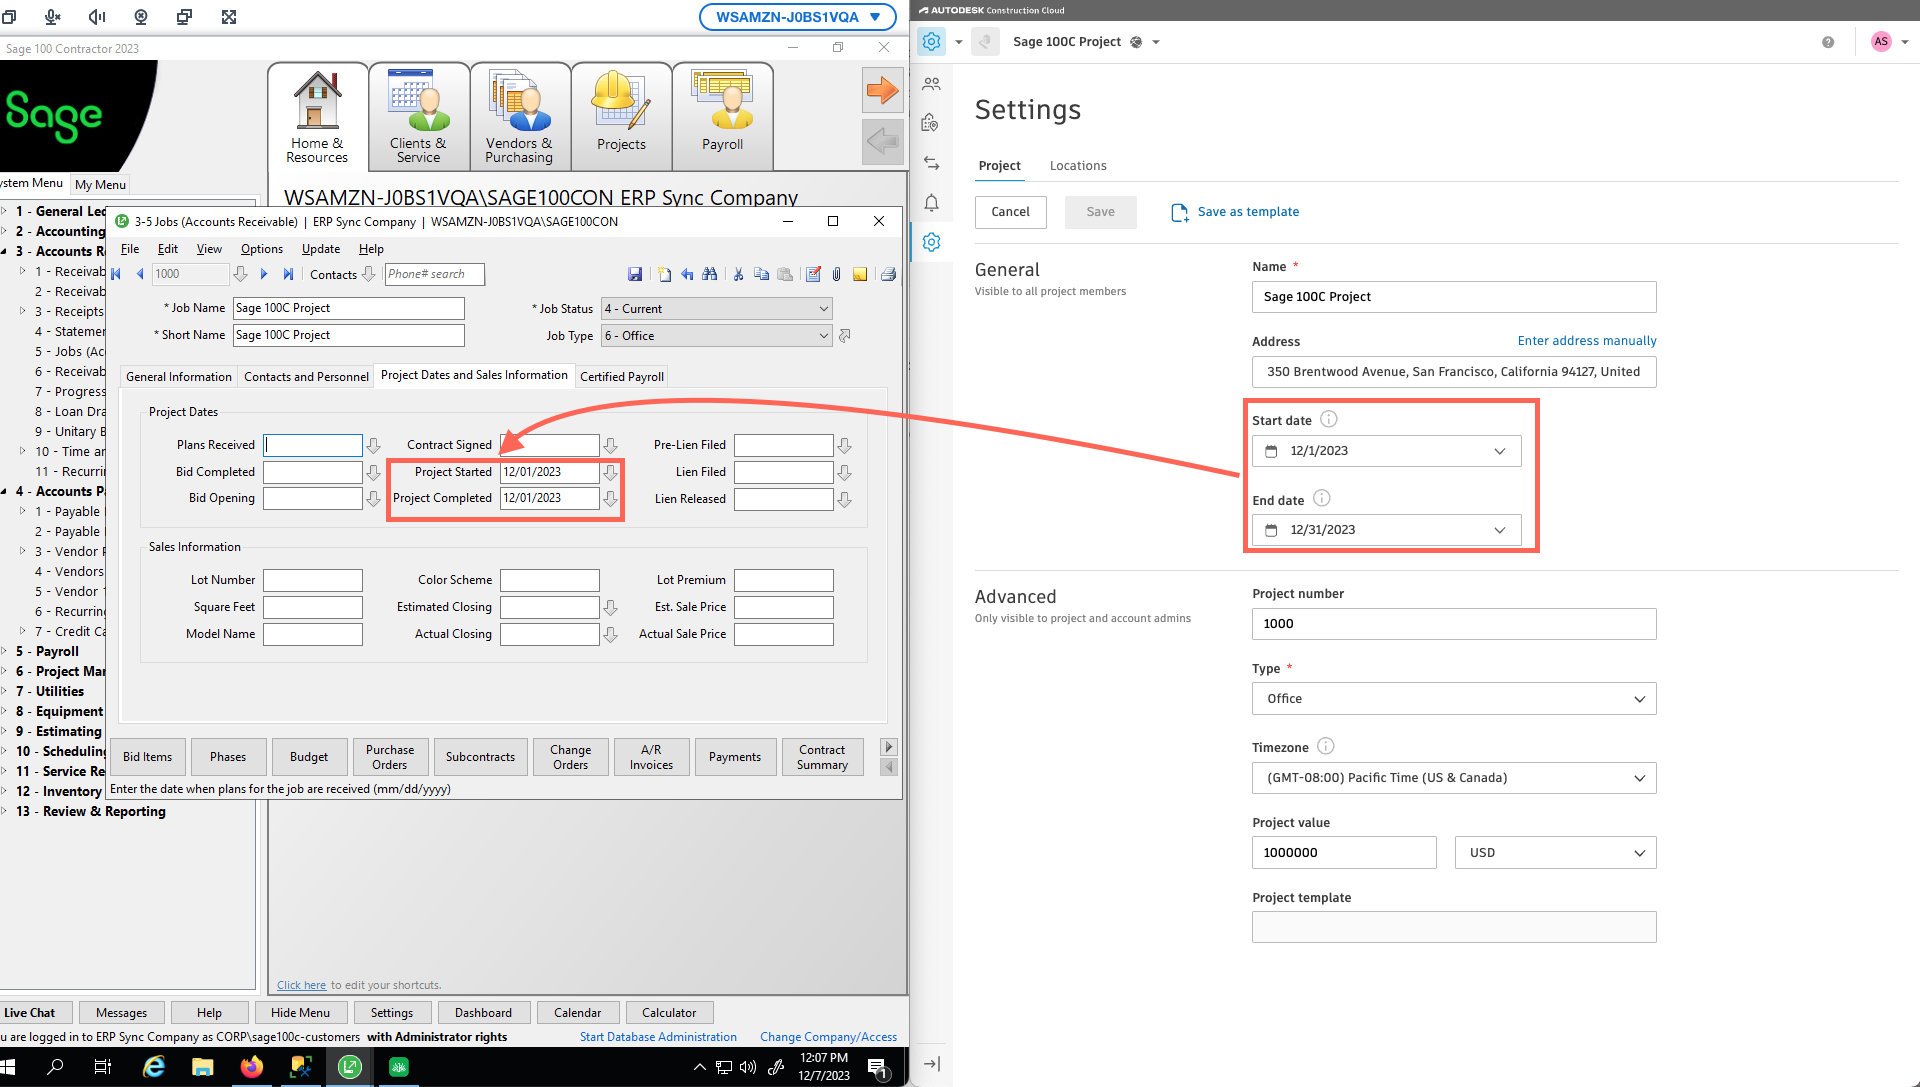
Visual Mapping
Project Templates
If you want to apply Project Templates in Autodesk Build as a default, see our guide on setting up Project Templates.
Configuring Autodesk Budget Codes to Match your Accounting System
You will want to make sure your Autodesk Build Budget Codes is set up to match the structure of your Sub Jobs, Cost Codes, and Cost Types in your Accounting System. We recommend properly configuring this in your Project Template(s) to ensure all Autodesk Projects use the same Budget Code structure.
The following includes a video walk through and guide to properly configure your Project Template's Budget Code.
To ensure they match:
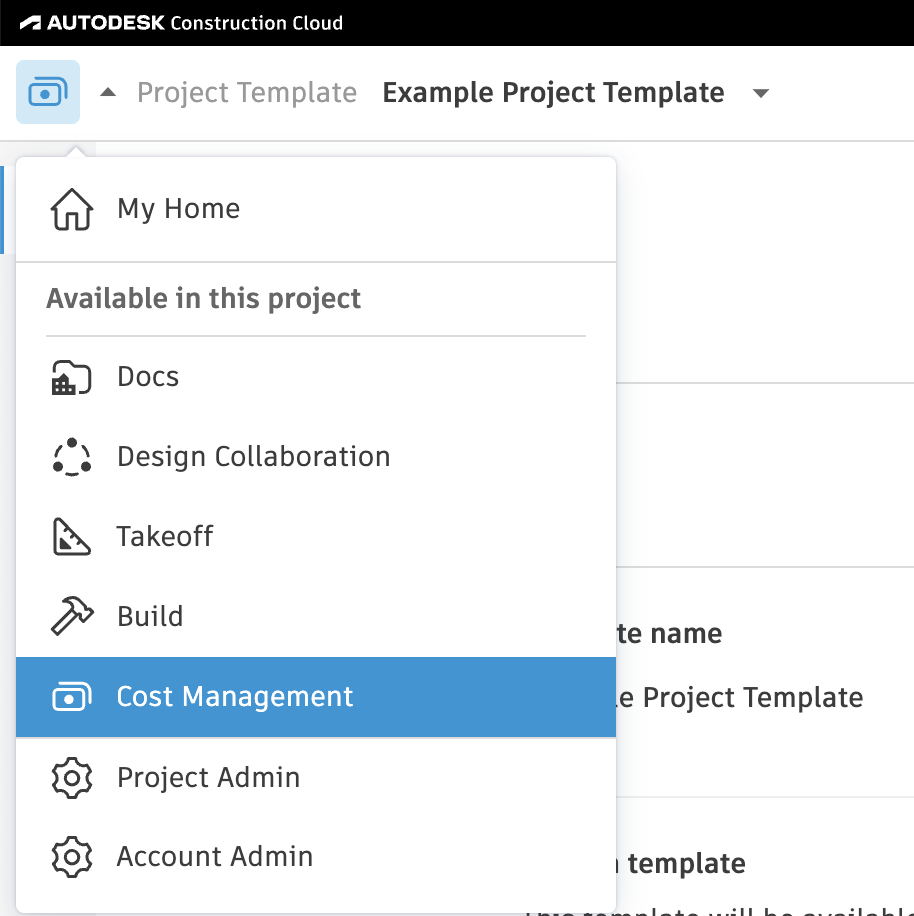
- In your Project Template, go to the Cost Management module.
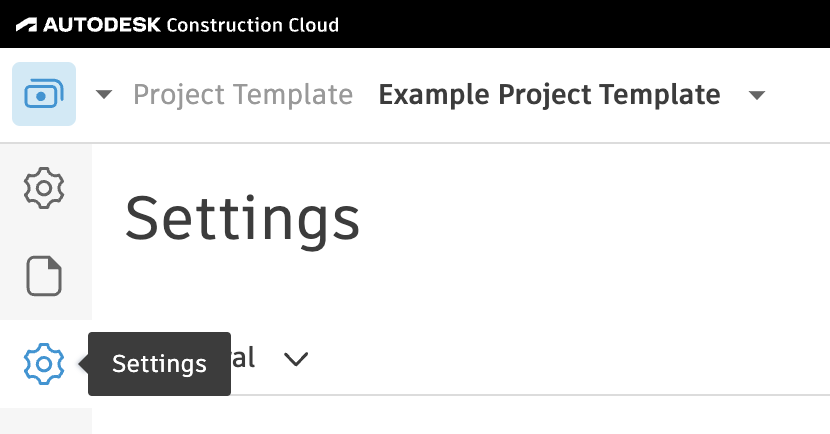
- Select the gear icon or Settings on the left navigation.
- Select the Budget tab, select Add New.

Configuring Sub Jobs
If you plan to use Sub Jobs, complete the following steps. If you do not, feel free to skip this step.
Note, the following Accounting Systems have the concept of Sub Jobs:
- Acumatica ("Tasks")
- CMiC
- Deltek ComputerEase ("Phases")
- Foundation ("Phases")
- Sage 100 Contractor ("Phases")
- Sage 300 CRE ("Extras")
- Sage Intacct
- Vista
To configure your Sub Job setup:
- Press the pencil icon next to Segment 1, and type in Sub Job.

- Below Sub Job:
- For Where, select "Code"
- For Number of Characters, select "Flexible"
- For Delimiter, select "Hyphen"

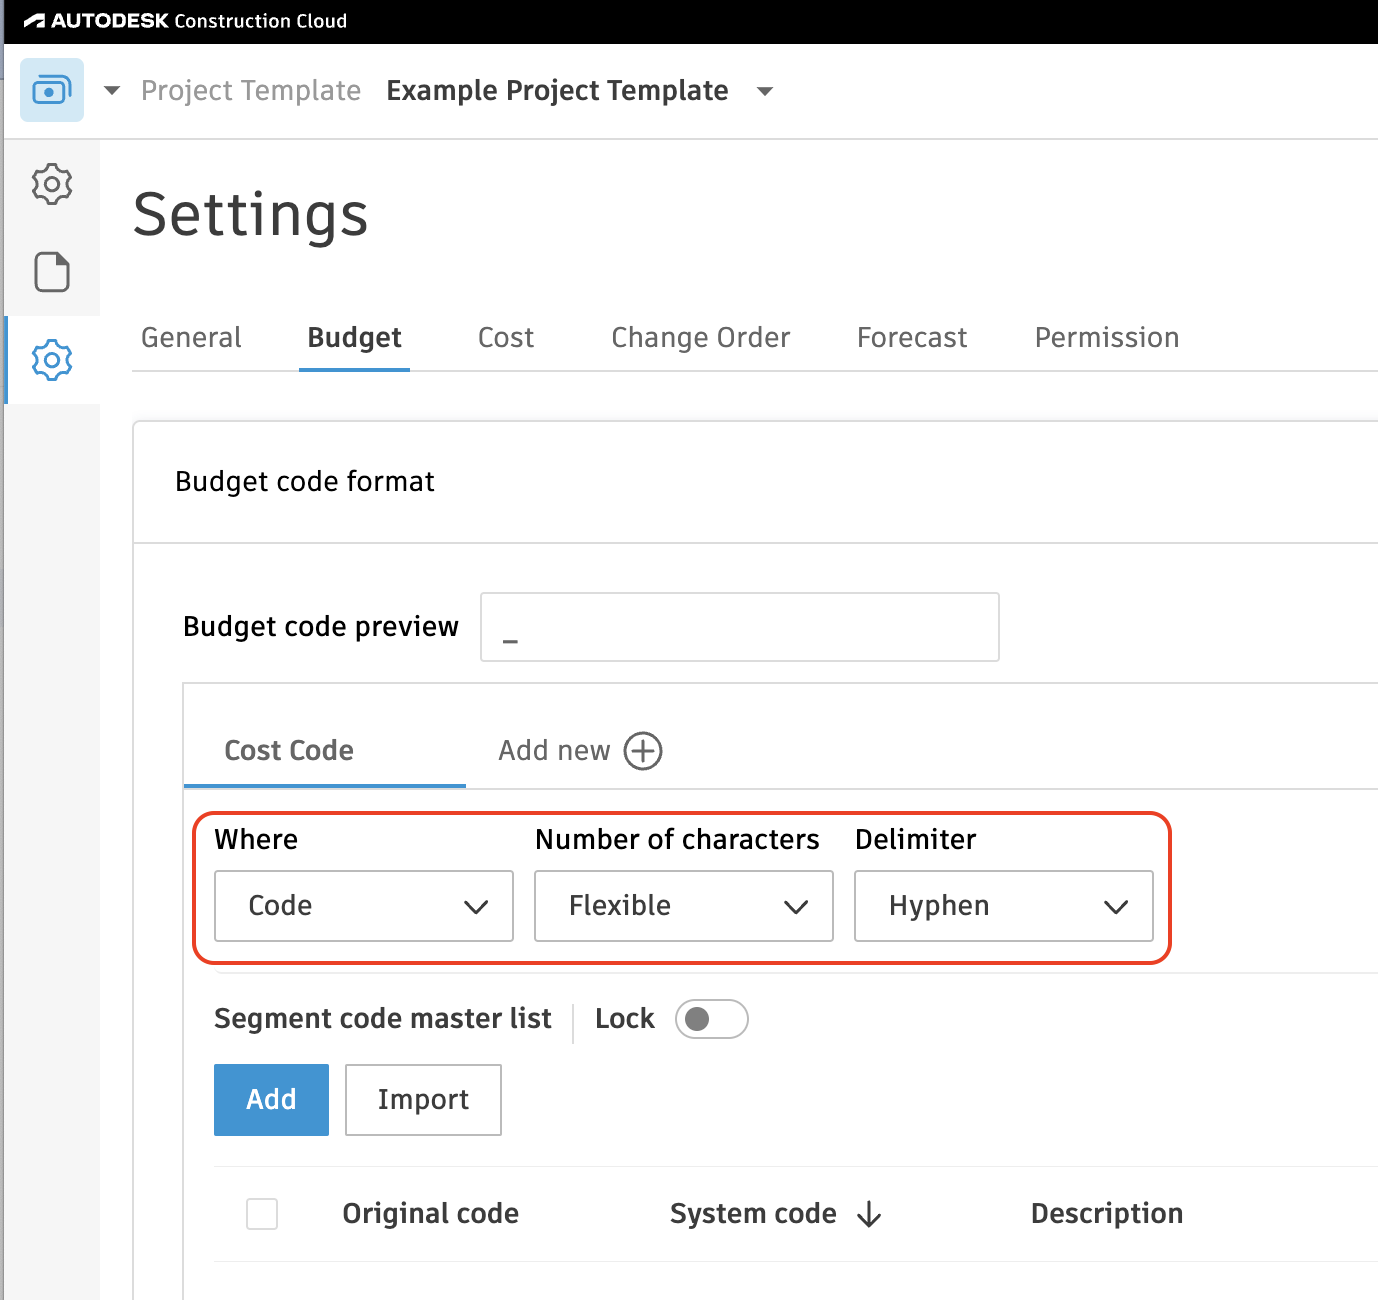
Configuring Cost Codes
To configure your Cost Code setup:
- Press the pencil icon next to Segment 1, and type in Cost Code.

- Below Cost Code:
- For Where, select "Code"
- For Number of Characters, select "Flexible"
- For Delimiter, select "Hyphen"
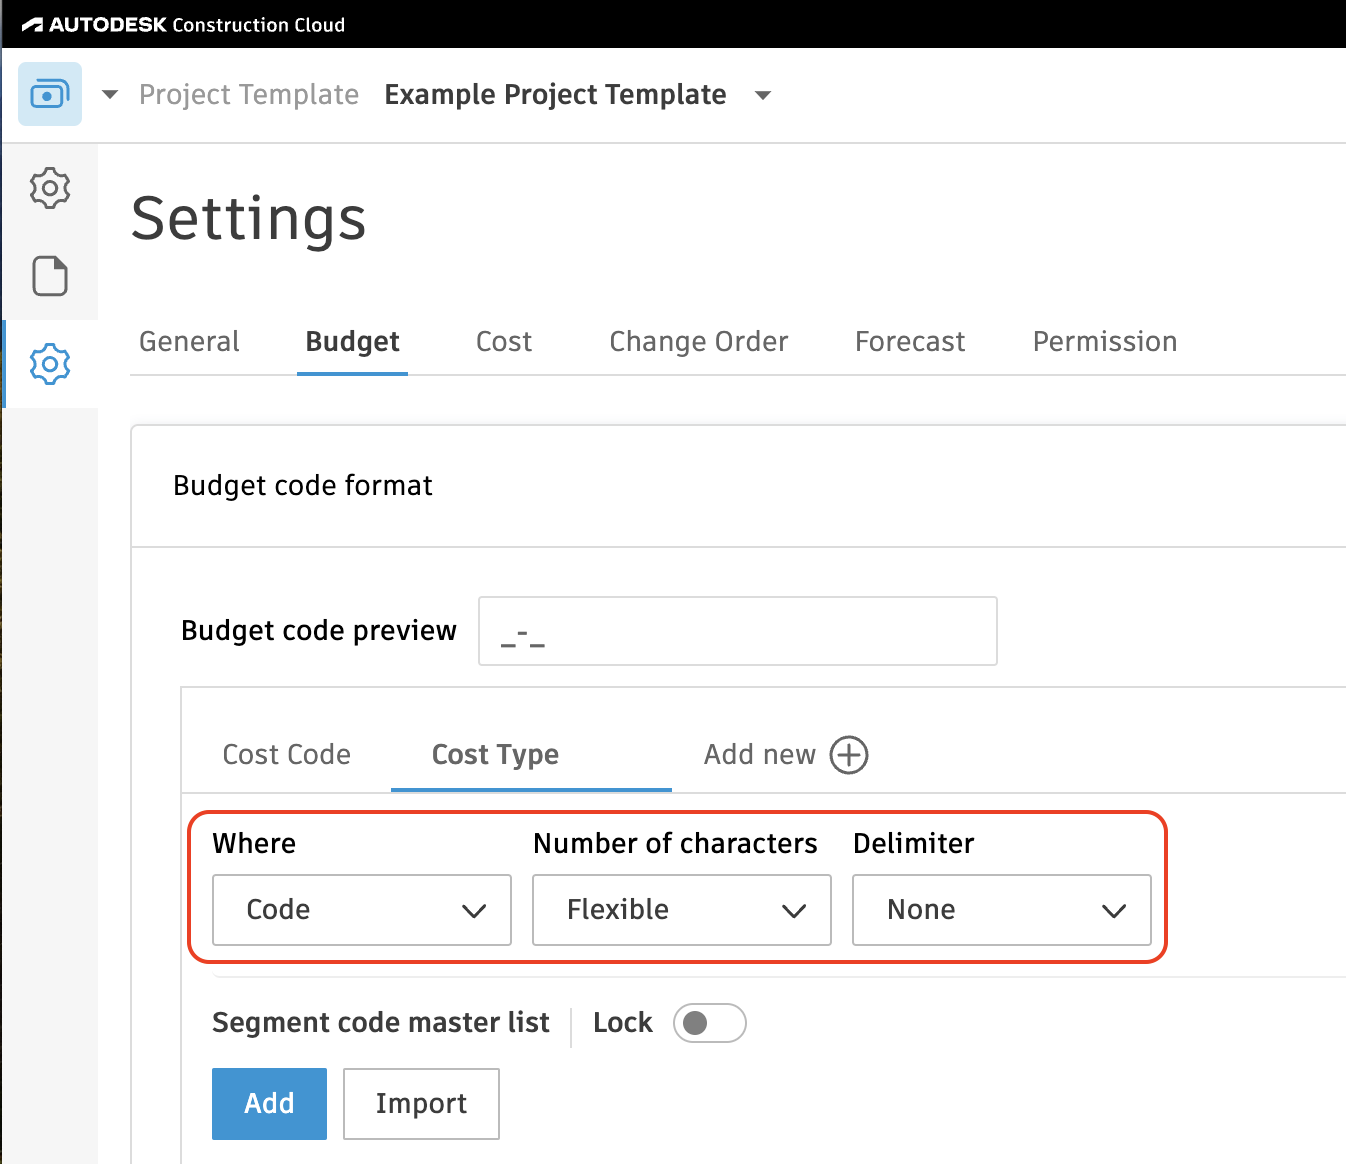
Configuring Cost Types
To configure your Cost Type setup:
-
Press the pencil icon next to Segment 2, and type in Cost Type.
-
Below Cost Type:
- For Where, select "Code"
- For Number of Characters, select "Flexible"
- For Delimiter, select "None"
Can we change the naming convention of these segments?
Yes, you can change the naming convention based on your team's preference. However, this should be consistent across every other Project Template created.
Can we have more than three budget segments?
No, Agave only supports syncing up to three budget segments.
Can we modify each segment detail?
If you want the segment to appear as part of your Budget Code, then "Where" should always be set to "Code".
"Number of characters" can be changed to match your accounting system. For example, if your Cost Type is always set to 3 characters like "LAB" or "MAT", then this can be set to "3" instead of "Flexible".
"Delimiter" can be set to any option on the drop down list based on preference.
Should we add budget codes to the Project Template?
We recomemnd leaving these segments empty in the Project Template. The goal is for the accounting system to be the single source of truth so that only one set of budget codes need to be maintained, and Agave can sync them directly from your accounting system to each Autodesk project as needed.
If you must have budget codes in the Project Template, ensure they are an exact match with what is in your accounting system to prevent sync errors due to discrepancy.
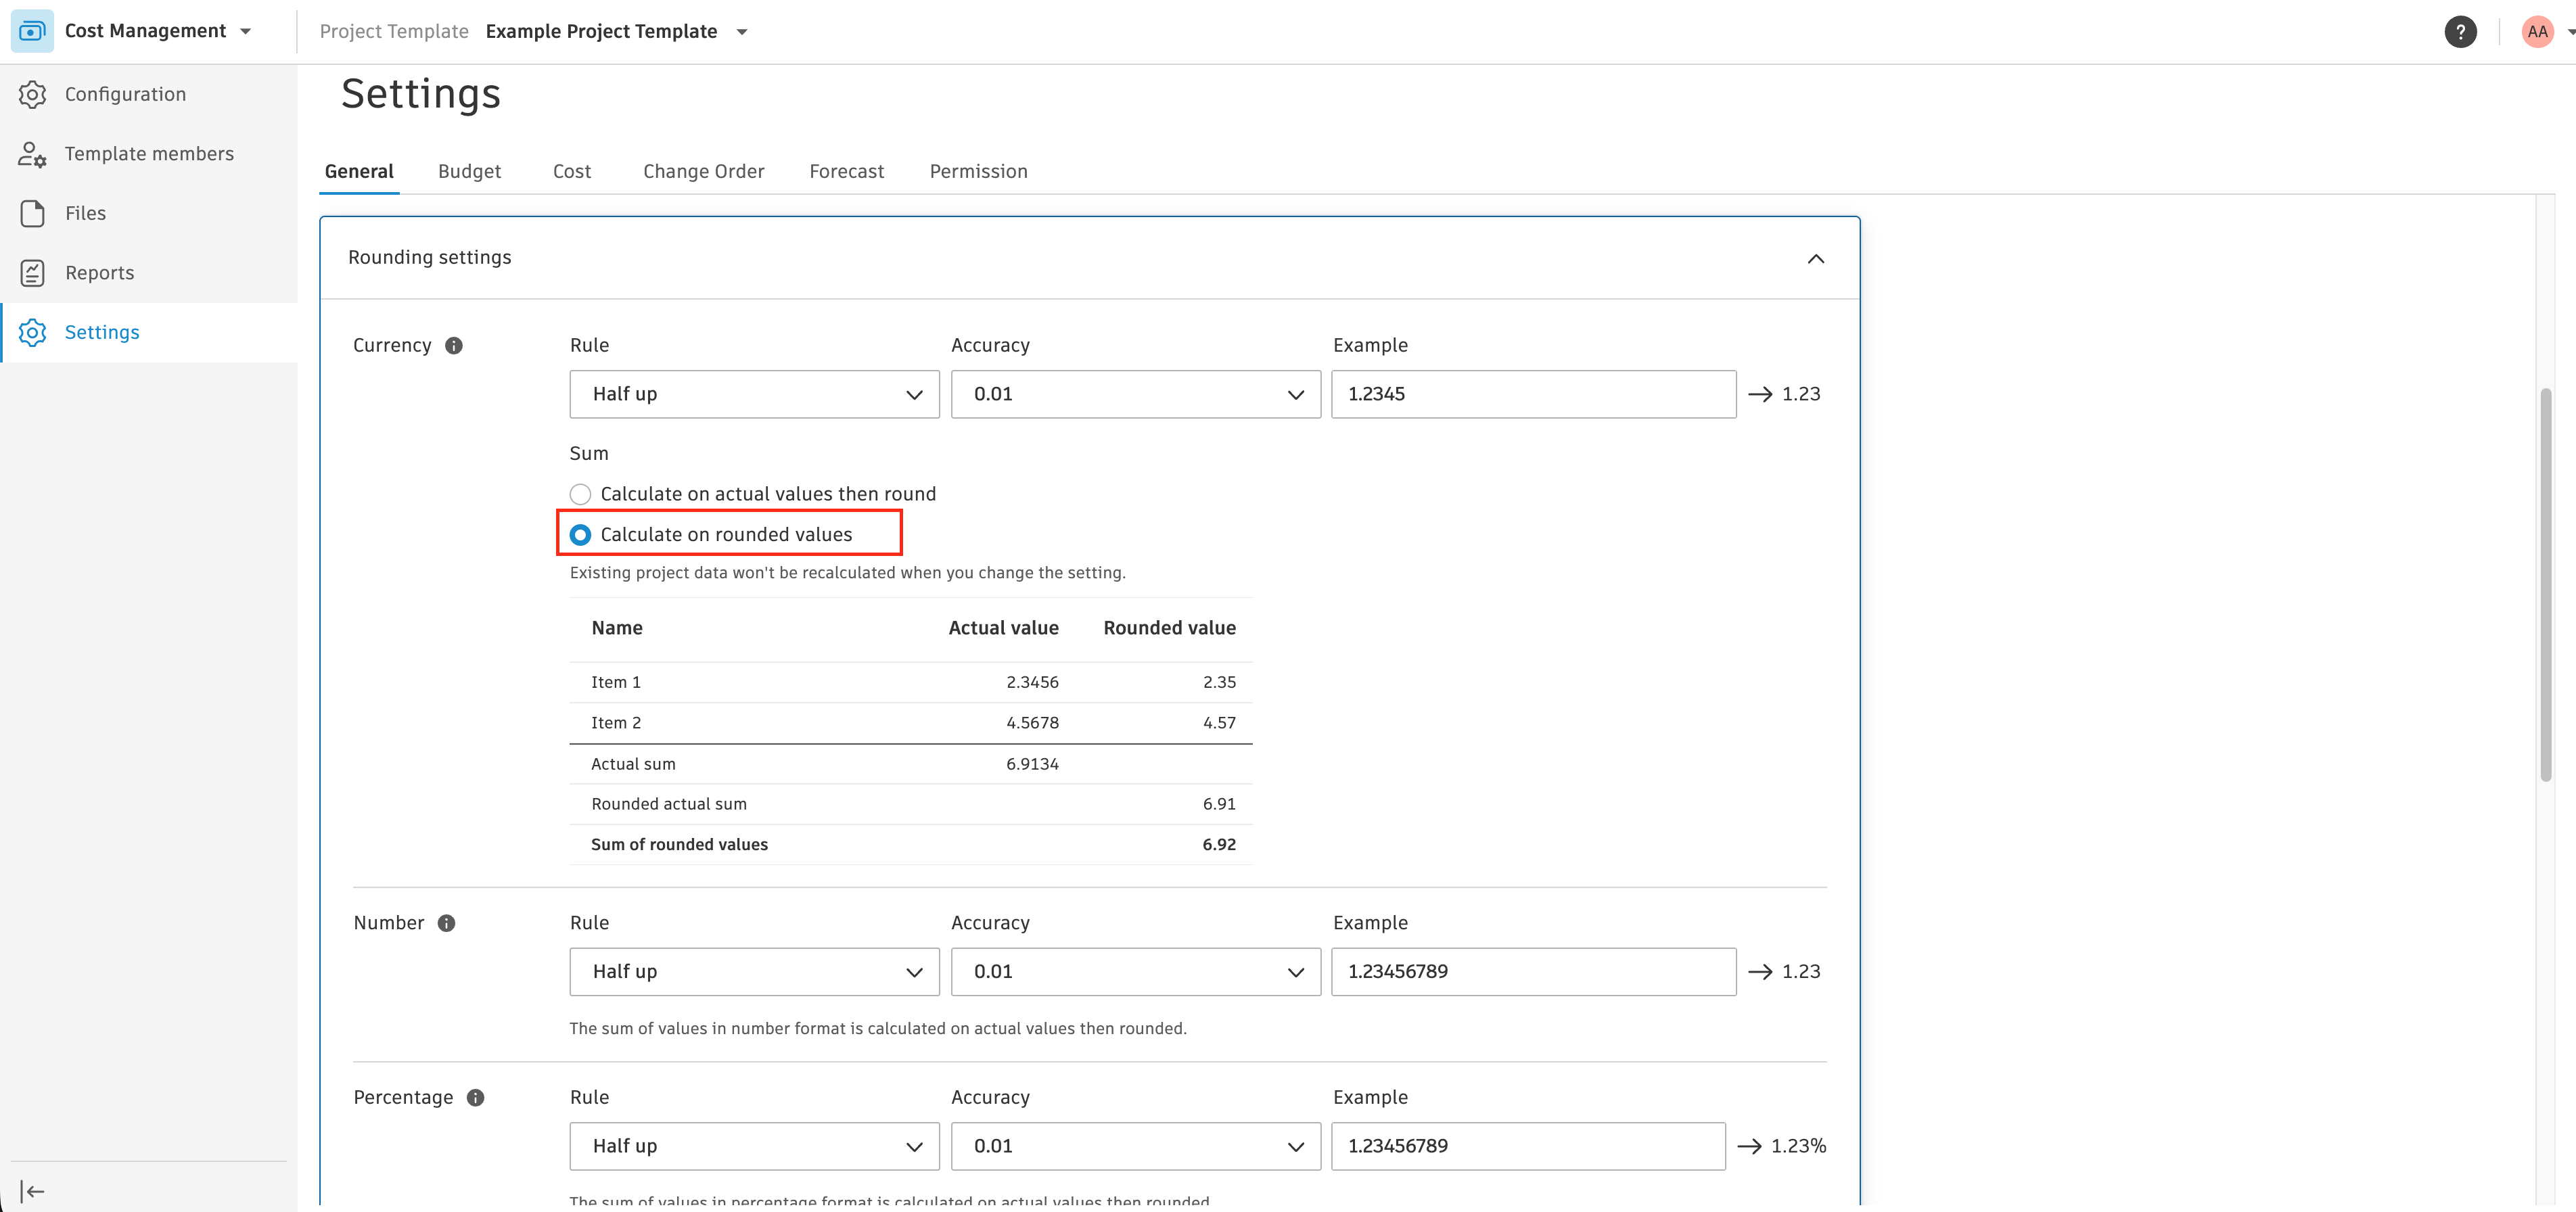
Configure Rounding Settings
Autodesk defaults to accumulating values at 4-decimal precision before rounding the total. Most accounting systems (e.g. Vista) round each line item first, then sum. This mismatch produces small discrepancies that cause reconciliation failures on audited jobs. Ensure that the Currency is set to “Calculate on rounded values”.
Common Errors and FAQs
Error: Project Already Exists
If you encounter the error [Autodesk Build Error] [Project Name] already exists, you will need to either:
- Link the Record: link the Project to the existing Project in Autodesk Build, or
- Check for Duplicates: if you cannot link the Project, it means there is already a Project in your accounting system that links to the Autodesk Project. In this case, you can:
- Delete or consolidate the duplicate Project in your accounting system,
- Ignore the duplicate record, or
- Update the name of the Project name to make it unique.
Error: Invalid State Code for Country
When syncing Projects, Vendors, or Customers in Autodesk Build, only valid state or province names and ISO 3166-1 alpha-2 country codes are supported. Additionally, the specified state or province must correspond to a valid location within the project's country.
United States
Below is a list of valid state codes for use in Autodesk Build:
- AL: Alabama
- AK: Alaska
- AZ: Arizona
- AR: Arkansas
- CA: California
- CO: Colorado
- CT: Connecticut
- DE: Delaware
- FL: Florida
- GA: Georgia
- HI: Hawaii
- ID: Idaho
- IL: Illinois
- IN: Indiana
- IA: Iowa
- KS: Kansas
- KY: Kentucky
- LA: Louisiana
- ME: Maine
- MD: Maryland
- MA: Massachusetts
- MI: Michigan
- MN: Minnesota
- MS: Mississippi
- MO: Missouri
- MT: Montana
- NE: Nebraska
- NV: Nevada
- NH: New Hampshire
- NJ: New Jersey
- NM: New Mexico
- NY: New York
- NC: North Carolina
- ND: North Dakota
- OH: Ohio
- OK: Oklahoma
- OR: Oregon
- PA: Pennsylvania
- RI: Rhode Island
- SC: South Carolina
- SD: South Dakota
- TN: Tennessee
- TX: Texas
- UT: Utah
- VT: Vermont
- VA: Virginia
- WA: Washington
- WV: West Virginia
- WI: Wisconsin
- WY: Wyoming
Canada
Below is a list of valid province codes for use in Autodesk Build:
- AB: Alberta
- BC: British Columbia
- MB: Manitoba
- NB: New Brunswick
- NL: Newfoundland and Labrador
- NS: Nova Scotia
- ON: Ontario
- PE: Prince Edward Island
- QC: Quebec
- SK: Saskatchewan
- NT: Northwest Territories
- NU: Nunavut
- YT: Yukon
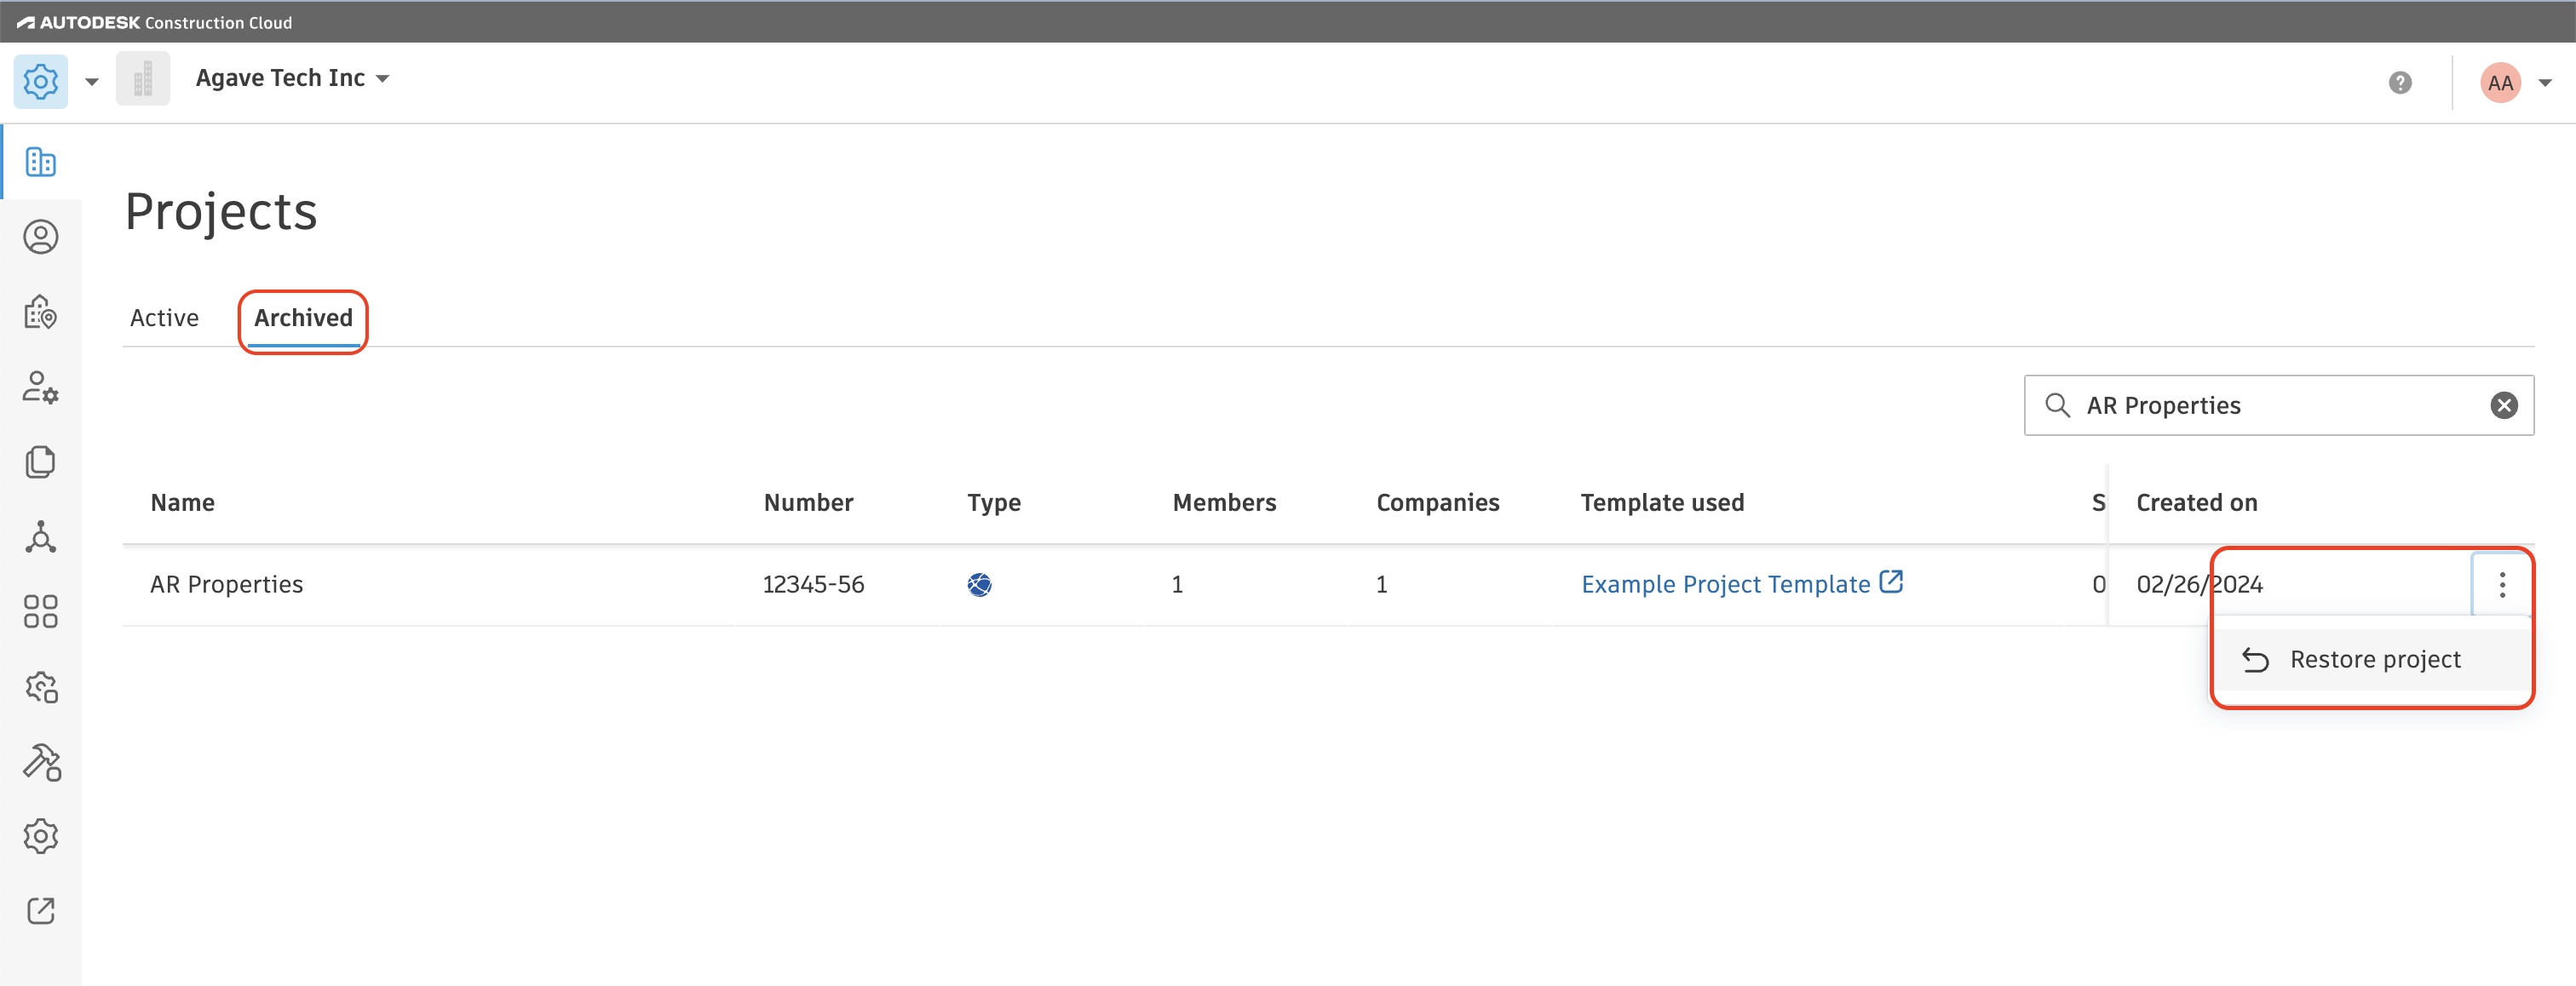
Error: NotAllowedException: Not Authorized. Current project is not active.
This errors is from the Project no longer being marked as Active in Autodesk.
To resolve this error, you can either:
-
Mark the Project as Active in Autodesk. You can do this by going to Account Admin-->Projects, and selecting the Archived tab. From there, you can select to Restore Projects:
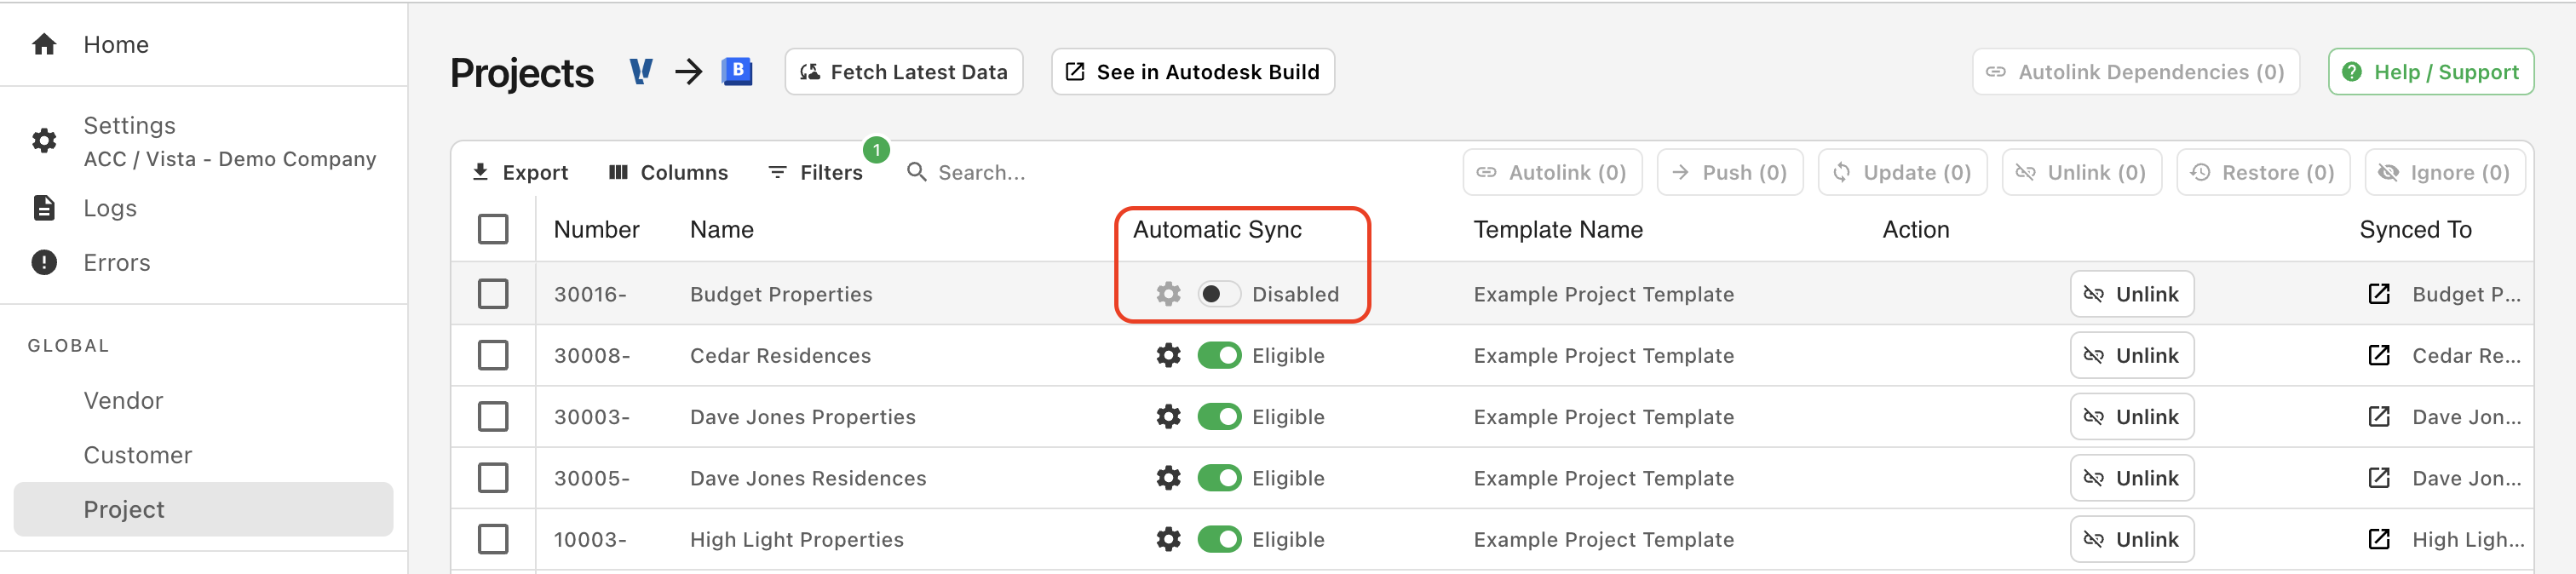
-
Disable Auto-syncs for the Project in Agave. You can do this by going to the Projects tab in the Agave Sync website, and toggling off Automatic Sync for the Project:
If you want to apply Project Templates in Autodesk Build as a default, see our guide on setting up Project Templates.
Configuring Autodesk Budget Codes to Match your Accounting System
You will want to make sure your Autodesk Build Budget Codes is set up to match the structure of your Sub Jobs, Cost Codes, and Cost Types in your Accounting System. We recommend properly configuring this in your Project Template(s) to ensure all Autodesk Projects use the same Budget Code structure.
The following includes a video walk through and guide to properly configure your Project Template's Budget Code.
To ensure they match:
- In your Project Template, go to the Cost Management module.
- Select the gear icon or Settings on the left navigation.
- Select the Budget tab, select Add New.
Configuring Sub Jobs
If you plan to use Sub Jobs, complete the following steps. If you do not, feel free to skip this step.
Note, the following Accounting Systems have the concept of Sub Jobs:
- Acumatica ("Tasks")
- CMiC
- Deltek ComputerEase ("Phases")
- Foundation ("Phases")
- Sage 100 Contractor ("Phases")
- Sage 300 CRE ("Extras")
- Sage Intacct
- Vista
To configure your Sub Job setup:
- Press the pencil icon next to Segment 1, and type in Sub Job.
- Below Sub Job:
- For Where, select "Code"
- For Number of Characters, select "Flexible"
- For Delimiter, select "Hyphen"
Configuring Cost Codes
To configure your Cost Code setup:
- Press the pencil icon next to Segment 1, and type in Cost Code.
- Below Cost Code:
- For Where, select "Code"
- For Number of Characters, select "Flexible"
- For Delimiter, select "Hyphen"
Configuring Cost Types
To configure your Cost Type setup:
-
Press the pencil icon next to Segment 2, and type in Cost Type.
-
Below Cost Type:
- For Where, select "Code"
- For Number of Characters, select "Flexible"
- For Delimiter, select "None"
Can we change the naming convention of these segments?
Yes, you can change the naming convention based on your team's preference. However, this should be consistent across every other Project Template created.
Can we have more than three budget segments?
No, Agave only supports syncing up to three budget segments.
Can we modify each segment detail?
If you want the segment to appear as part of your Budget Code, then "Where" should always be set to "Code".
"Number of characters" can be changed to match your accounting system. For example, if your Cost Type is always set to 3 characters like "LAB" or "MAT", then this can be set to "3" instead of "Flexible".
"Delimiter" can be set to any option on the drop down list based on preference.
Should we add budget codes to the Project Template?
We recomemnd leaving these segments empty in the Project Template. The goal is for the accounting system to be the single source of truth so that only one set of budget codes need to be maintained, and Agave can sync them directly from your accounting system to each Autodesk project as needed.
If you must have budget codes in the Project Template, ensure they are an exact match with what is in your accounting system to prevent sync errors due to discrepancy.
Configure Rounding Settings
Autodesk defaults to accumulating values at 4-decimal precision before rounding the total. Most accounting systems (e.g. Vista) round each line item first, then sum. This mismatch produces small discrepancies that cause reconciliation failures on audited jobs. Ensure that the Currency is set to “Calculate on rounded values”.